
Welcome to the tutorial on Managing Client Information in CTI Navigator Web II. You can use Client Manager to Edit, Delete or Export existing client information; Add New Clients; Search to Find a Client; View or Print Detailed Reports of information about selected Clients (such as saved Searches, CMAs, Client Web Settings and Contact information); or Email a message (with attachments if desired) to a selected Client or Clients.
You can click on a topic below to go directly to that section of this tutorial.
Touchscreen Note. Where instructions are to select or click, touchscreen device users would touch, press or tap as appropriate for your device.
To open the Client Manager from any screen in CTI Navigator, click on Clients in the Top Menu, and then select Client Manager. To open the Client Manager from the Home Page you can click on “Manage Clients” in the Links section, or in the Clients section click either “View my Clients” or the Go button. You can enter a client name or partial name in the client search box before you click the Go button to open the Client Manager screen that includes summary information for that client. Select Add a New Client to open a blank Client record. For further information on using the Home Page, see the Home Page tutorial.
The Client Manager main screen will look similar to one of the images below, depending on the size of the screen on your device.
The Client Manager screen displays two toolbars of buttons above a one-line summary table of key information that you have saved for each client. The Client information summary table includes First and Last Name, Partner’s First Name, Status of the client’s interest in purchasing or selling real estate, Home Address, Home and Cell Phone numbers, and primary E-mail address. Client information can be sorted and/or filtered by any of these columns, and the columns can be moved or re-sized on the summary table. (See the “Introduction” tutorial for instructions on how to sort, filter, find items, and customize tables.) Columns cannot be added to or deleted from the Client summary table.
▲ Return to Table of Contents ▲
You can click on the heading in the Status column to sort clients by their Status (if you have specified Status in their client record). Click on the Filter icon in the Status heading to select and display only clients of one particular Status: Active, Active Hot, Closed, Casual, or Inactive.
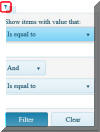
Click on the down arrowhead
button
![]() immediately below "Show items with value that" to set the
primary filter to the
appropriate option (such as "Is Equal to", "Starts
With", or "Contains").
Then enter
the desired client name (if filtering by “Is Equal to”) or
partial name (if filtering by “Contains”) in the empty
box immediately below the filter setting you selected.
immediately below "Show items with value that" to set the
primary filter to the
appropriate option (such as "Is Equal to", "Starts
With", or "Contains").
Then enter
the desired client name (if filtering by “Is Equal to”) or
partial name (if filtering by “Contains”) in the empty
box immediately below the filter setting you selected.
The quickest way to view detailed information about a particular client is to click on the client's First or Last Name in the Client Manager table. This opens the "Client Record" screen. On the Client Record screen you can click a button to Print the client details or click a button to E-Mail a message to this client pre-addressed to the client's primary email address. Information on this screen cannot be edited. To add or change client information, click the Edit button. Click the Select button to return to the main Client Manager screen. To display all your clients, click the down arrow beside "items per page" at the bottom of the screen and select All.
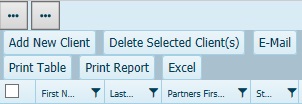
Toolbar buttons in the first tier toolbar (which is either immediately below Navigator's main menu-bar or, on narrow screens, is collapsed into a menu button beside Navigator's main menu button) on the main Client Manager screen, apply only to one client at a time. Select a client by clicking anywhere on their one-line summary in the table of clients.
After selecting a client (or for the last client checked if you select multiple clients), use the buttons in the first tier toolbar as follows.
Toolbar buttons in the second tier toolbar (which is immediately above the summary table headings) can apply to one or more clients. Click in the checkbox in the first column beside the First Name to select multiple names. To select ALL displayed clients, check the box in the Heading of the first column of the table.
After selecting one or more clients, use the buttons in the second tier toolbar as follows.
Add New Client: Open the Add/Revise Client Information screen. First Name is the only field required to create a new client record. However, it is advisable to also enter at least a phone number and email address in the client record. Click the Save button after entering client information.
Delete Selected Client(s): Completely remove all information about the selected client(s). A “Confirm Delete” screen will display. Read this screen carefully to confirm that the correct client is listed for deletion. Also note that “All searches associated with that client will also be deleted.”
E-Mail: Open a new email message screen pre-addressed to the primary email address for all selected clients. See the separate tutorial "Create Email Messages and Use Message Templates" for detail information on emailing.
Print Table: Open a print dialog box with
Selection Options to print the one-line summary for the Current Client, Selected Client, or All Clients;
Report Option to print the table in Landscape Orientation; and
Print, Preview (in browser), or PDF Options.
Note: You can customize the table by sorting, filtering, re-arranging the sequence and changing the width of columns before printing the table. (Click here for instructions in the Introduction tutorial on how to customize tables.)
Selection Options to print the one-line summary for the Current Client, Selected Client, or All Clients;
Report Option to print "Showing Page Heading" (with your name, office, and primary phone number at the top of each page); and
Print, Preview (in browser), or PDF Options.
▲ Return to Table of Contents ▲
Let’s take a look at how to use each of these Client Management functions.
To add a new client into your client database, you can either click the “Add New Client” button at the top of the Client Manager screen or click the “Add New Client” shortcut on the Home page. Either way will open a pop-up window where you can enter information about a new client, or edit information about an existing client.
On the Add/Revise Client screen are sections for client Contact information, Comments, Addresses, Tracking Information, Preferences, and Personal Information. Click on a section heading to open or close that section.
Enter as much or little client information as you desire. The only required information is “First Name”, but it is advisable to also enter at least a phone number and email address.
In addition to numerous defined fields that can be used in Reports and in Merge Fields (such as Name, phone number and email address), there are open boxes where you can enter comments or notes to yourself about your client. {Only you or someone with your MLS ID and password (such as your Broker or Office Manager) can access what you enter about your clients.}
After you have entered information about your client, click the Save button. Click OK on the confirmation message that pops up. This also will Close the “Add/Revise Client” screen.
At the top of the General Information table click Save or click Cancel as appropriate to return to the main Client Manager screen.
To verify or change information about a client, first highlight to select that client in the Client Manager table. Then click the Edit button in the toolbar to open the “Client Information” screen. You can scroll through this screen to see all the information about that client that you have stored in your CTI Navigator.
Enter client information in the appropriate sections. These are the same fields and sections as described previously in Add a New client.
After adding or changing the information about that client, click the Save button. Click OK on the confirmation message that pops up.
To Remove a client from your Client Manager, first highlight or check the box beside that client in the table, and then click the “Delete Selected Client(s)” button at the top of the screen. A confirmation screen will display with the name of the client to be deleted. Read this screen carefully to confirm that the correct client is listed for deletion. Note that All searches associated with that client will also be deleted (regardless of whether or not there are other recipients).
Click the OK button to compete the deletion; or click the Cancel button to stop before deleting the client and their associated saved searches.
▲ Return to Table of Contents ▲
Click the E-mail button at the top of the Client Manager screen to open an e-mail screen pre-addressed to the client(s) selected in the table. Of course, you can manually enter additional email addresses. The Email buttons in Client Manager work the same as on other CTI Navigator screens. See the separate tutorial on “Addressing Email” for further details.
After addressing and entering your message, check “Send me a copy” (which is recommended so you can have history of your correspondence), then click the Send button at the top of the E-mail screen to send the message.
To return to the Client Manager screen without sending the message, click the Cancel button at the top of the E-mail screen.
The Print buttons in Client Manager work the same as on other CTI Navigator screens. You can print the entire table of all your clients, or just a one-line summary for selected clients. Select clients by checking the selection box beside their name. If you filter and/or sort the table before printing, the table will then print as filtered and sorted.
After filtering, sorting, and/or selecting, click the Print Table button in the Client Manager toolbar. I
n the "Print Client" dialog box, confirm or change the selection to the Current Client, Selected Client(s), or to All Clients. You also can check or un-check to print the report in Landscape Orientation.Click the Print button at the bottom of the Print Client dialog box to print using your browser's printer controls.
Click the Preview button at the bottom of the Print Client dialog box to open a new window in your Internet browser that displays how the selected report will look when printed. Close the browser tab to close the Print Preview.
Click the PDF button to display the table in your browser's PDF viewer. Use your PDF Viewer controls to save, print or email your table of client information.
Click the Cancel button to cancel creating a PDF file or printing the Detail Report.
▲ Return to Table of Contents ▲
Print Client Information Report
To Print a Detailed Report of the saved information for one or more client(s), first highlight a client or check the selection box beside multiple clients in the table. Then click the “Print Report” button in the Client Manager toolbar. You also can click the “Print” button at the top of any Client Record screen.
I
n the "Print Client" dialog box, confirm or change the selection to the Current Client, Selected Client(s), or to All Clients. You also can check or un-check to “Show the Page Heading”.Click the Print button at the bottom of the Print Client dialog box to print using your browser's printer controls.
Click the Preview button at the bottom of the Print Client dialog box to open a new window in your Internet browser that displays how the selected report will look when printed. Click the X in the browser tab to close the Print Preview screen.
Click the PDF button to download the report as a PDF file. To be allowed to Download and Save a PDF file from the MLS server into your device. You may need to add “ctimls.com” as a Trusted Site in your device's Security settings.
Click the Cancel button to cancel creating a PDF file or printing the Detail Report.
To see a 1-line summary for each Search that has been saved for a selected client, click the Searches button in the first tier toolbar.
To see a 1-line summary for each CMA that has been saved for a selected client, click the CMAs button in the first tier toolbar.
To download your client summary information in Excel spreadsheet format (.xlsx), first sort, filter and arrange information on the Client Management screen in the layout you want to export. Then click on the Excel button in the Client Manager toolbar to download the client summary data in a file named Clients.xlsx.
Note that all client information on-screen will be
downloaded (regardless of whether or not the client checkbox is selected).
To download information just for selected
clients, use the filter
![]() function to display just selected clients before clicking on the Excel
button.
function to display just selected clients before clicking on the Excel
button.
▲ Return to Table of Contents ▲
Click the Client Web button to display “Client Settings” information. These settings indicate the selected Client’s Access to and Usage of your MLS sponsored Agent Website. This includes their personalized searches that have been saved on your website.
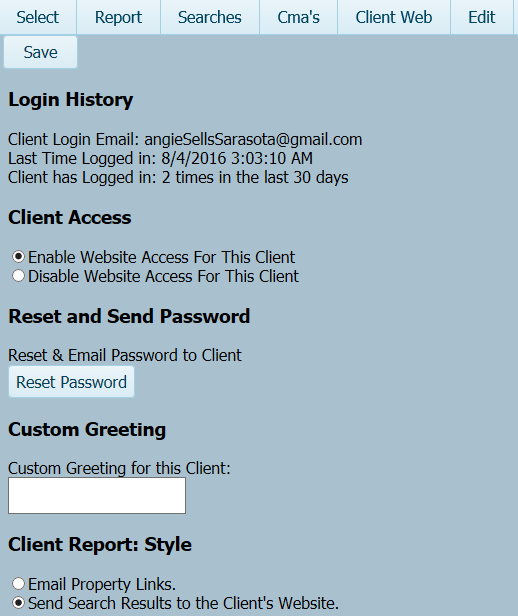
The Login History section of Client Settings shows the Client’s Login Email Address, the Last Date and Time that this client logged into your website, and the number of times that this client has logged into your website in the last 30 days.
In the “Client Access” section, you can select to Enable or Disable this client’s access to their personalized web pages on your website.
To have the system automatically assign a new password for this client on your website, and to email the password and your Agent Website address to them, click the “Reset Password” button in the “Reset and Send Password” section.
To display a Special Greeting to your client when they log into their web page on your Agent Website, type your greeting in the Custom Greeting box.
In the Client Report Style section, you can specify which search results Links to include in automatic notifications to this client.
Select “Email Property links” to send links just to individual properties in the notification message. If you prefer to send links to a third-party hosted website instead of to your MLS sponsored website, select “Email Property links” as the Client Report Style. In this case you also should customize the message in the Client Notification section for your automatic notifications to include the desired link to your third-party hosted website instead of to your MLS sponsored website.
Select “Send Search Results to the Client's Website" to send both individual property links and a link to all saved searches for this client to the client portal on your MLS sponsored Agent website.
Linking to the Client-specific Searches on your MLS sponsored Agent website gives clients special benefits. This includes seeing up-to-the-minute search results, displaying property locations on a map, saving properties of special interest to a Favorites list, and rejecting listings that are not of interest.
For instructions on creating custom notifications, see the tutorial on "Automatic Search and Notifications".
To completely close the Client Manager, click any button in Navigator's main menu-bar at the top of the screen.
This concludes the tutorial on “Managing Client Information” in CTI Navigator Web II.
To return to the Index of Tutorials for CTI Navigator Web II, click here.
[ManagingClientInfo.aspx||rev.02.07.2017]