
Click on any topic below to go directly to that section in this tutorial.
Touchscreen Note. Where instructions are to select or click, touchscreen device users would touch, press or tap as appropriate for your device.
This tutorial provides an overview of how to Search Listings and view search results in CTI Navigator Web II.
The process of searching is similar whether you are searching Listings or Rentals (or Tax rolls where they are available). You can start a Search by selecting (see Touchscreen note) the “Search Listings” shortcut in the LINKS section of the Home Page, or by clicking Search in the main menu-bar at the top of all the main screens in CTI Navigator.
When the Search Listings screen opens, the Search Menu-bar (with blue background) and the Search Toolbar (with white background) display directly below Navigator’s main Menu- bar (which appears at the top of all screens) as shown below.
The Search Listing shortcut on Navigator's Home Page automatically sets Form Type as Residential, and Status as Active. If instead you click Search in the top menu-bar, you can select any Search Type, including "All Listing Types."
Note. When searching "All Listing Types" only criteria that are common across all types can be searched. For example, since Lots and Land do not have bedrooms or baths, these criteria cannot be included in a search across all listing types.
You can easily change
the Search Type by clicking (or tapping) on the down button (![]() ) beside the current Search Type
on the search toolbar and selecting a different
type. The Form Type will automatically change to be compatible with the Search
Type.
) beside the current Search Type
on the search toolbar and selecting a different
type. The Form Type will automatically change to be compatible with the Search
Type.
Alternatively, you can either select a Search Template; select one of your Saved Searches (under “My Searches”); or select a Client and then select a search you have saved for that client. (When a Client is selected, “My Searches” changes to “Searches for: [ClientName]”.)
Click on the Map button in the search toolbar to either display on a Map those properties that match currently entered criteria, or to add search criteria based on geographical location. (Click here for details.) Click the Criteria button to switch back from the Map view to the text view in Search. The same button toggles to display Map or Criteria depending on the current view.
The most frequently used search
criteria for the selected Search Type are listed down the left side of the
screen. At least one of the criteria items displayed in red must be specified.
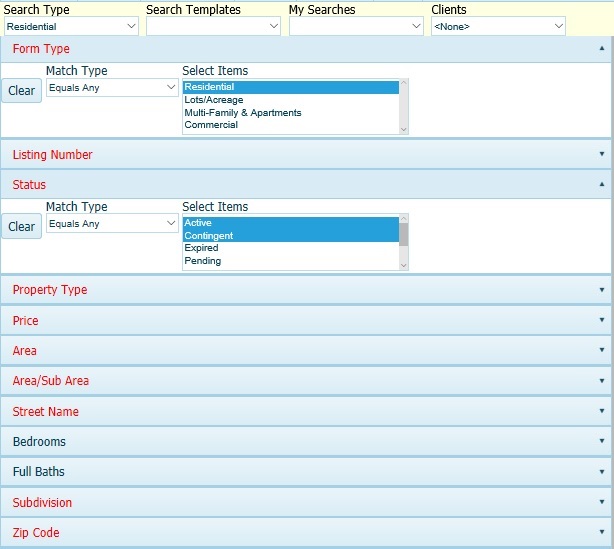 (Click on this image to enlarge an example of a Residential search criteria
screen.)
(Click on this image to enlarge an example of a Residential search criteria
screen.)
To specify a search criterion item and how it is to be used in your search:
"Equals All" Note. Do not select "Equals All" for criteria that are mutually exclusive. Equals All is not the same as selecting all. When Match Type is set to "Equals All", only listings each of which match all those criteria will match. For example, any listing has only one current Status (Active or Contingent or Expired or Sold et cetera). If you set the Match Type for Status to "Equals All", there are zero listings that would each match all statuses. If you set Area or Zone to Equals All, none of the listings will individually be located in all Areas or all Zones, so the match count would be zero regardless of any other criteria selected.
To select all items for a criterion, set Match Type to "Equals Any" and use the multi-select procedure appropriate for your device (see "select more than one item" below).
As soon as you enter or change search criteria and click on another search item (to complete your entry), the number of listings that match all the search criteria you have specified so far will automatically display in the “Match Count” section of the Search Menu-bar. You also can click on "Match Count" (or "Update Match Count") in the search toolbar to manually run the search and display the number of listings that match all the search criteria currently specified. This count can be useful to know as a starting point when you first open a saved search.
To see an example for entering search criteria, click here.
▲ Return to Table of Contents ▲
Add Client. To add a new client to be associated with this search, click the Options button in the Search Menu-bar, select Add Client, and enter at least a first name for the client. Also entering an email address and/or phone number is highly recommended. A client cannot be automatically notified of auto-search results unless they have a valid email address in their client record.
You can add a new field using either "Add Field" or "Arrange Fields." "Add Field" inserts the new field directly on the current search criteria screen. "Arrange Fields" holds existing and new field names in a temporary dialog box where the fields can be rearranged before they are applied to the search criteria screen.
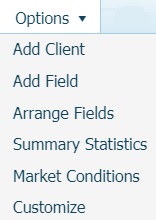
Add Field. To add another search field
to the current list of search criteria, click the Options button and
select “Add Field”. On the next screen
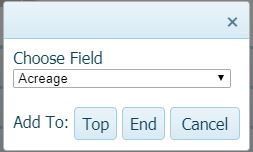 (click on image to enlarge) click in the box below “Choose Field” to
display a list of the names of all available fields for the current Search Type.
Scroll to, or type the first few letters of, the desired field and click on its name. Then click on the
Top or End button to add the selected item to the top or bottom
respectively of the existing search criteria
list.
(click on image to enlarge) click in the box below “Choose Field” to
display a list of the names of all available fields for the current Search Type.
Scroll to, or type the first few letters of, the desired field and click on its name. Then click on the
Top or End button to add the selected item to the top or bottom
respectively of the existing search criteria
list.
Arrange Fields.
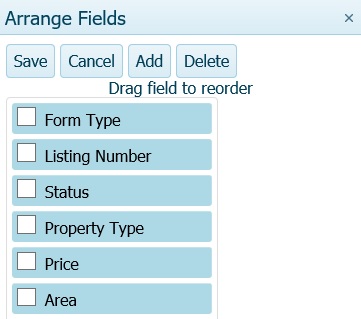 (click on image to enlarge) To add as many search fields as desired (one at a
time), click the Options button, select "Arrange Fields", and click on
the
Add button at the top of the "Arrange Fields" screen. On the "Choose
Field" screen select a field name in the drop-down list and then click the Add
button at the bottom of the Choose Field screen. Repeat these steps to
add as many search fields as desired (one at a time). New fields are added at the
bottom of the list of field names on the Arrange Fields screen. You can click-and-hold any field name
(new or existing) on the Arrange Fields screen and
drag it to the desired position in the list (such as closer to the top). To remove
one or more fields, check the box beside each field name to be removed, and then
press the Delete button at the top of the Arrange Fields screen. After making all desired
changes to the list of field names, click the Save button at the top
of the Arrange Fields screen to return to the Search Criteria screen. The search
criteria will reflect all changes (additions, deletions and rearrangement) made on the "Arrange Fields" screen.
(click on image to enlarge) To add as many search fields as desired (one at a
time), click the Options button, select "Arrange Fields", and click on
the
Add button at the top of the "Arrange Fields" screen. On the "Choose
Field" screen select a field name in the drop-down list and then click the Add
button at the bottom of the Choose Field screen. Repeat these steps to
add as many search fields as desired (one at a time). New fields are added at the
bottom of the list of field names on the Arrange Fields screen. You can click-and-hold any field name
(new or existing) on the Arrange Fields screen and
drag it to the desired position in the list (such as closer to the top). To remove
one or more fields, check the box beside each field name to be removed, and then
press the Delete button at the top of the Arrange Fields screen. After making all desired
changes to the list of field names, click the Save button at the top
of the Arrange Fields screen to return to the Search Criteria screen. The search
criteria will reflect all changes (additions, deletions and rearrangement) made on the "Arrange Fields" screen.
To save your customized list of search criteria you can either select Customize in the Search Options (described below) to make your list the default criteria for the current Search Type; or you can click Save in the Search Menu-bar and select to Save as New Search or to Save as New Template (described below) to save your customized list for easy re-use when desired.
Customize. To set your current set of search criteria as the default layout for the current Search Type, click the Options button, select Customize, and select "Set current search as startup criteria." To reset the search criteria and layout to the system default, click the Options button, select Customize, and select "Set system criteria as startup."
▲ Return to Table of Contents ▲
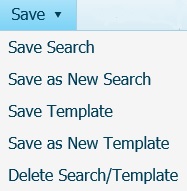
Click Save in the Search Menu-bar and select Save Search or Save as New Search to save your customized search criteria and their layout to include all the values you have selected for all these criteria. Select "Save Search" if you opened an existing search and want to save changes to it. Select "Save as New Search" to save your current search criteria with a name and description.
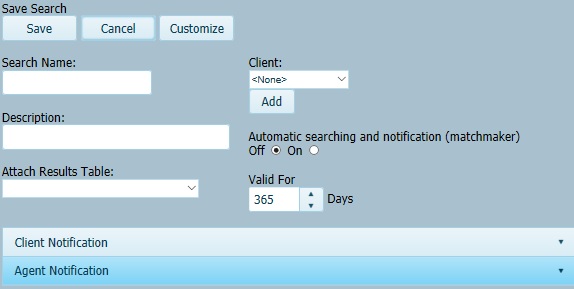 On the "Save Search" screen, enter or modify any features associated with
this search (such as Name and Description). You can associate the search
with a
custom table format (if you have created one), and if desired, you also can
associate it with a client and set it to
automatically
search and notify yourself and/or your client. After entering or confirming
the search features, then click "Save" at the top of this screen. Note
that the search and/or changes to the search will not be saved until the Save
button is clicked on the Save Search screen.
On the "Save Search" screen, enter or modify any features associated with
this search (such as Name and Description). You can associate the search
with a
custom table format (if you have created one), and if desired, you also can
associate it with a client and set it to
automatically
search and notify yourself and/or your client. After entering or confirming
the search features, then click "Save" at the top of this screen. Note
that the search and/or changes to the search will not be saved until the Save
button is clicked on the Save Search screen.
When you save a search, Saved Searches can be easily reopened by clicking their name in the My Searches box on the Search Menu-bar.
Select Save Template or Save as New Template to save your customized search criteria and their layout but to include only some preset values (as a starting point), and leave the value of other criteria in your list to be specified when you open the template to start a new search. Select "Save Template" if you opened an existing Template and want to save changes to it. Select "Save as New Template" to save your current search criteria with a name and description. A Saved Template can be easily reopened by clicking in the Search Templates box on the Search Menu-bar and selecting its name under "Personal Templates."
To create a “Summary Statistics Report” for the listings that match all of the search criteria that have been specified, click the Options button and select Summary Statistics.
Summary statistics for Non-Sold listings include the:
Summary statistics for Sold listings include the:
Click Preview to see a Summary Statistics Report in your browser without printing it.
To save or email a Summary Statistics Report, click the PDF button. Then use the save or email features in your PDF Viewer.
To create a “Market Conditions Report” for the listings that match all the search criteria that have been specified, click the Options button and select Market Conditions. Enter a period ending date for the report. Statistics will be based on the 12 months immediately preceding the period ending date.
To include a one-line summary for each individual property in each time period covered by the Market Conditions Report, if desired, check “Show supporting detail.”
Note that Listing Status and Dates should not be included in the search criteria on which a “Market Conditions Report” is based.
Click Preview to see a Market Conditions Report in your browser without printing it.
To save or email a Market Conditions Report, click the PDF button. Then use the save or email features in your PDF Viewer.
For further details on creating Summary Statistics Reports and Market Conditions Reports, click here.
▲ Return to Table of Contents ▲
Follow the steps below as an example for entering search criteria for a fairly simple Residential search. In this example, you will set the criteria for Active or Contingent, Residential properties, priced between 175 & 200 thousand dollars, with at least 3 bedrooms, 2 full baths, a minimum of 1800 square feet living space, built on or after 2000, and with VA/FHA or Owner Financing.
The quickest way to open a Residential Search from the Home Page is by clicking on the Search Listing shortcut in Links. You also can click the Search button in Navigator’s menu at the top of any page and then select Residential.
The default values for Form Type and for Status should display when the Search Residential screen opens. To open a search criterion field so you can select or enter the appropriate modifiers, click anywhere on the row displaying the field name. To hide a criterion's modifiers, giving you more screen space to display other criteria, click anywhere on the row displaying the field name. (Clicking on the search criterion name toggles the display on and off.)
Form Type: To begin specifying search criteria, confirm that Form Type has its Match Type set to “Equals Any” and Residential is highlighted in the "Select Items" list. If desired, you can click anywhere on the Form Type row to hide its settings.
Skip Listing Number and go to Status.
Status: under Status, confirm that Match Type is set to “Equals Any” and verify that "Active" is selected (highlighted) in the drop-down list. If "Continent" is not already highlighted, use the multi-select command or gesture appropriate for your device (e.g., hold down Windows Control key or Mac Command key) to also select Contingent. Both Active and Contingent should be highlighted when both are selected.
Price: click anywhere on Price to open its modifier settings. Leave Match Type set to Between; click in the Minimum box and type 175. Then either press the Tab key on your keyboard or click in the Maximum box and enter 200.
Thousands note. Prices are in thousands by default, so leave the “In Thousands” box checked, and do not enter 3 zeros for thousands. For example, enter 175 for $175,000.
Skip to Bedrooms: click anywhere on Bedrooms to open its modifier settings.
Leave Match Type
set to Minimum; and enter 3 in the text box. You
can either type the number 3 or click on the up-down spin button
![]() to select 3.
to select 3.
Full Baths: click anywhere on Baths (Full Baths or Baths/Full) to open its modifier settings. Leave Match Type set to Minimum; then click and enter 2 in the box.
SqFt: Click on the appropriate Square Feet item for your MLS (Heated, Living, Above Grade, or Approximate) if displayed. (If not displayed, see the Arrange Fields note below.) Leave Match Type set to Minimum, then click in the box and enter 1800 (do not enter a comma).
Arrange Fields note. If a search field for Square Feet is not displayed by default, click Search Options in the Search Menu-bar, select "Arrange Fields" (or "Add Field to end") and add the appropriate field (as described here). Also add the field for "Financing Terms" since it is not normally displayed on the system default search residential screen.
Actual Year Built: click on "Actual Year Built" to open its modifier settings. Leave Match Type set to Minimum; then click and enter 2000 in the box.
Financing Terms: Click on Financing Terms to open its modifier settings. (If not displayed, see the Arrange Fields note above.) Leave Match Type set to “Equals Any” and select VA/FHA. Then scroll down (if needed) and use the multi-select command or gesture appropriate for your device (e.g., hold down Windows Control key or Mac Command key) to also select “Owner Finance.” Both VA/FHA and Owner Finance should be highlighted.
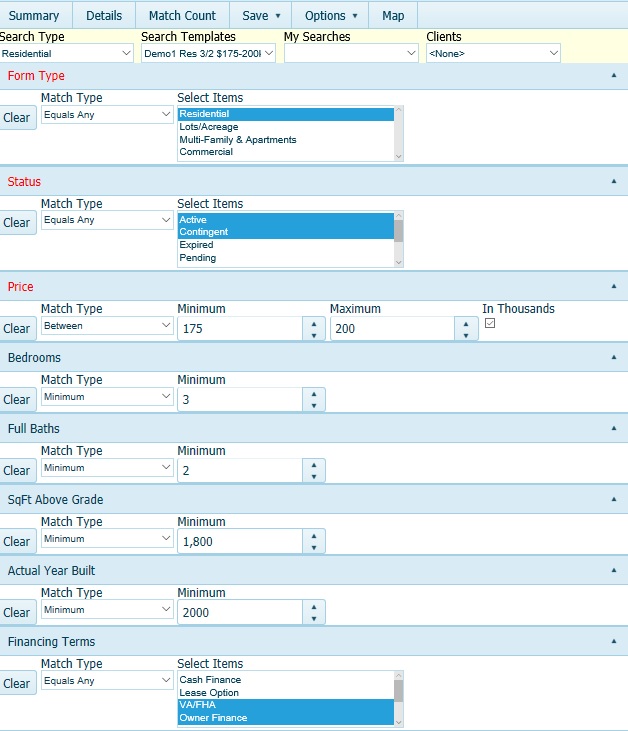 (Click on this image to see the criteria settings and display sequence used in this example)
To see the number of listings that match all the search criteria that have been specified so far, view (or click on) the “Match Count” or “Update Count – Matches” button in the Search Menu-bar, just above the search toolbar.
Click the Summary button in the Search Menu-bar to open the one-line per listing "Summary" Search Results screen in its default table layout; -- or --
Click the Details button in the Search Menu-bar to open the Details screen for the first listing in the current default layout for search results.
Note that the Summary, Details, and Criteria buttons toggle to display the appropriate option for the current screen. For example:
▲ Return to Table of Contents ▲
Click the Summary button
on either a Search Criteria screen or on a Search Details screen
to display a one line summary for each listing that matches the search
criteria.

If the listings are sorted,
the sort column will be indicated by a triangle icon (![]() ascending or
ascending or
![]() descending) in the column heading (such as Price in
the above image). Click on a column
heading in the summary table to sort by that column, to change the direction
(ascending or descending) in which displayed listings are sorted by that
column, or to remove the sorting (the triangle icon disappears) so that a
different column can be used to sort. More than one click may be required to
sort in your desired direction. For more information on sorting, including
multiple column sorting, see the
Introduction and Usage Guide tutorial.
descending) in the column heading (such as Price in
the above image). Click on a column
heading in the summary table to sort by that column, to change the direction
(ascending or descending) in which displayed listings are sorted by that
column, or to remove the sorting (the triangle icon disappears) so that a
different column can be used to sort. More than one click may be required to
sort in your desired direction. For more information on sorting, including
multiple column sorting, see the
Introduction and Usage Guide tutorial.
Sort Conflict Note: If clicking on a column heading does not affect the sorting, either click on the Options button and select “Clear All Sorts”; or find and click on any other column displaying the sort icon to remove its sorting setting.
To change the sequential order in which the columns display in a results table, click-and-hold on a column heading, then drag-and-drop it in the desired location.
To change the width of a column in a results table, click-and-hold on the right-side of the column boundary line, and drag the boundary line to the desired width.
To change which columns are
displayed in the Summary Results table,
click on the Options
button on the Search Toolbar,
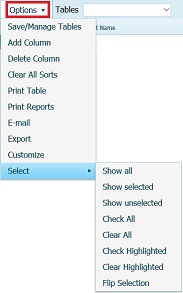
and either
You also can change the columns by clicking in the box beside Tables in the Summary Results screen toolbar and selecting a System Result Table or a Personal Result Table that you previously created and saved.
To set your revised table layout as the default for your current Search Type, click on the Options button and select Customize.
To select a listing for
further action (such as printing or emailing), click on the check-box
beside
the listing in the
first column of the summary table. To Select All properties, check the
box in the first column heading, or click Options, click Select
![]() ,
and click "Check All."
,
and click "Check All."
Other
Options button on the Summary Results Toolbar are to:"Select" Options on the Summary Results Toolbar are:
At the bottom of the
summary results screen you can scroll to a new or previous page, set the number of
items to display per page, see the total number of items, or Refresh
![]() the current page view.
the current page view.
Listing data can be easily exported from a Search Results screen as follows.
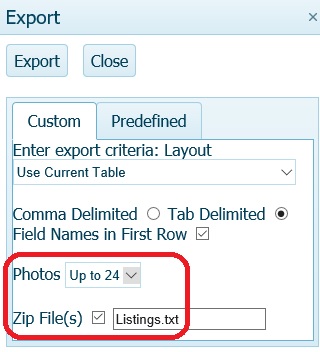
The number of Records (Listings) and number of Photos per property that were exported will display. Depending on your device, a "Listings" file will download into your browser's default location, and/or you will be prompted where to save and open the "Listings" file.
If you selected to export a Zip file, double-click on that file to unzip and display its contents. The main data file will display as "Listings.txt" or with the file name and extension that you entered.
If you exported Comma Delimited format, but did not check Zip File or you checked Zip File but did not change the default extension from .txt, you can rename the file to change the txt file extension to csv for faster importing into a spreadsheet program (such as Excel). Importing a tab delimited text (.txt) file typically is slower than importing a csv file because during the import you will need to specify which mark to use for separating columns (field delimiter) and what format to use for each column in a txt formatted table.
If you selected to export photos, the photo files will be in the same folder as, but separate from, the data file. Each photo file will display its MLS number followed by an alphabetical letter ({MLS#a}.jpg) indicating its sequential order ("a" is the main photo, "b" is second, and so forth) as set by the listing agent. These .jpg photo files can be copied for use in other programs.
▲ Return to Table of Contents ▲
To export listing data in Comma Separated Value (csv) format:
To export listing data in Excel's native "xls" or "xlsx" format:
Note: Information in an XLSX file is stored in an Office Open text file that uses XML to define its parameters.
Click on the Details button on a Summary Results screen to open the Details screen for the first listing currently displayed at the top of the Summary Table. Click on any List # in the Summary Results table to open the Details screen for that particular listing.
Click on the Details button on a Criteria screen to open the Details screen for the first listing that matches the search criteria in the current default layout for search results.
The Details screen opens a Full Report by default. To change the report being displayed, click in
the box beside the Report button in the Search Results toolbar at the top
of the screen and
select a different report.
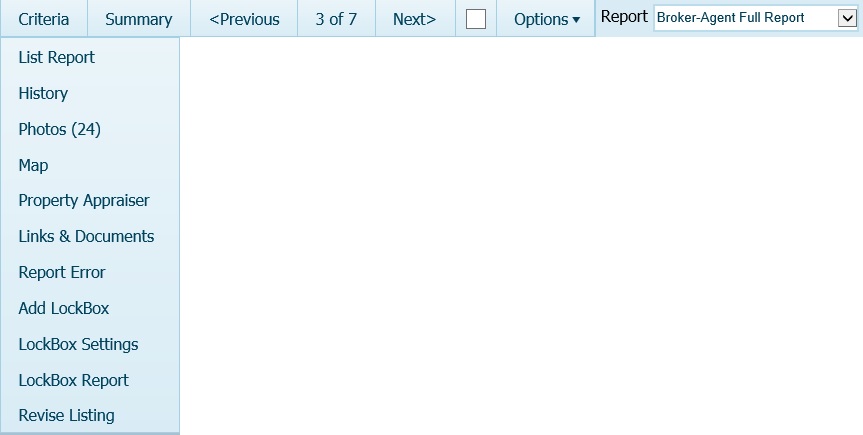
On any Details screen you can click the appropriate button on the left pane to see other Details about a Listing - such as History, Photos, Map, Property Appraiser, Documents, LockBox, and so forth.
To display the Detail Report for the Next listing in the search results, click the Next> button at the top of the Details screen. The Next> and <Previous buttons scroll through the Search Results table in the sequence in which they are sorted on the Summary screen.
Check the box between the
Next> button and Options button,![]() , to select a listing for further
action (such as printing or emailing). To un-select a listing, click
in the box again to remove the check mark.
, to select a listing for further
action (such as printing or emailing). To un-select a listing, click
in the box again to remove the check mark.
Click on the Options button in the Details toolbar and select Print to print one or more reports for the currently displayed listing, for the selected listings (that you checked), or for all listings in the results table.
While, there is no automated route planner-optimizer built into CTI Navigator, there are several free web-based apps for route planning.
See "Export Listing Data in Spreadsheet Format" above for instructions on exporting in a spreadsheet format (that can be imported into third party route planners) in CTI Navigator Web II. In CTI Navigator Silverlight, select Help > Tech Tips > General Usage > “Export in Spreadsheet Format”.
▲ Return to Table of Contents ▲
To Save or Copy listing photos:
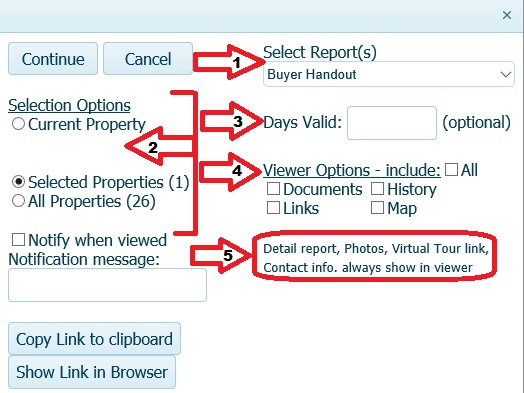
Click on the Options button in the Details toolbar and select E-mail to send a selected Email Report (see #1 in image below) for the currently displayed property or for selected properties that you have checked (see #2 in image below), or for all properties in the search results table. Unless you select a different report, the "Buyer Handout" report is selected by default. You can chose to set how many days the email link to the report and property details stays accessible (see #3 in image below), after which it will automatically expire.
You also can set the
Email Viewer
Options (see #4 in image below)
to include links to other detail information
about each selected property from the MLS - such as attached Documents, Internet Links,
Listing History, and/or Map. Check "All"
to select all Viewer Options. In addition to any Viewer Options selected, emails
from search results screens always include
(see #5 in image below)
the Selected Report and
the sending agent's Contact information
(from the MLS agent record), plus all
Photos, Virtual Tour Links, and a
link to the property record on the Property Appraiser
website (where available).
(See separate tutorials for details on Emailing Reports and Documents, Addressing Email, and Creating Email Messages and Using Message Templates in CTI Navigator II.)
To modify your search criteria, click the Criteria button at the top of any Details screen. This will re-open the criteria selection screen.
Click on the Map button at the top right of the Search Criteria toolbar to either display on a Map those properties that match currently entered criteria, or to add search criteria based on geographical location.
To display results
on a Map based on
search criteria already entered, click the
Map button on the Search
Criteria toolbar, and then click
on the "Show Properties"
button at the top left
of the Map. The
location of each matching (or
selected) property will be indicated by a color coded circular button displaying
the first letter of the listing status (such as
![]() =Active,
=Active,
![]() =Sold).
=Sold).
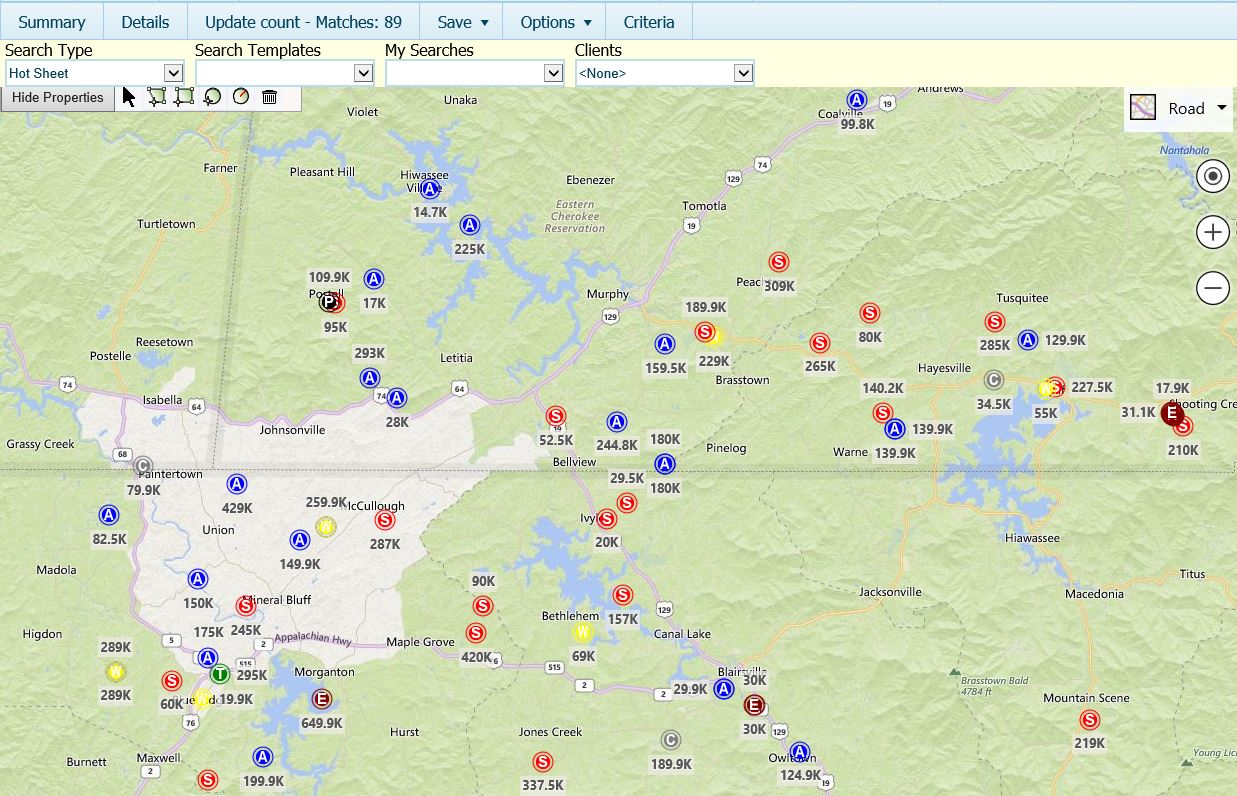
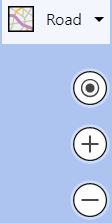
Use the Map View Controls
 (click
on image to enlarge) in the
top right of the map
to change the style of map (Road, Aerial, Bird's Eye or Streetside), activate
"Locate me", zoom in (+) or zoom out (-) if
desired. "Locate me" will attempt to find the geolocation of your device and
center it on the map. Click and hold anywhere on the map to move the map view
around. Warning: Do not save your search when
the map is centered on your current location unless you want this search to
always open in that view.
(click
on image to enlarge) in the
top right of the map
to change the style of map (Road, Aerial, Bird's Eye or Streetside), activate
"Locate me", zoom in (+) or zoom out (-) if
desired. "Locate me" will attempt to find the geolocation of your device and
center it on the map. Click and hold anywhere on the map to move the map view
around. Warning: Do not save your search when
the map is centered on your current location unless you want this search to
always open in that view.
To find and display listings within a geographical area drawn on a Map:
To Draw a Circle around a desired area on the map:
To Draw a Rectangle around a desired area on the map:
To Draw a Polygon around a desired area on the map:
Note: Area selection figures can overlap or be drawn inside one another ("stacked") on the map.
To print the entire map displaying properties that match your search criteria, use your browser’s print controls or the device's keyboard print command (such as Ctrl+P keys in Windows or Command+P on Mac).
To print the entire map displaying properties that match your search criteria, use your browser’s print controls or the device's keyboard print command (such as Ctrl+P keys in Windows or Command+P on Mac). To Print just a section of the map, use the appropriate screen capture app in the operating system for your device (such as Windows’ Snipping Tool, Mac Preview, or the Mac Command-Shift-4 keyboard command). To save the map as a pdf file (so it can be attached to email), select "Print to a PDF file" (in Windows 10 or Safari) or print to a PDF converter (such as Cute PDF Writer, Bullzip PDF Printer, or PDF Creator) appropriate for your device.
See also "Print Map with Thumbnail Description of Displayed Listings" and see "Set Sequence to Display and Print Listings on a Map" in the Details Screen section above.
To close a search and return to the Home page, click the Home button in Navigator’s Menu bar at the top of the screen.
To end your CTI Navigator Web II session, click “Sign Off” in the top menu. This will return your browser to the Sign-In page.
This concludes the Overview of Search Listings tutorial.
▲ Return to Table of Contents ▲
To return to the Index of Tutorials for CTI Navigator Web II, click here.
[Search_Overview.rev.12.12.2017]