Welcome to the tutorial on managing Automatic Search and Notifications in CTI Navigator Web II. This feature is known as CTI Matchmaker in the desktop version of CTI Navigator.
You can click on a topic to go directly to that section of this tutorial.
Touchscreen Note. Where instructions are to select or click, touchscreen device users would touch, press or tap as appropriate for your device.
You can set CTI Navigator to automatically notify you and/or your client when new or changed listings match specified criteria. “Automatic Search and Notification” is based on Saved Searches that you associate with one or more Clients, and/or yourself.
The purpose of Automatic Search and Notification is to automate future searches so you do not have to keep repeating them.
The Notification system does not email current search results. It is presumed that you would immediately notify your clients about any existing listings that already meet their criteria when you first enter those criteria into the search system.
Automatic Searches run on a scheduled, not continuous, basis. As a result, notices about listing changes that occur after a scheduled search has already completed (such as after mid-day), will not be emailed until the next scheduled search (which may be during the night).
To setup and activate an Automatic Search and Notification is basically a 5-step process:
▲ Return to Table of Contents ▲
Open a Search Criteria screen either by entering new search criteria, or by opening a Search that already has its criteria saved.
To create a new search:
Click the Search button in Navigator's main menu-bar and select a Search Type; - or -
On the Home Page
in the Quick Find section: enter the MLS Number, Street Address, Condo Name, or Owner’s Name for a listing > click Go > then click the Criteria button in the Search Criteria toolbar; - or -
in the Links section: select either Search Listings or Search Rentals as appropriate.
Enter desired search criteria. For information on how to enter and use Search criteria, see the “Search Overview” tutorial.
To open an existing search, click "Manage Searches'' in the Links section of the Home Page, or in the Search drop-down menu on Navigator's top menu-bar. Then either click on the Name of a saved search in the table of saved searches, or select a saved search (by checking its selection box), click on Options at the top of the table, and select "Show Search Criteria. To return to the Manage Searches screen, click on your browser's back arrow.
Other Options on the Manage Searches screen include:
Delete Selected Search
For more details, click here to see the "Manage Searches" tutorial.
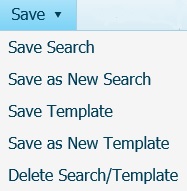
On the Search Criteria screen (for a new or previously saved search), click the Save button in the Search Menu-bar (directly beneath Navigator's main Menu bar at the top of the screen), and select either "Save Search", or “Save As New Search”.
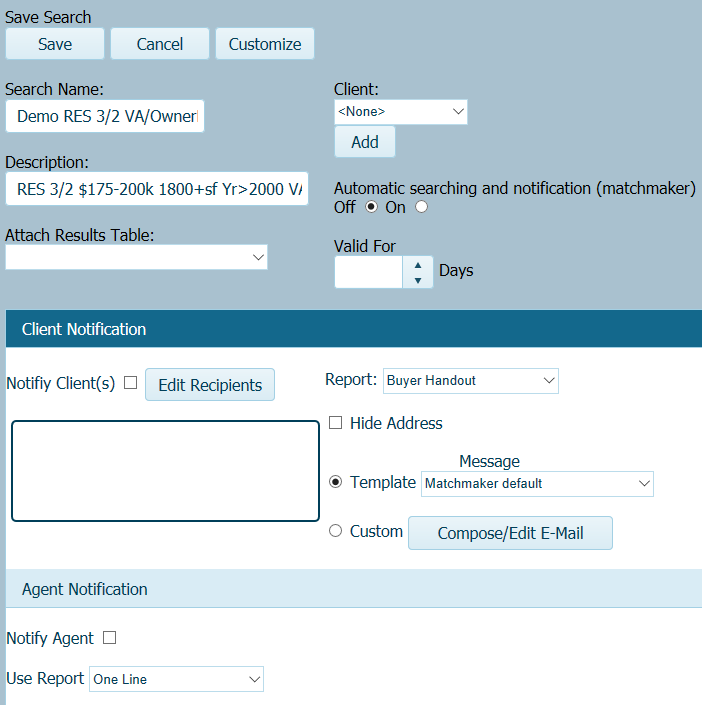
This will open a “Save Search” screen.
The Search Name, Description, and the name of any Attached Results Table will display at the top of the Save Search screen (see image below). If this is a new search, enter the appropriate Name and Description, and select a System or Personal Results Table if appropriate.
▲ Return to Table of Contents ▲
To the right of (or below) the search information on the Save Search screen is a Client section. Here you can either select an existing client, or Add a new client to associate with this saved search.
To select a client from a list of your existing Clients, click in the box beneath Client (which initially displays <None>), and then click on the client’s name.
To add a client, click the Add button, enter at least a First name and one email address, and then click the Save button. To exit the Add/Revise Client screen without saving, click its Cancel tab. Only you, someone you assign to share your Identity, or someone with management authority for your office can see your saved client information. (See separate Manage Client Information tutorial for further details.)
When associating a client with a saved search, you should be aware of the following conditions:
1. Only one client can be the Saved Search associate – even though multiple Clients can be Recipients of the same automated notifications.
2. The association between a Client and a Saved Search is independent of whether or not Automatic Notification is enabled.
3. The Client associated with a Search is NOT automatically notified when Automatic Search and Notification is turned ON. To be available to be automatically notified, clients must be entered in the Client Notification section (which we will describe below). In addition, only those Clients listed in the box under “Notify Client(s)” will be notified when Notification is turned ON.
To enable automatic
notifications, click the On button
beneath “Automatic Searching and Notification (Matchmaker)”.
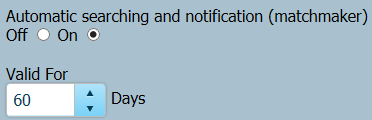
Then select the # of Days that you want the search and notification to be Valid. This is typically 30 to 90 days.
The # of Days will automatically decrease with each passing day. When the number of valid days reaches zero, the automatic search and notification will stop running – but all the search and notification information will be retained in the system.
You can easily extend or shorten the number of valid days later. To do so, use either Manage Searches or Save Search.
After entering the number of valid days, complete the information under the Client Notification tab below. Setting Automatic Notification to ON as described above will automatically open both the Client Notification and Agent Notification tabs. Otherwise, click anywhere on the tab to open it. Note that only those clients that you enter in the Client Notification section can receive automated search notifications.
▲ Return to Table of Contents ▲
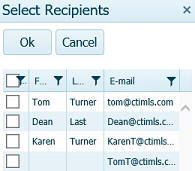
To enter a client to receive Notifications, click the Edit Recipients button beside "Notify Client(s). This will open a searchable Select Recipients screen which lists the names and email addresses for all clients you have saved in CTI Navigator (see image below).
 (Click on image to enlarge)
To select one or more clients or email addresses, check the box in the first column beside each client's information. You can check to select multiple clients. To select all your clients, click in the checkbox at the top of the first column. Checking toggles. To un-select a checked client, click again in the checkbox beside the client information. To un-select all selected addresses, click twice in the checkbox at the top of the first column (to toggle its checkmark on then off).
Click on a column heading to sort the list of your clients by the information in that column (such as First Name, Last Name or E-mail address). Clicking a heading toggles to sort ascending or descending.
Click on the filter icon
(![]() ) in a Name or Email Address column heading to
find specific clients
by name, partial name or email address, whichever column is selected.
) in a Name or Email Address column heading to
find specific clients
by name, partial name or email address, whichever column is selected.
Click on the filter icon in the checkbox column heading to filter by whether clients are checked or not checked. Select "Show items with value that is True" to display only those clients that are checked. Select "Show items with value that is False" to display only those clients that are not checked. Then click the Filter button.
 (Click on image to enlarge)
To reverse the true/false filter, click the filter icon in the checkbox column heading again, and change the value from True to False, or from False to True as appropriate. Then click the Filter button again. To remove this filter, click the filter icon in the checkbox column heading, and click the Clear button instead of the Filter button.
Click the Ok button at the top of the "Select Recipients" screen to complete the recipient selection (or un-selection) and return to the Client Notification screen. Click the Cancel button to not save any clients selections.
To activate automatically sending search results notifications to selected clients, check in the Notify Client(s) box (next to the “Edit Recipients” button). No notifications for this search will be sent to any client unless this box is checked.
On the right side of (or below) the Client Notification section, you can
click on the box beside Report to select a different Report to be sent;
check in the "Hide Address" box to prevent listing addresses being displayed in the Report being sent;
click in the box under Message beside Template to select an existing message other than the "Matchmaker default";
click Custom and then click on the "Compose/Edit E-Mail" to create a custom message to be sent.
▲ Return to Table of Contents ▲
If you want to receive notifications yourself, check “Notify Agent” in the Agent Notification section. This is normally checked by default.
Then click in the box beside “Use Report” and check the Report that you want sent to you. The report you receive can be the same as, or different from, the one sent to clients. For example, agents typically send Buyer Reports to Clients, but Full Reports to themselves.
Note that Full Reports can contain confidential and/or sensitive information (such as security codes and owner names) that should not be sent to non-MLS members (such as the public).
Click the Save button at the top of the screen to save your changes.
When new or changed listings match criteria that are specified in a saved search, CTI Navigator automatically sends an e-mail notification ("Matchmaker") message to the recipients who are stored with the saved search. The email notification lists the activity, MLS#, property address, and price for these listings in a format similar to the following:
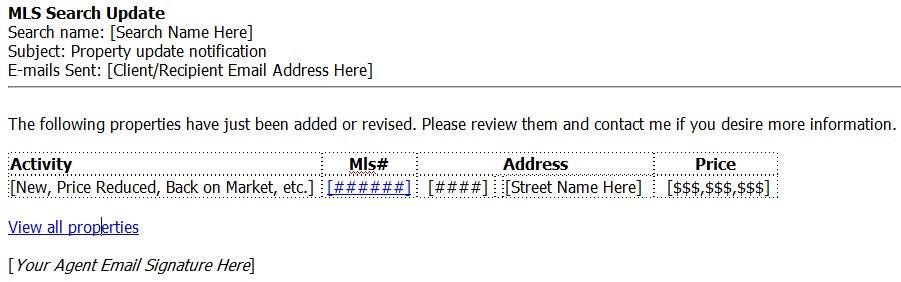
Recipients can click on the MLS# beside a property in the notification list to display a Detail Report (such as Buyer Handout) for the property in the format you selected when you created the Auto-Search. Recipients can stop receiving automated Matchmaker notifications by clicking where indicated in the notice at the bottom of the email message.
If you set the "Client Report Style" in Client Web to "Send Search Results to the Client's Website," the primary client associated with this search can click on "View all properties" (when displayed) to see this and previously saved search results in their client portal on your MLS sponsored Agent Web.
If you set the "Client Report Style" in Client Web to "Email Property Links" or if there are no previous auto-search results, "View all properties" will not appear in the notification.
Warning: If you set the "Client Report Style" in Client Web to "Send Search Results to the Client's Website," but you disable your Agent Web, any auto-notification link to "View All Properties" will fail.
By default, Navigator copies the originating agent when emailing auto-search results to designated clients/recipients. However, Matchmakers do not notify the originating agent when a recipient opens system generated search results.
To change, extend or stop an auto-search notification message later, open Manage Searches (as described previously), check beside the desired search, click on the Options button in the toolbar, and select "Edit Search/Notification Settings." This will open the Save Search screen (described above). After making changes, click the Save (or Cancel) button at the top of the Save Search screen to return to the Manage Searches screen.
To see which Saved
Searches are associated with which clients, open Manage Searches
(as described previously).
The name of the primary client associated with each saved search will be
displayed beside each saved search on the
Manage Searches screen. You also can see which searches are associated
with a client on any Search Criteria screen by selecting a Client in the search
toolbar and then clicking the down button
(![]() )
beneath "Searches for: {selected Client Name"} in the search toolbar.
)
beneath "Searches for: {selected Client Name"} in the search toolbar.
To see or change the Recipients of a Saved Search, check the selection box beside the name of the saved search in Manage Searches, click on the Options button in the toolbar, select "Edit Search/Notification Settings", and click to open the "Client Notification" tab. Then follow the instructions to "Edit Recipients."
When used judiciously, Automatic Searching and Notification is an extremely popular tool that benefits both clients and real estate agents.
However, it is good business practice to ask for your client’s permission before adding them to automated notifications. Otherwise, some client’s feel that automated notifications are just another form of unwanted e-mail spam.
This concludes the tutorial on Automatic Search and Notification in CTI Navigator Web II.
▲ Return to the Top of this Web Page ▲
To return to the Index of Tutorials for CTI Navigator Web II, click here.
[rev.12.04.2017]