
You can click on a topic below to go directly to that section of this tutorial.
| Main Screen |
| Manage Searches Toolbar Buttons |
| Filter Button |
| Options Button |
| Edit Search or Notification Settings |
| Extend Expiration Date (for 1 or more searches) |
| Index of Tutorials |
To see a summary table of all your Saved Searches, click on Manage Searches either in the Links on the Home Page or in the drop-down list under Search in the main menu-bar. The Manage Searches table displays the following for each saved search:
Any status in this table of "false" indicates OFF and "true" indicates ON. For example, "false" in the Auto column means that Auto-Search-and-Notify is set to OFF. In this case the search will not run automatically and no notifications will be sent (to you or to any client). "False" in the "Notify Client" column means that "Notify Client(s)" is not checked. In this case, automatic search result notifications will not be emailed to any clients (although you may be notified if Auto-Search-and-Notify and "Notify Agent" are both set as true).
As a shortcut, you can double-click on a search Name to open the Criteria for that search; or double-click on a search Description to open its search Notification Settings. Click on your browser's back arrow to return to the Manage Searches table.
▲ Return to Table of Contents for this Tutorial ▲
The Manage Searches toolbar displays Filter and Options buttons.
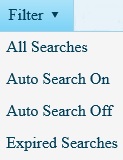
Selections under the
Filter button provide shortcuts to quickly
display only searches with Auto-Search-and-Notify On or Off, or that have
already Expired. You do not need to check any specific searches to use
filtering. To return to the unfiltered list, select "All Searches" under
the Filter button. You can achieve the same results without leaving the table by
sorting or using the filter icon
![]() in the
"Auto" or "Expires" column on the table.
(Click
here for detailed instructions on "How to Sort & Filter in a table" in the Introduction tutorial.)
in the
"Auto" or "Expires" column on the table.
(Click
here for detailed instructions on "How to Sort & Filter in a table" in the Introduction tutorial.)
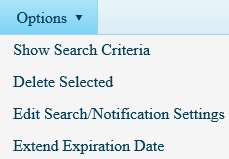
Click on the Options button in the Manage Searches toolbar to:
Show Search Criteria
Delete Selected Search
Edit Search or Notification Settings
Extend Expiration Date (for all selected searches).
Before applying the Show Criteria, Delete Search, or Edit Settings options, first check the selection box in the first column beside one particular search (i.e., do not check more than one search at a time).
Click the "Edit Search/Notification Settings" option to turn Auto-Search-and-Notify On or Off; to Edit the number of Days Valid; or to Edit the notification Recipients, or notification Reports for the selected search. If you make any changes, be sure to click the Save button before leaving the search settings screen (such as by clicking the browser's back arrow).
To extend the Auto-Search-and-Notify expiration date for one, all or a group of saved searches, first check the selection box for those searches to be extended by the same number of days from today. To select ALL displayed searches, check the selection box in the heading of the first column of the table. Then click the Options button and select "Extend Expiration Date." Enter the number of days to set as valid for the selected searches. The number of valid days will be extended from the date you make the change (it is not added to the existing number of days remaining for each search).
For example, if a selected search currently has 1 day remaining and another selected search has 40 days remaining, and you select both searches and extend the date by 30 days, both searches will expire on the same date 30 days from today. In the case of the second search in this example, the extension reduced the remaining number of days from 40 to 30. Note that if you extend the expiration days for all saved searches using this option, all your current searches will expire on the same date.
The Extend Expiration Date dialog box opens on top of the Manage Searches table. So once the date extension has succeeded (or is cancelled), the dialog box disappears and the Manage Searches table stays on-screen.
▲ Return to Table of Contents for this Tutorial ▲
To go to the Index of Tutorials for CTI Navigator Web II, click here.
[Manage_Searches.aspx||rev.05.12.2017]