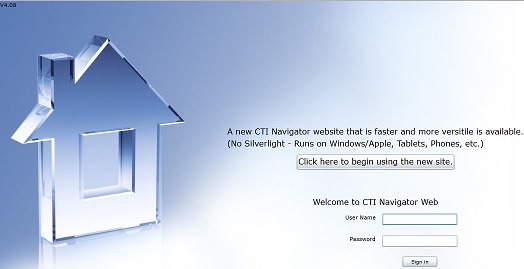
CTI Navigator Web II is designed to run on virtually all Internet enabled devices (Android/Apple/iOS/Windows computers, tablets and Smartphones) and provide a common user interface across all screen sizes (see screen size below), screen types (touch screen and non-touch screen), and Internet browsers. You do not need to download or install any CTI Navigator specific app or browser plug-in (such as Silverlight) onto your tablet, cell phone, or computer to use this (HTML) version of CTI Navigator.
Click on any topic below to go directly to that section in this tutorial.
Touchscreen Note. Where instructions are to select or click, touchscreen device users would touch, press or tap as appropriate for your device.
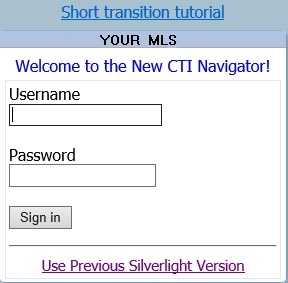
To open new Navigator Web II, first enter your six (6) letter agent code and your current password for CTI Navigator on the sign-in screen at the Navigator website for your MLS. Then click on the "Sign in" button.
To open the previous
"Silverlight" version of Navigator Web, first click on "Use
Previous Silverlight Version" at the bottom of the sign in box
 (click on mage to enlarge). After your browser loads the Silverlight plug-in,
then enter your six (6) letter agent code and your current password. Although
CTI continues to support the "Silverlight" version of Navigator Web, this
version is not recommended for routine use because Microsoft is phasing out its
support for the Silverlight plug-in.
(click on mage to enlarge). After your browser loads the Silverlight plug-in,
then enter your six (6) letter agent code and your current password. Although
CTI continues to support the "Silverlight" version of Navigator Web, this
version is not recommended for routine use because Microsoft is phasing out its
support for the Silverlight plug-in.
However, Navigator Desktop users who want to convert their Desktop Matchmaker searches into Navigator Web format may want to temporarily use the "Convert Desktop Matchmakers" tool in Navigator Web Silverlight. The conversion process will allow you to import or add client recipient email addresses into your Navigator Web's client database, and will automatically enable Auto-Search-and-Notify for each saved search that is converted. Once converted, these saved searches will be available in both the Silverlight and HTML version of Navigator Web (but will no longer be available in Desktop Navigator). Click here for detailed instructions and examples for converting Desktop Matchmakers to Automated Search and Notifications in Navigator Web.
To see some tips for transitioning from using CTI Navigator Web Silverlight to using new CTI Navigator Web II (HTML), either click on "Short Transition Tutorial" at the top of the sign-in screen before clicking on the Sign In button; or after signing in, click on Help in the main menu-bar and select the "Transition Tips" section in the Introduction Tutorial.
▲ Return to Table of Contents ▲
Current unread (new or updated) News items immediately display when you sign into CTI Navigator Web II. Click the checkbox beside "Read" at the top of any news item you do not want to pop-up the next time you sign in. Click Next or Previous to scroll through news articles. Click the "Close" or "Home" button at the top of the message to close the News screen and open the Home Page. Both read and unread news topics will be listed in the News section of the Home Page (until they expire). You can click on any news item on the Home Page to display its detail in the News Viewer.
When there are no unread news
items, CTI Navigator Web II opens to a
Home Page that provides shortcuts for quick and easy access to all of the most
commonly used MLS functions.
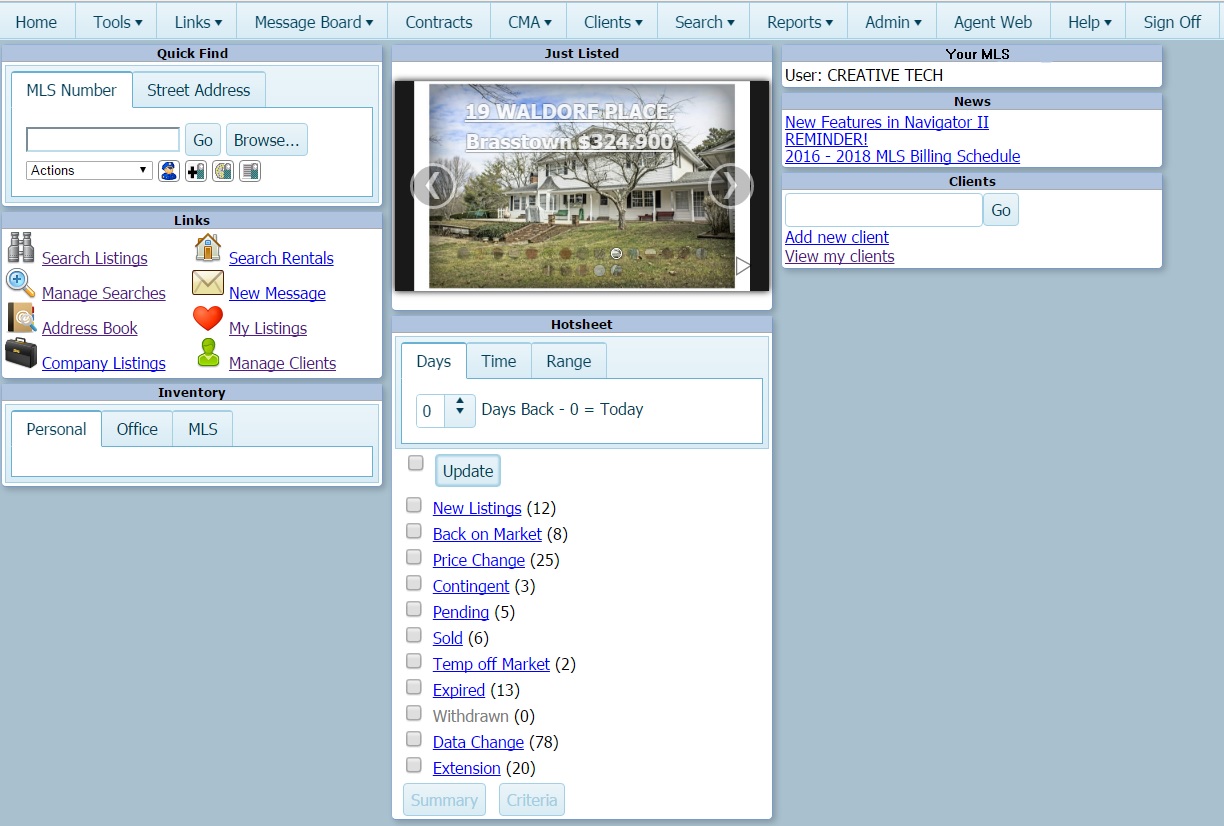 (Click on image to enlarge an example Home Page.) For details, see the separate
tutorial for using the Home Page.
(Click on image to enlarge an example Home Page.) For details, see the separate
tutorial for using the Home Page.
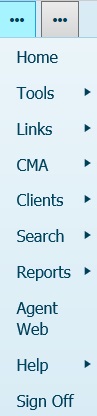
All of Navigator's main functions are accessible
from the menu-bar that is displayed at the top of all the main
pages.
An arrowhead icon beside a menu item indicates that it has a drop-down menu of
options. Click on a menu item with an arrowhead icon to display its options.
![]()
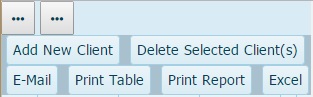
Toolbars for specific functions display immediately below the main
menu-bar at the top of the screen. For example, two toolbars display below the
main menu-bar in the Client Manager screen
(as shown below):

Only one toolbar may display at a time on narrow screen devices (click here to see Client Manager on a narrow screen). Click on a toolbar item to open its function or to display its options. You may need to select an item below the toolbar before the tools can function.
▲ Return to Table of Contents ▲
To
optimize readability, menus
and toolbars are responsive to screen width. On
small or narrow screens
the sections that normally display on the right on full size computer screens will display
on the left below the other sections.
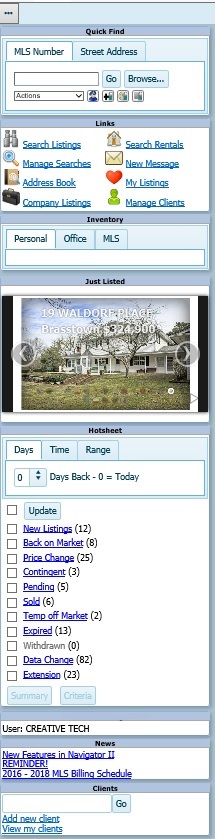 (click on image to enlarge)
On narrow screens, such as
some Smartphones, menus and/or toolbars may be collapsed into one or more buttons (
![]() ) at the
top of the screen. Click on the first such button on the left to display the
Home Page menu vertically (as shown below):
) at the
top of the screen. Click on the first such button on the left to display the
Home Page menu vertically (as shown below):
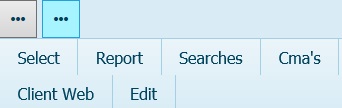
If there are two menu buttons at the top of the screen, click on the second button
(the one on the right) to
display a hidden toolbar horizontally
that is specific to the current function. For example, on a narrow screen
the first tier toolbar may be collapsed into a button at the top so that only
the second tier toolbar initially displays (such as the Client Manager second
tier toolbar example below that starts with "Add New Client"):
Click on the second button (the one on the
right) to change display of the second
tier toolbar to display of the first tier toolbar such as the Client Manager
first tier toolbar example below that starts with "Select"):
Clicking on a menu button toggles the display of the collapsed (hidden) menu or toolbars between on and off.
▲ Return to Table of Contents ▲
To increase (or decrease) the on-screen size of all text, icons and buttons in CTI Navigator, use the Zoom control in your browser. Zoom is usually set in the browser's menu. The browser's Zoom setting does not affect the size of printed items.
Warning: Do not increase or customize just the text size in your browser, since that can cause some menus or toolbars to overlap the text below.
There are two ways to copy or save listing photos in Navigator II: either (1) one-at-a-time while viewing a Photos Report on a search results Details screen; or (2) by exporting a specified number of photos for selected listings using the Export option on a search results Summary screen. Detail steps for using each approach are described in the Search tutorial by selecting "Save or Copy Listing Photos."
The display of information in most tables can be easily customized. For easy re-use of your customized format for a search results table, select "Save/Manage Tables" in Options after making your format changes. Note that this saves formatting only - not data.
You can add or remove a column in most tables by clicking the Options button and selecting Add Column or Remove Column. On the subsequent pop-up dialog box, select the name of the desired column from a drop-down list, and then click the add or the delete button. New columns are added as the last column on the right side of the table. To move the column elsewhere in the table, click-and-hold on the column heading, and drag-and-drop it into the desired position.
You also can right-click on a column heading and select to Remove that column, Add a new column, or change how information is Sorted in that column. If you click on Remove Column, the column on which you clicked will be removed immediately. Removing the column does not remove the data, only its display in the table.
To change the sequential order in which the columns display in a table, click-and-hold on a column heading, and drag-and-drop it into the desired location.
To change the width of a column in a table, click-and-hold on the right-side of the column boundary line, and drag the boundary line to the desired width.
Most information displayed in a table (such as email
addresses, CMA reports, Client summary information, and Saved Searches) can be
sorted (![]() )
and/or filtered (
)
and/or filtered (![]() ).
Use the filter function to find items by name or partial name.
).
Use the filter function to find items by name or partial name.
To
sort by a column, click on the column heading. If items in that
column can be sorted, a sort icon for the current sort setting will display
beside the Heading. An Upward pointing arrowhead
![]() indicates that the items in that column are sorted in Ascending order
(starting with the lowest letter, such as A, or smallest number at the top of
the column). A Downward pointing arrowhead
indicates that the items in that column are sorted in Ascending order
(starting with the lowest letter, such as A, or smallest number at the top of
the column). A Downward pointing arrowhead
![]() indicates that the items in that column are sorted in Descending order
(highest letter, such as Z, or largest number at the top). Each click on the
heading will toggle the sorting up, down, or off (no arrowhead displayed) for
information in that column.
indicates that the items in that column are sorted in Descending order
(highest letter, such as Z, or largest number at the top). Each click on the
heading will toggle the sorting up, down, or off (no arrowhead displayed) for
information in that column.
System Results default tables are presorted by at least one data column (such as MLS#, Price, or Date). If you want to change the sorting sequence in a presorted table, or if your sort does not change the item order as expected, clear any existing sorts by clicking on Options and selecting "Clear All Sorts." Then set your own sorts in the desired sequence.
Multiple column sorting is supported on Search Results Summary tables. To enable multiple column sorting, click on Options and select "Multi-Sort". (If Single-Sort displays instead of multi-sort, then multi-sort is already enabled.) When multiple columns are set to sort, the sorting will occur in the order in which sorting was set. For example, if you first set to sort search results by Area, then by Property Type, then by Price, the results will display sorted by Area, then within Area by Property Type, then by Price within each Property Type for each Area. To reset sorting on a Search Results Summary table, click Options and click on "Clear All Sorts"; or right-click on the column heading, select “Clear ALL Sorts.”
To find a specific item or group of items (whether or not
currently displayed), click the filter icon
![]() in the appropriate column heading of a table. This will open a dialog box
for setting how to filter the items in the selected column.
in the appropriate column heading of a table. This will open a dialog box
for setting how to filter the items in the selected column.
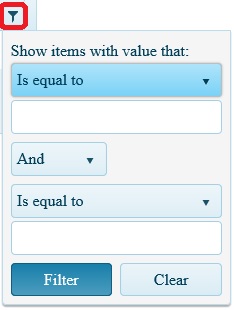 (click on image to enlarge)
Click on the down arrowhead button
![]() immediately below "Show items with value that" to set the
primary filter to the appropriate option
(such as "Is Equal to", "Is Not Equal to", "Starts With", or "Contains").
Then enter the desired item name or partial name in the empty box immediately
below the filter setting you selected.
immediately below "Show items with value that" to set the
primary filter to the appropriate option
(such as "Is Equal to", "Is Not Equal to", "Starts With", or "Contains").
Then enter the desired item name or partial name in the empty box immediately
below the filter setting you selected.
If desired, an associated secondary filter setting can be entered below the primary filter setting in the same dialog box. Select the secondary filter option and enter the item name in the box below this option. To set the association between two filters:
Select "And" between the two filter settings to require that items include both the primary and secondary values.
Select "Or" between the two filter settings to require only that items include either the primary or the secondary values.
You can filter by any field that displays the filter icon and you can set filters in several columns. Filter settings are retained until you close the table whose items are being filtered.
Click the Filter button at the bottom of the filter setting screen to apply the filter(s) as specified. To remove filtering, click the filter icon in the column heading and click the Clear button at the bottom of the filter setting screen.
All of the main control buttons are at the top of the screen. Click on a button in the menu-bar or a toolbar to display its function options.
However, the controls for the
page or number of items to display on a screen
(such as in search results table and agents in the address book) are at the
bottom of the screen. 
To display All items on one screen, click the down arrow beside "items per page" at the bottom of the screen and select All:
![]()
Using Touchscreens. Where instructions are to select or click, touchscreen device users would touch, press or tap as appropriate for your device.
Selection Toggles: Checking a selection box or icon toggles the function On and Off.
Browser Back-Forward Arrow Warning. You can use the Back arrow in your Internet browser control to return to the previous screen in Navigator II. Note however, that clicking Back in the browser will break the link to temporary (unsaved) information on the server for the current function. Clicking the Forward arrow in the browser may display the prior screen image, but the link to information on the server will have been lost. So, for example, if you have entered some search criteria, click the browser's back arrow, and then click the browser's Forward button, your search criteria may still display on-screen if your browser saves the display "cookie", but the criteria are no longer saved on the server and must be re-entered. In most browsers you can click its refresh icon to re-set the screen without logging out of Navigator.
If you accidentally click back in the browser, or click on a main menu item while using a Navigator function, click Home on Navigator's main menu-bar, and then re-open the desired function to start over (i.e., temporary information is not saved).
New Task. To open a new task in your current session of Navigator in a new tab of the same browser, click Tools and select New Task (tab). This allows you to leave your current Navigator function open (such as in Search) and use a different function (such as in CMA) in a new tab. You do not need to sign into Navigator when you use the New Task tool to open your current session of Navigator in a new tab.
Warning: Do not manually sign into Navigator separately in another tab or another browser. If you sign into Navigator multiple times on the same computer, changes in one browser tab (session) can affect Navigator information in the other tab.
To recover from a server error (such as "Object Referenced not set...", "Object variable or Width block variable not set", or "Value cannot be null...") or other malfunction, close CTI Navigator Web II, then clear the browser’s cache of temporary files. Do not use “beta” in the new Navigator URL address, and, if needed and appropriate, set Windows to trust Navigator's website for your MLS. The basic steps are described below for the most popular browsers.
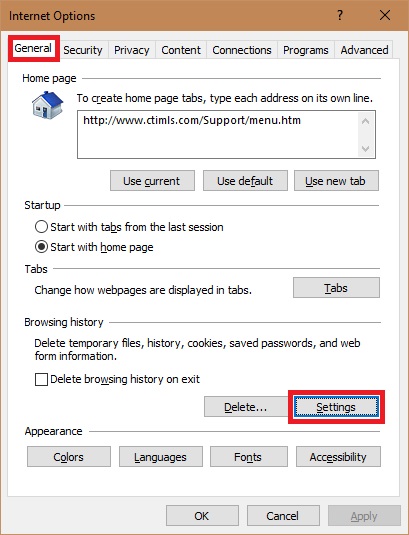 (click on image to enlarge) > click the Settings button (in the
"Browsing History" section near the bottom) >
click the "View Files" button (at the bottom just above OK
button) > Select All files (in ...Windows/iNetCache folder) >
Delete >
close the iNetCache screen > click OK on "Website Data Settings"
screen to return to the General tab screen.
(click on image to enlarge) > click the Settings button (in the
"Browsing History" section near the bottom) >
click the "View Files" button (at the bottom just above OK
button) > Select All files (in ...Windows/iNetCache folder) >
Delete >
close the iNetCache screen > click OK on "Website Data Settings"
screen to return to the General tab screen.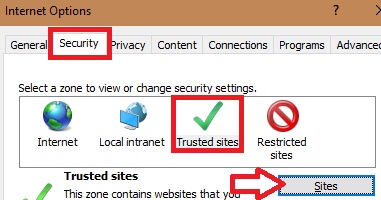 (click on image to enlarge) > click on "Trusted Sites" (beneath
the green check-mark between "Local intranet" and "Restricted sites") > click
Sites button > un-check
"Require server verification (https:)...
" > click in the "Add this website to the zone" box and type
CTI Navigator's website address for your MLS >
click the Add button > click the Close button.
(click on image to enlarge) > click on "Trusted Sites" (beneath
the green check-mark between "Local intranet" and "Restricted sites") > click
Sites button > un-check
"Require server verification (https:)...
" > click in the "Add this website to the zone" box and type
CTI Navigator's website address for your MLS >
click the Add button > click the Close button. If toolbars, menus or other Navigator items are not visible or do not display properly, or the cursor does not accurately select the expected position inside a text entry box, set your browser's zoom to its native 100% level. You can verify or change the zoom setting of all major browsers in their main menu.
If Navigator’s scrollbars are not visible on a MacBook:
If you do not find a date, text or map error, close both CTI Navigator and your browser. Then open your browser, clear the browser's history of temporary files (as described above), and sign into Navigator again. If the problem persists, try using Navigator in a different browser.
A "Maximum request length exceeded" error indicates that a file size it too large to process all together. To fix this error when sending a new listing and/or sending a new set of listing photos, reduce the number of photos being sent initially (to 6 or less). It is not normally necessary, but if you are sending an unusually large number of attached pdf documents (more than 4) all at once, you also may need to reduce the number of documents being sent initially (to 4 or less). After all the listing information and initial set of photos and documents have been uploaded successfully to the MLS server (and you receive the MLS# assigned to this listing), you then can add the remaining photos (and/or documents).
If the above procedures do not resolve the problem you are experiencing, or you need personal assistance resong Navigator Web II, click on Help in the main menu-bar and select Support. This will display the current contact information (hours, toll-free phone number and email address) for CTI Tech Support.
▲ Return to Table of Contents ▲
To add a shortcut link to CTI Navigator in Chrome on your Android Home Screen:
To add a shortcut link to CTI Navigator in Internet Explorer on your Windows phone Home Screen:
▲ Return to Table of Contents ▲
The new system embodies the same functionality as the original CTI Navigator Web. However, due to its responsive design, items will shift to different locations depending on the size of your screen. When on a computer, the new system maintains a similar look and feel as the original Navigator Web. But, in order to accommodate small screens such as on Smartphones, some items (such as email or print MLS reports) were moved to a menu item called Options. So, if you do not see the button you are looking for, check for it under Options.
When on a narrow screen mobile device,
menus are collapsed to two buttons
![]() .
The first is the main menu for the
entire system. The second is for items specific to the current
function you are in.
.
The first is the main menu for the
entire system. The second is for items specific to the current
function you are in.
To see the number of matches for your
search criteria, click "Match Count" in the search toolbar.
When adding shapes to search on the map: select the shape
tool; click and let up (or tap with a finger); then move your mouse
(button up) or move your finger (on touchscreen) to define your
area. (Using the Silverlight version of Navigator Web you click and begin to
drag without letting the mouse button up.)
To
sort by a column, click on the column heading. If the
sort does not change as expected, right-click on the column heading,
select “Clear ALL Sorts”, then click the up/down arrowhead as
appropriate to sort. If multiple columns are set to sort, the
sorting will occur in the order in which sorting was set.
To view the photos for a listing, select Photos in the Detail view. This will display a photo gallery. Click on an individual photo in the gallery to open it in a "Photo Viewer". You can click on the photo in this viewer to display left and right navigation buttons that allow you to move from photo to photo. To close the Photo Viewer and return to the Photo Gallery, click the "X" in the upper right corner of the viewer frame.
In the previous "Silverlight" version of Navigator Web, when you email a listing, your client receives your message with a link they can click on to view the properties. When they click on the link, a scroll-able web page with the listings is displayed. In the new system, when the client clicks on the link, a "Property Viewer" is displayed. The viewer has Previous/Next buttons to cycle through the properties, similar to the Details view in listing search. Photos and Virtual Tours links are always included. You have the option to include documents, map, and other links, and also to attach a file to your email.
Unread news items immediately display when you sign in. All Announcements are itemized on the Home Page under "News". Click on any news item to display its detail in a News Viewer screen. You can scroll through all news items on the viewer screen. Click the box beside "Read" for any news item you do not want to display the next time you log in.
Add a Photo - To resize a photo, you can use your mouse wheel, or, on a touchscreen use your fingers to pinch in/out, to zoom the size of your photo image. The new system is sensitive to photo orientation, and you can rotate the photo as needed. Then adjust the crop-box over the desired image area and click save.
Map - The system will automatically try to add a location pin on the map based on the street address. However, if it can't locate the address, you can position the map to the property location. Click the "Set Location" button, and then click on the map position where you wish to place the pin. You can then drag the pin as need for fine adjustment.
Instructional Tutorials are available by clicking on Help in Navigator's main menu.
▲ Return to Table of Contents ▲
To return to the Index of Tutorials for CTI Navigator Web II, click here.
[rev.12.18.2017]