Full Screen
Narrow Screen
You can click on any topic in this table to go directly to that section.
Touchscreen Note. Where instructions are to select or click, touchscreen device users would touch, press or tap as appropriate for your device.
Welcome to the tutorial on “Customizing Your Agent Website” in CTI Navigator Web II. CTI Navigator automatically creates a customizable website for all agent members. Your agent website gives you a personalized presence on the Internet where you can describe and promote the real estate services that you offer.
Agent Web includes a Client Portal feature. The Client Portal displays listing search results that match the client's desired property criteria. Either you or your client can perform searches and save the results in their private portal on your MLS sponsored agent website. Automated Search (Matchmaker) reports can be set in the Client Web feature of Client Manager to be sent to the Client Portal.
|
Full Screen |
Narrow Screen |
|
|
|
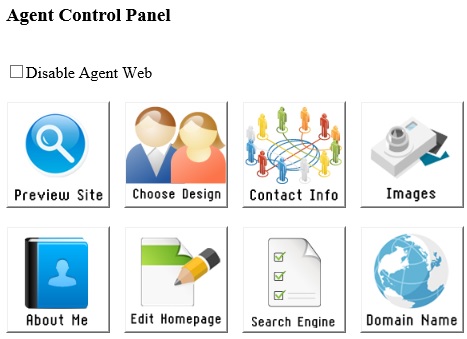
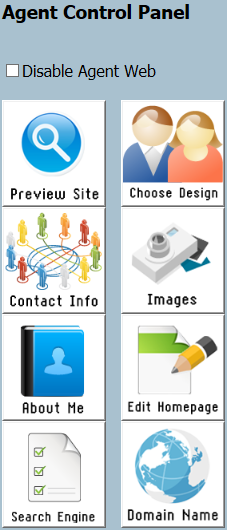
To preview or customize your agent website, select Agent Web in the top menu-bar of CTI Navigator II. This will open the Agent Control Panel (see images above). From here you can customize the content and appearance of your agent website. In the Agent Control Panel are control buttons to choose a webpage Design; to specify a personalized Domain name; to edit your Contact Information, About Me, or Homepage; to upload your photo or company logo; to select Keywords to optimize Search Engine visibility; and to Preview your agent webpage.
You can select the items in the Agent Control Panel in any order. However, when you first customize your website, you may find it useful to progressively select items in order of increasing detail. For example: Preview Site > Domain Name > Choose Design > Images > Contact Information > About Me > Edit Homepage > and Search Engine. Let’s now look at how to use each of these controls.
▲ Return to Table of Contents ▲
 (click on image to enlarge example Home Page)
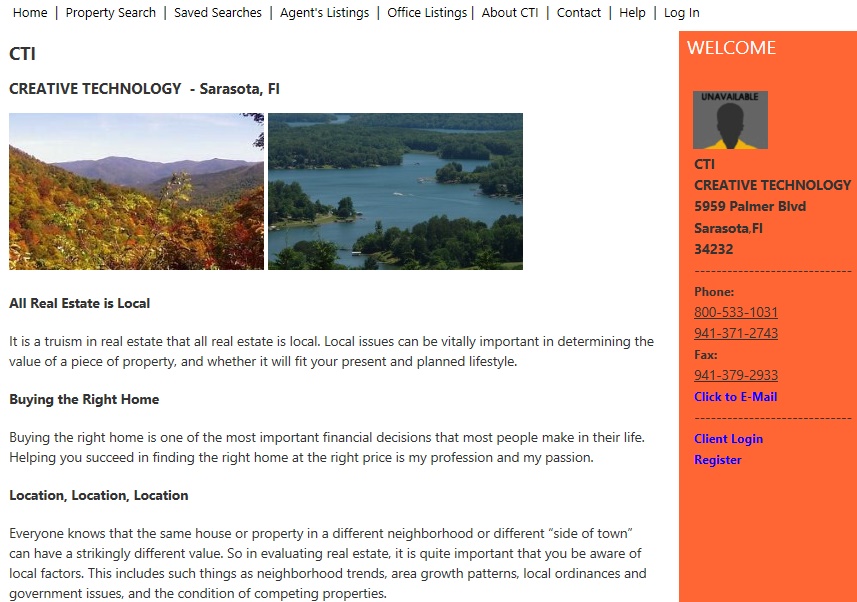
To see your current website, click the
Preview Site button. This will open the existing Homepage for your
website using the existing domain name, page design, and wording. The
site will be fully functional and will display in a separate browser window.
Your existing Domain Name will be visible in the browser’s address box at
the top of the screen. The Title of your Homepage will display in the
browser tab for your website.
Because your agent website runs in its own browser window, you can use the browser’s controls (such as the back and forward arrows) to navigate between web pages at your website. Running your website outside of CTI Navigator also allows the public and your clients to directly access your website.
Your agent website includes pages for Property Search, SAVED Searches, AGENT Listings, Office Listings, About Me, Contact, and Client Log In. The general Public can Search Listings and Save their Searches on your website. Clients who have given you their property criteria and their email address can select Saved Searches to see up-to-the-minute results for all active searches that have been setup for them. This includes Matchmaker Auto--search results.
For instructions on setting up and editing private web pages on your agent website as a personalized "Client Web" for your clients, see the "Manage Client Information" tutorial.
For now, close your website the way you normally close a website (such as click the X in the top far-right corner of the screen).
 (click on image to enlarge)
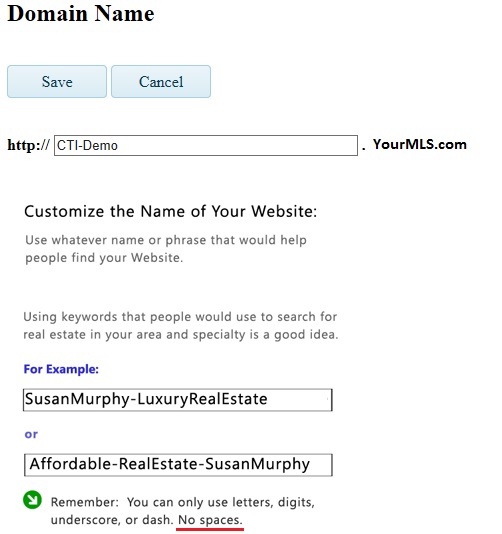
Select the Domain Name button in the
Agent Control Panel to open a screen where you can customize the name of your
website. It is a good idea to use a relatively short, easily
remembered and easily spelled name that relates directly to you and
your business. You may want to include this website name on your business cards,
advertising materials, and email signature. (See also the "Public
Access to Your Agent Website" section in this tutorial.)
Your personal domain name can contain letters, numbers, underscore or hypen/dash; but it cannot contain any Spaces or Underscore. Use a hyphen (-) or dash (—) mark instead of a space.
Type your preferred domain name in the box after http:// that is at the top of the screen. You can type a domain name in the box that is longer than can be displayed, but longer names are not recommended. If you do type an extra long domain name, use the arrow keys on your keyboard to scroll left and right in the box.
The extension after your domain name is displayed outside the box and it cannot be changed. This is because the extension identifies the MLS server CTI uses to host your agent website. Click the Save button to save any changes and return to the Agent Control Panel screen. Click the Cancel button to return to the Agent Control Panel screen without saving any changes.
Once you select and start using a domain name, you should not change it unless there is a compelling reason.
▲ Return to Table of Contents ▲
 (click on image to enlarge)
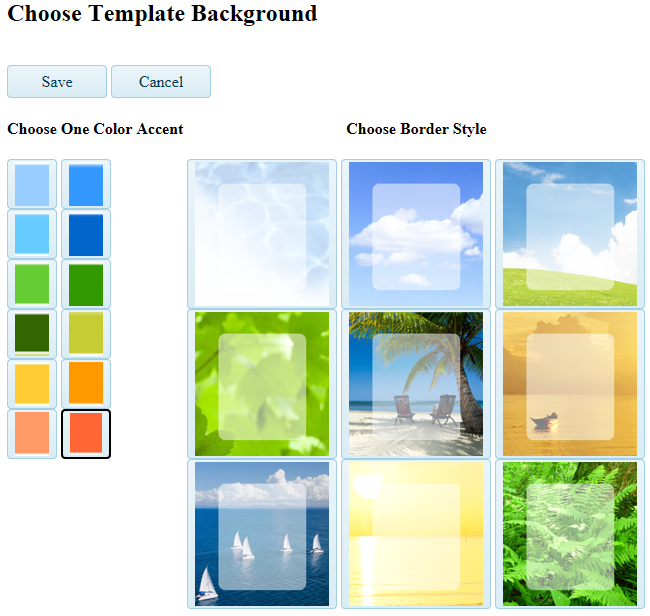
Select the Choose Design button in
the Agent Control Panel to choose a background Image, and an
accent Color for your web pages. Your selection will be indicated by a
thick frame around the background image and around the color thumbnail that
you choose.
The background image will display on web pages that do not show listing images – for example the Home, the Search web pages. The white mask in the center of the background image indicates where text will display. The white background makes it much easier to read the words. But the part of the image behind this mask will not be visible on your web pages.
The Accent Color is used to frame Sections of words. For example, it is the color of the frame around your Contact Information. This color also is used for the solid background of web pages that display listing information - such as Agent or Office Listings pages. If you change the Accent Color, both the frame for text and the solid background on listing web pages will change.
Click the Save button to save and apply your chosen design elements to your agent web pages. The Save or Cancel button will close the Choose Design screen and return to the Agent Control Panel.
After changing a feature, such as the Design, it is a good idea to click the Preview Site button to ensure that your website looks the way you intend. If you have previously viewed your website in this computer session, you may need to Refresh or Re-Load the web page in your browser so it will reflect changes.
Select the Images button to Add or Delete your Agent Photo to the MLS server. Your photo will display on your Agent Website, on your Agent Details in Navigator's Address Book, and on your CMAs.
If you have Management authorization for your office, you can Add or Delete the company logo from the Images screen. The same logo will display on the MLS Sponsored agent websites and on CMAs for all agents in your office.
To add an image, click the Upload button beneath Photo or Logo, and change Look-In to the location of the image on your computer. Select the appropriate image and click Open to open it in the Image Cropping Tool. This is the same tool used to add photos to listings. Images must be in standard photo format (jpg or jpeg).
Move and resize the red cropping frame as needed to cover the part of the image that you want to display on your website. Your can use the control buttons at the bottom of the image, or click on the frame and drag it to resize. The frame keeps its height-to-width ratio constant. To move the entire frame, click and hold anywhere inside the frame.
After centering the image, click the Capture button to save the part of the image that is inside the cropping frame. To close the Image Cropping Tool without saving the image, click the Cancel button. Either button will return you to the Images screen.
Click the Exit button on the Images screen to return to the Agent Control Panel. For more information on cropping images, see the “Add or Edit a Listing” tutorial [when available].
▲ Return to Table of Contents ▲
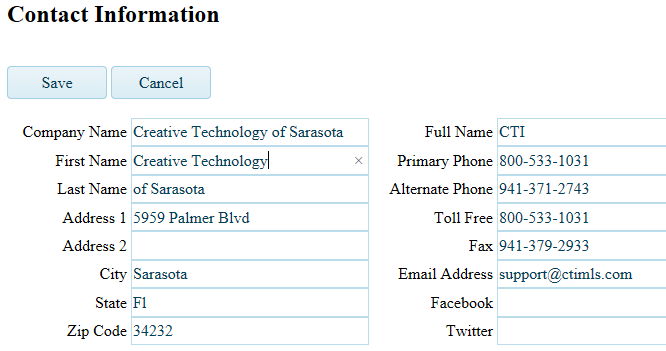

Click the Contact Information button to customize the contact information for you on your website. The default contact information will be populated automatically from your agent information in the MLS roster. Items with empty boxes do not display, or use any space, on your website.
Entering your Social Media address (such as Face book or Twitter) will cause the icon for that service to appear in your contact information on your website. Clicking on the icon will activate the link to the address that you entered.
Additions or changes to your contact information for your agent website will not affect your information in the MLS roster. Click the Save or Cancel button to return to the Agent Control Panel.
To modify or replace information displayed on your Homepage or on your “About Me” web page, click the appropriate Edit Homepage button or the About Me button in the Agent Control Panel. The tools, templates and process of editing information displayed on either of these web pages is the same. Let’s click Edit Homepage to use as our example in this tutorial.
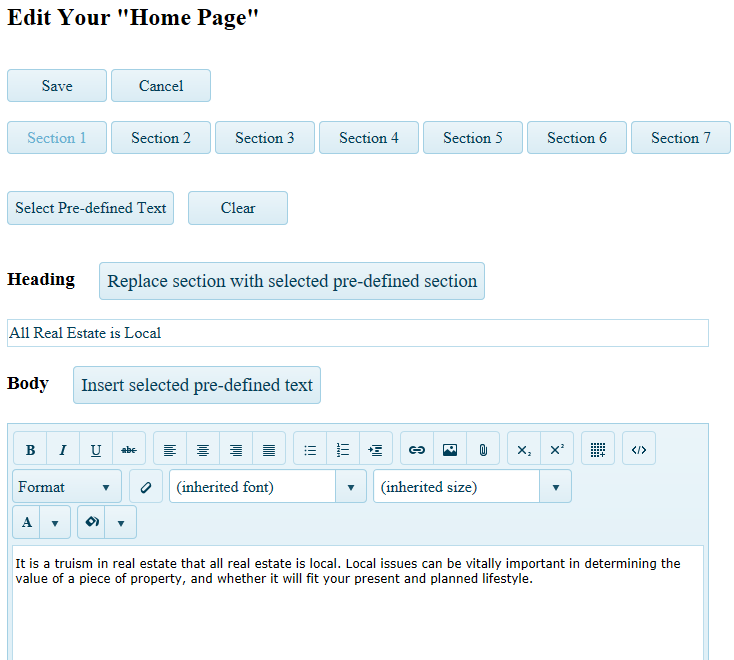
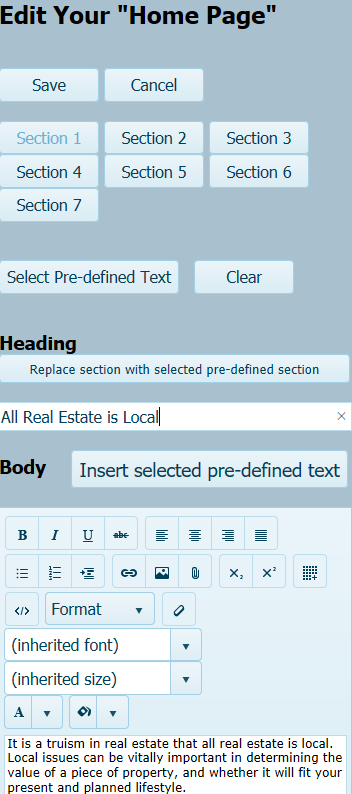
The Control buttons to Save and Cancel after editing your web page are at the top of the Edit screen. Click the Save button to save all the sections of text with their current sequence and wording, and return to the Agent Control Panel. Click Cancel to return the screen to the Agent Control Panel without saving any changes.
Sections tab are below the Save and Cancel buttons. The Section tabs are numbered to indicate the sequence in which they will appear on your web page. Empty sections do not display or use any space on your web page. Empty sections can be used as invisible placeholders for future insertions. So, you can skip over a section and leave it empty if you plan to add text in that position sometime later.
To open a section for editing, just click on its Tab. The current text for the Heading of the selected Section will display in the box below "Heading". The current wording in the "Body" of the selected section of the web page will display at the bottom of the Edit screen beneath the Editing Tools.
You can type or paste text into the Heading and Body of a Section. Section Headings are not required, but they are highly recommended to aid readability.
The box for the Body of text is large enough for most topics. However, it is possible to enter more text in the Body of a section than you can see all at once. A vertical scroll bar appears when there is more text in the box than is visible on-screen.
To remove all of the current text in both the Heading and in the Body, click the Clear button beneath the Section tabs. Clicking Clear will remove the text only from the displayed Section, and leave the Edit screen open. Normally you will want to clear the boilerplate text in all sections for "About Me" and enter your own professional and personal information.
To insert text from one of the system templates into the Heading and/or Body of your web page, click on the "Select Pre-defined Text" button beneath the Section tabs.
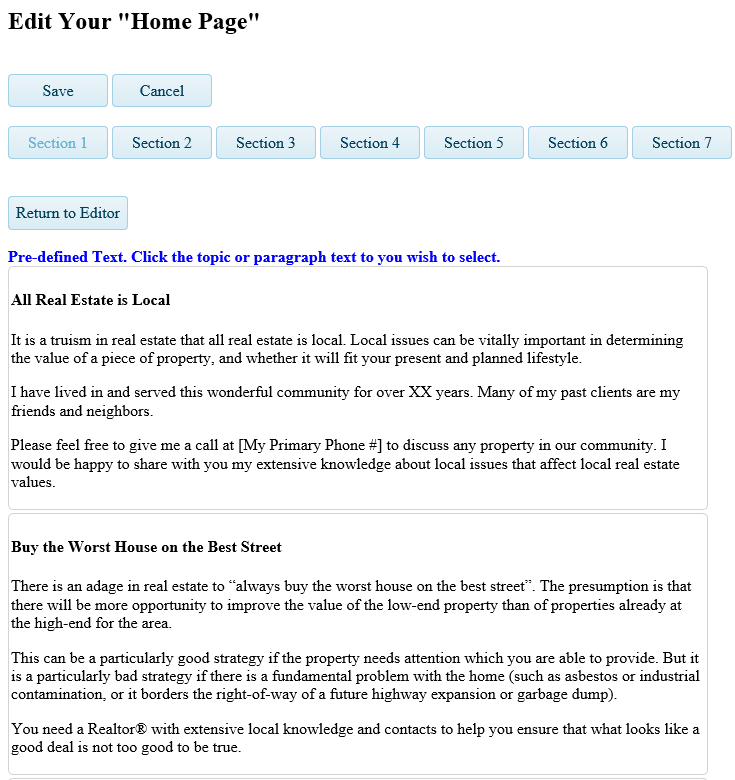
On the screen of pre-defined text templates (see image to left), confirm the correct numbered Section tab is selected at the top, then scroll down to the template to be used. Click on the template Heading (in bold type) to copy all of that template's wording, including its heading. If you want to use several but not all paragraphs in the template, select its heading and plan to delete unwanted paragraphs after you insert the entire template in the Body of the web page. Otherwise, click on an individual paragraph to copy just its wording. After selecting either one paragraph or one template, scroll to the top of the list of templates (below the Section tabs) and click the "Return to Editor" button.
On the web page Edit screen (displayed above), if you selected an entire Template, click the "Replace Section with Selected Pre-defined Section" button beside Heading to replace the current text in both the Heading and Body of the selected Section. Otherwise, click at the location in the Body where you want to insert text from a template, and then click the "Insert Selected Pre-defined Text" button beside "Body".
Both the Heading and Body of text can be changed, replaced, or added to once they have been copied into a Section. You can use your mouse to paste text or an image from other sources. You also can use standard keyboard commands such as
| WINDOWS | Apple MAC |
| Paste = Ctrl+V key | Paste = Command |
| Select all (highlight) = Ctrl+A key | Select all (highlight) =
Command |
| Undo = Ctrl+Z key | Undo = Command |
| Redo = Ctrl+Y key | Redo =
Command |
When copying, always verify that inserted material displays properly, and be careful to respect copyrighted material. Remember that your web pages will be accessible to the worldwide public on the Internet.
Extensive Editing Tools are displayed in a toolbar above the text for the Body of the web page. There are editing buttons to Format and Align text, Insert symbols, images or hyperlinks, create a table, view HTML code, and Remove formatting.
To save changes to all sections of the web page, click the Save button at the top of the edit screen before changing to any other function. Clicking Save will close the edit screen and return to the Agent Control Panel.
▲ Return to Table of Contents ▲
Click the Search Engine button in the Agent Control Panel to customize your website Homepage Title, Website Description, and Internet Search Engine Keywords. Careful selection of these items for your website may help increase the prominence of your website to Internet Search Engines. This in turn can help more potential clients find your website.
Your Homepage Title goes in the Top box on this page. The title should be a brief, unique descriptive tag or label for you and your business. It must be less than 66 characters long, including spaces. Think of your title as an advertising Headline for your business. It is what typically appears in the tab at the top of the browser when someone is viewing your web page. If your website is selected in an Internet search results page, this title will usually appear in the first line of the results as an identifier for your website.
Your Web page Description goes in the middle box. It should accurately summarize your business in about 25 to 30 words or less (the maximum is 150 characters including spaces). If your website is selected in an Internet search results page, this description may be displayed as a snippet in the results. Consumers typically use these snippets to help determine if your website is likely to contain the kind of information they are searching for.
Your list of Keywords should be entered in the Bottom box. Keywords should be words or short phrases that are actually used on your website and that reflect the theme and content on your site. Keywords should be what you would expect your target clients to enter as search terms in Internet search engines (like Google, Bing, and Yahoo). To be effective, keywords must be spelled exactly as used by the public. Do not go overboard with a long list, and do not list unimportant or non-specific words. Your keyword list should focus on what is most important and distinctive about you and your services.
At the top of the Agent Control Panel, your can check to "Disable Agent Web." This is not normally checked unless you want your clients to only use a third-party hosted website. In this case you also should customize the message in the Client Notification section of Client Manager so your automatic notifications will include the desired link to your third-party hosted website instead of to your MLS sponsored website.
Warning: If you "Disable Agent Web" in the Agent Web Control Panel, the public will not be able to access your website. Also, if you disable your Agent Web you should set the "Client Report Style" to "Email Property links” (instead of "Send Search Results to the Client's Website"). Otherwise, any auto-notification link to "View All Properties" will fail.
The public can access and use many features on your Agent Website. The public can view your personal information (on your Home page and "About Me" page), your contact information (on every page), your agent listings, and your office listings. They also can perform simple searches by form type and map location, and see listing details and photos. To save their search results, users can register their name and email address on your Agent Website. Navigator will then automatically create and email them a secure personal password. (Note: Users cannot specify their password.)
Registered users (clients) can save their searches, rate properties, save properties to a favorites list, see listings personally recommended by you, or be notified automatically when new listings or changed listings match their preferred criteria by signing into your Agent Website. When registered users sign into your Agent Website their Saved Searches serve as a Client Portal to access these personalized search results. You can register your clients by entering their name and email address in Client Manager, or users can register themselves by entering their name and email address on your Agent Website. Navigator will automatically create and email a short password to clients who register themselves. If appropriate, you can trigger Navigator to send your Agent Website address and a personal password to a client by clicking on the "Reset and Send Password" button in the client's record.
This concludes the tutorial on Customizing Your Agent Website in CTI Navigator Web II.
▲ Return to Top of this Webpage ▲
To return to the Index of Tutorials for CTI Navigator Web II, click here.
[rev.12.01.2017]