Addressing Email
This tutorial describes how to use the Address Book in CTI Navigator Web II to access and use Client, Agent, Office and Affiliate contact information stored on the MLS server.
-
To see how to create and address a new Email Message, and how to to Use Message Templates (including your default Email Signature), click here.
-
To see how to create Email Reports and Documents, click here.
Contents
Click on a topic in the table below to go directly to that section in this tutorial.
Touchscreen Note. Where instructions are to select or click, touchscreen device users would press or tap as appropriate for your device.
Overview
You can open your Address Book directly from the Home Page Links, from Navigator's Tools menu, or from a New Message screen. If you open the Address Book directly, click the appropriate tab (Clients/Agents/Offices/Affiliates), check the box beside the name of one or more recipients (under one or more tabs) to select them, and then click the Email button in the top toolbar to open a New Message screen. Your new message will be addressed "To" the selected address or addresses.
To copy your email to other recipients, click on the "CC, BCC and other options" button. This will expand the email screen to display individual Carbon Copy (CC), and Blind Carbon Copy (BCC) fields. Other options will also display that allow you to select files to Add as Attachments, to "Insert Merge Field", and to insert a pre-written message Template .
To address your message to other recipients, click on the appropriate CC or BCC button, click on the appropriate tab (Clients/Agents/Offices/Affiliates), check the box beside the name of one or more recipients to be copied, and then click the OK button to return to the New Message screen. The email address for each selected recipient will display beside (or beneath on narrow screens) the CC or BCC address button that you initially selected.
To remove all addresses in an address box (To, CC, or BCC), click anywhere inside the box, and then click the X that appears in the far right side of the address box. To selectively remove individual addresses in an address box, highlight the address and delete it using the command appropriate for your device.
If you clicked "E-mail" under the Options button on a Summary or Details search results screen, check the desired Properties under "Selection Options", select the desired Report and Viewer Options to include, and then click the "Continue" button above the "Selection Options" near the top left of the email window. This will open a New Message screen on which you can click the "To", or "CC, BCC and other options" buttons to open and use your Address Book.
You can manually type in the email address for recipients (whether or not they are in your Address Book). To send to multiple recipients, type a semi-colon between email addresses (recipient1address; recipient2address;...). If desired you can leave one space after the semi-colon to make the string of addresses more legible.
▲ Return to the "Addressing Email" Table of Contents ▲
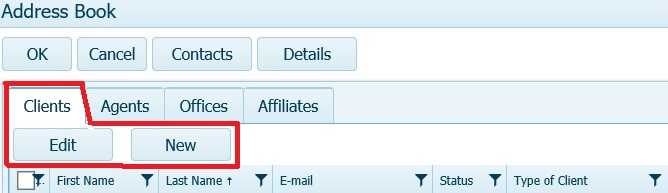
Address Book
When you open your personal Address Book directly (from Home Page Links or Menu-bar Tools), there will be buttons at the top of the screen for Contacts, Details and Email, and tabs below these buttons for Clients, Agents, Offices, and Affiliates.
To use information in your Address Book, first select the appropriate tab. The Offices Tab with the Office information headings, and the Affiliates Tab with Affiliate information headings are shown in the Address Book screens below.


To see the Agents Tab and description, click here. To see the Clients Tab and description, click here. You can Sort or Filter the information under any of these tabs (as described below) to find and select the names (with email addresses) you want to use to address your email message.
After selecting one or more recipients (under the appropriate tab), you can either
-
Click the Email Button to open a New Message screen with the selected recipient's email address displayed in the "To" address field (see "Move Address" below); - or -
-
Click the Details button to display the contact information (such as phone number, email address and office) for the last selected recipient.
On the Details screen, you can either:
-
Click on a phone number to activate your device's communication app to dial the number for you if this supported by your device; - or -
-
Click on an email address to open your device's default email handler (instead of emailing through Navigator's email app); - or -
-
Click the Email Button to open a New Message with the selected recipient's email address displayed in the "To" address field (see Move Email Address" below); - or -
-
Click the
-
Click on any button in Navigator's menu-bar to close the Details screen without taking any of the preceding actions.
Agents Tab
The Address Book toolbar with Agents Tab selected and the agent information headings is shown below:

When selected, the Agents tab displays a special "Show Office Agents..." button in the toolbar above the tab. To see a list of all agents in a particular Office, click on the "Show Office Agents" button on the Agents tab screen and select the name of the desired office. To return to the list of all agents, click the X button beside "Show Office Agents".
Filter
To find a specific person or office by name (whether or not
currently displayed) under any tab in the Address Book, you can click the filter icon
![]() in the appropriate column heading, and enter the desired name or partial name in
the first empty box below "Show items with value that:".
Then set the filter to the appropriate option by clicking on the "Is equal to
in the appropriate column heading, and enter the desired name or partial name in
the first empty box below "Show items with value that:".
Then set the filter to the appropriate option by clicking on the "Is equal to
![]() "
button
immediately below "Show items with
value that".
"
button
immediately below "Show items with
value that".
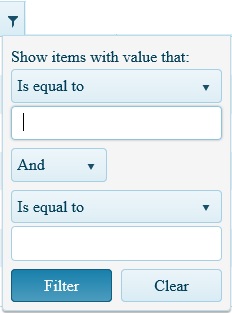
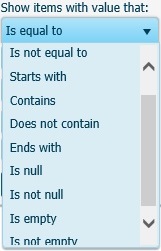
If you know the exact spelling
of the desired item name, leave the filter set to "Is equal to". But if you are only sure how to spell the
beginning of the name, click on the "Is equal to
![]() "
button and set the filter to "Starts
with" (or "Contains" as appropriate). For Clients and Agents, be careful
to select the filter in the
heading of the desired First Name or Last Name column.
"
button and set the filter to "Starts
with" (or "Contains" as appropriate). For Clients and Agents, be careful
to select the filter in the
heading of the desired First Name or Last Name column.
Click the Filter button at the bottom of the filter setting screen to apply the filter as specified. To remove filtering, click the filter icon in the column heading and click the Clear button at the bottom of the filter setting screen.
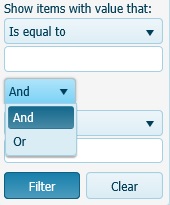
Dual Filter. A filter can have two values and their
relationship will be determined by the setting of the And/Or button between them
on the filter screen. Enter a name or string of characters
in the first empty box and a different set of characters in the second empty box
on the filter screen. Use "And" (the default setting) between the two
values when items must match both values to pass the filter and be
displayed. Click on the "And
![]() "
button and select "Or" when items can match either value
specified.
"
button and select "Or" when items can match either value
specified.
For example, to list all brokers but exclude broker associates under the Agents tab, you can click on the filter icon in the Designations column > leave "Is equal to" set for the first value > enter broker in the first filter box > leave "And" set in the middle > click on the "Is equal to
" button below the "And
You can filter by any field that displays the filter icon. Also, you can set filters in several columns. Filter settings are retained until you close your Address Book.
Sort
To sort by a column, click on the column heading. An
Upward pointing arrow  (such as beside "Last Name" in the Agents tab image above)
indicates that the items in that column are sorted in Ascending order
(starting with the lowest letter, such as A, or smallest number at the top of
the column). A Downward
pointing arrow
(such as beside "Last Name" in the Agents tab image above)
indicates that the items in that column are sorted in Ascending order
(starting with the lowest letter, such as A, or smallest number at the top of
the column). A Downward
pointing arrow  indicates that the items in that column are sorted in Descending order
(highest letter, such as Z, or largest number at the top). Each click on the
heading will toggle the sorting up, down, or off (no arrow displays when the
column is not sorted).
indicates that the items in that column are sorted in Descending order
(highest letter, such as Z, or largest number at the top). Each click on the
heading will toggle the sorting up, down, or off (no arrow displays when the
column is not sorted).
Select
To select a person or office in the Address Book, check the box in the first column beside the name. You can check multiple names. To select ALL displayed names, check the box in the Heading of the first column. If a selected recipient does not have an email address in the address Book, they will not appear on a New Message screen.
At the bottom of the page. you can set the number of
Items displayed
per page, see the total number of items, and/or scroll through the
pages.
![]()
Address Book opened from New Message screen
When
you open the Address Book by clicking on an Address button
(To, CC, or BCC)
on a New Message screen,
four (4) action buttons will appear at the top of the screen:
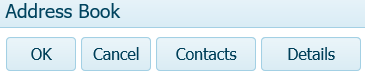
After selecting one or more recipients (under the appropriate tab) in the Address Book, you can either
-
Click the OK button at the top of the Address Book screen to return to the New Message screen with the selected recipient's email address displayed in the address field (To, CC, or BCC) from which you opened the Address Book (see "Move Email Address" below if desired).
-
Click the