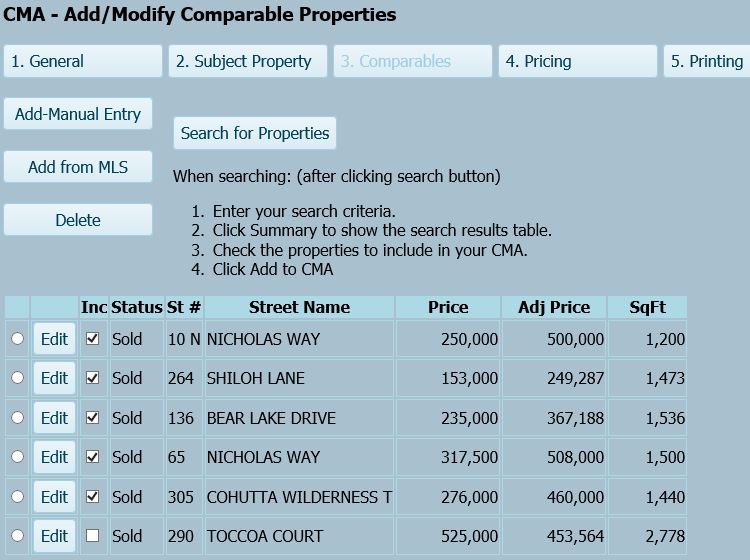
CMA - Add/Modify Comparable Properties screen
To edit one or more comparable properties, select CMA in
Navigator's main menu-bar, open an existing CMA in the CMA Manager (or start a
new CMA), and then select the Comparables tab. This will open the “CMA
- Add/Modify Comparable Properties” screen. Comparable properties must be
added to this screen before you can adjust their pricing. For instructions on
how to add comparable properties to a CMA (using the "Add-Manual
Entry", "Search for Properties" or the "Add from MLS" buttons on this screen), see the
“Overview of Creating CMAs”
tutorial.
 (Click on image to enlarge an
example "CMA - Add/Modify Comparable Properties"
screen)
(Click on image to enlarge an
example "CMA - Add/Modify Comparable Properties"
screen)
Warning: After completing your adjustments to the comparable properties for the current CMA, you must return to the "CMA - Add/Modify Comparable Properties" screen and click Save. Otherwise, none of your changes will be retained.
▲ Return to Table of Contents ▲
CMA - Add/Revise a Comparable Property screen
Edit Button
To make an adjustment to a property listed on the “CMA - Add/Modify Comparable Properties” screen, click the Edit button in the row containing the property's street Address (see example image above).
Note that the round button in the first column beside a listing is to select it to be deleted when the Delete button is clicked. The checkbox in the Include (Inc) column is to select the listing(s) to include in the CMA. Only properties checked in the Inc column will be included in the CMA pricing computations and report.
Clicking the Edit button will open the "CMA - Add/Revise Comparable" screen. This screen contains a toolbar with buttons to Save (Ok) or Cancel any changes to the selected Comparable, set the property location on a Map, add or replace the property Photo, or make Adjustments to the price. It also displays the current information for the selected Comparable Property and for the Subject Property in three columns: Field Name, Subject Property, and Comparable Property.
Only the information for the Comparable Property can be edited. The features of the Subject Property are displayed for reference and cannot be changed on this screen. (To edit the Subject property’s features, click Cancel or Ok to return to the "CMA - Add/Modify Comparable Properties" screen, click the Subject Property tab, and then click its Edit button.)
In the Comparable Property column you can select and modify any of the information displayed for a comparable property as appropriate.
- The Address and Zip Code shown are used to help set the property location on the Map. Click and type in the appropriate data entry box to modify the address if appropriate.
- “Approximate Square Feet” is used in automatic pricing adjustments. If this field is empty, it will be treated as the number Zero. Zero will distort pricing adjustments that are based on square footage, and can produce misleading statistical averages. [So be sure that square footage is entered where applicable - especially for Sold Comparables.]
- In the boxes for Features and Remarks, edit the text so that all the text that you want to display in your CMA report fits visibly inside the box without scrolling. To delete or move up text that is below the bottom of the box, click inside the box and either use your mouse, your keyboard Down Arrow or “Page Down” key, or finger on a touchscreen to scroll down. When displayed in the CMA report, text that is below the last visible line in a Features or Remarks box will overflow into the margin and appear partly or completely cut-off. It is best to remove text below the bottom line. This affects only the CMA report.
- The current Adjusted Price for the property is displayed above the thumbnail photo on the "CMA - Add/Revise Comparable" screen. If you make a change on this screen that impacts price (such as Sale Price or Square Footage adjustments), the Price Adjustment will be reflected when you click either the Ok button or the Adjustments button at the top of the screen.
- Click on the Map button set the property location on the Map by either Address, Longitude-Latitude, or manually (see Map button section below for details)
- Click the Photo button to add or replace the photo for the comparable property.
- Click the “Ok" or "<Back” button at the top of any edit screen to temporarily save changes you made on that screen. These temporary changes will not be saved to the MLS server as part of the CMA until you save the CMA package itself. To permanently save changes, click the “Save” button in the CMA toolbar at the top of most CMA screens.
▲ Return to Table of Contents ▲
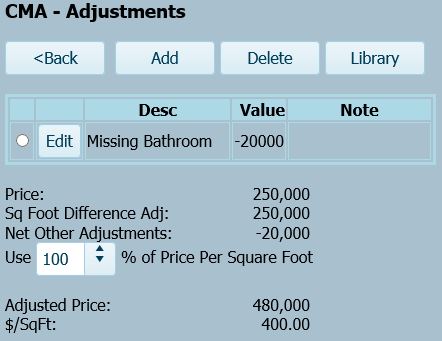
CMA - Adjustments Screen
Adjustments Button
Click the Adjustments button at the top of the
"CMA - Add/Revise Comparable" screen to
open the "CMA - Adjustments" screen where you can make price adjustments for other specified features. Price adjustments typically
are made to compensate for differences in location, land, frontage, square
footage, number of bedrooms and baths, age, and so forth. Basically, adjustments
are made for any attributes that could meaningfully affect the market value of the
property in relation to the Subject property.
 (Click on image to enlarge an example "CMA - Adjustments"
screen)
(Click on image to enlarge an example "CMA - Adjustments"
screen)
There are three (3) ways to enter price adjustments on the "CMA - Adjustments" screen:
1. Click the Add button (described below) to enter a new adjustment value just for this property; - or -
2. Click the Library button (described below) to enter a new adjustment into your Library of re-usable adjustments, or to apply an existing adjustment from your Adjustment Library; -or-
3. Change the percentage of “Price per Square Foot”, if this is applicable. This percentage is displayed in the small box below "Net Other Adjustments." Reducing the % reduces the effect of differences in square footage. This type of adjustment may be applicable, for example, when the value of the land (lot size) for comparable properties substantially exceeds the value of the building(s); or when a substantial area of otherwise comparable buildings is un-finished, unheated or otherwise lower quality (such as below grade). Note that the "% of Price Per square Foot" adjustment applies to all comps in the CMA. Use 100% normally (which is the default).
The Adjusted Price on the "CMA - Adjustments" screen will dynamically change whenever an adjustment is entered.
Add Button
To enter a new adjustment directly, click the
Add
button in the toolbar at the top of the "CMA - Adjustments" screen. This will open
the "CMA - Add/Edit Adjustment" screen
![]() (click on image to enlarge a blank "CMA
- Add/Edit Adjustment" screen)
(click on image to enlarge a blank "CMA
- Add/Edit Adjustment" screen)
where you can enter:
Enter a Positive adjustment Value to increase the price of a Comp to statistically approximate what it would be worth if it had a feature that the Subject property has but the Comparable lacks. For example, if the Subject property has water frontage but the comparable property does not have water frontage, the sold price of the Comparable should be increased to approximate what it would have sold for if it had water frontage. In general, enter a Positive adjustment to add the dollar value of a feature that the Comparable does not have but the Subject property does have. The default value will be positive until you click on the "+/-" button (which toggles between positive and negative).
On the other hand, if the Comp property has water frontage but the Subject property does not have water frontage, a negative adjustment should be applied to reduce the Comp's price to approximate what it would have sold for without water frontage. In general, enter a Negative adjustment to remove the dollar value of an extra feature that the Comparable has but the Subject property lacks.
Click on the Ok (or Cancel) button at the top of the "CMA - Add/Edit Adjustment" screen to return to the "CMA - Adjustments" screen.
The CMA function will automatically apply a positive or negative adjustment for square footage when square footage is provided. The CMA uses the average price per square foot to calculate the effect of differences in square footage on price. Be careful that none of your Sold Comps are missing square footage (where applicable) because just one listing with zero square feet will drastically skew the average price.
Library Button
Check the Library button at the top of the "CMA - Adjustments" screen to enter a new adjustment to or apply an existing adjustment from your Library of re-usable adjustments. Your Adjustment Library is the same for all of your CMAs.
▲ Return to Table of Contents ▲
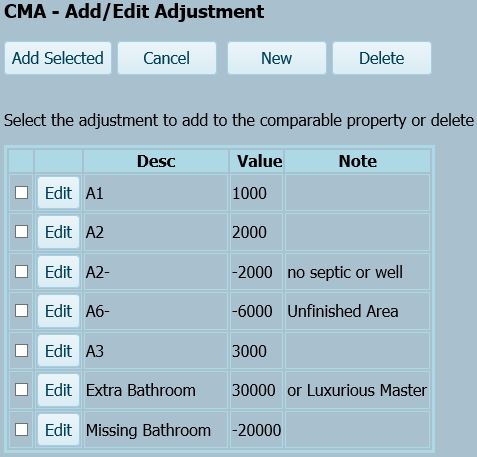
CMA - Add/Edit Adjustment screen
 (Click on this image to enlarge an example "CMA - Add/Edit Adjustment"
library.)
(Click on this image to enlarge an example "CMA - Add/Edit Adjustment"
library.)
New Button
To create a new adjustment in your Adjustment Library, click the New button in the toolbar at the top of the "CMA - Add/Edit Adjustment" screen. This will open the same screen as the Add button on the "CMA- Adjustments" screen described previously. When you add your adjustment into the Library, it is not automatically applied to any property.
Add Selected Button
To apply one (or more) of the adjustments in your Library to the current Comparable property dollar value, check the selection box in the first column beside the adjustment on the "CMA - Add/Edit Adjustment" [Library] screen, and then click the "Add Selected" button at the top of the screen. The selected adjustment will display on the "CMA - Adjustments" screen and its value will be reflected in the Adjusted Price.
Delete Buttons
To remove an adjustment from either the Library or in the List of Applied Adjustments, click the round radio button in the first column beside the adjustment, and then click the "Delete" button at the top the screen.
- Deleting an adjustment from the "CMA - Adjustments" list will remove the effect of that adjustment on the selected property, but will not remove the adjustment from your Library of Adjustments.
- Deleting an adjustment from the Library of Adjustments will permanently remove it from the Library, but will not automatically remove it from the "CMA - Adjustments" list if it has been applied already to the current comparable property.
Edit Buttons
To Edit an adjustment in either the Library or in the List of Applied Adjustments, click on its Edit button. This will open a "CMA - Add/Edit Adjustment" screen. To change the Positive or Negative Value of an Adjustment, click its plus/minus button. Click the Ok button at the top to save the change. If the adjustment was already applied, any change will be reflected automatically on the "CMA- Adjustments" screen.
Back Button
Click the Back button in the "CMA - Adjustments" screen toolbar to return to the "CMA - Add/Revise Comparable" screen for the selected comparable property.
▲ Return to Table of Contents ▲
Map Location Button
Click the Map button on the "CMA - Add/Revise
Comparable" screen to view the location of the selected comparable property
on a map. It will be indicated by a colored
locator pin (![]() )
.
The location is initially calculated from the property's address and zip code.
If appropriate, you can temporarily modify the address on this screen, and then
click on the "Find by Address" button to automatically re-locate the pin.
)
.
The location is initially calculated from the property's address and zip code.
If appropriate, you can temporarily modify the address on this screen, and then
click on the "Find by Address" button to automatically re-locate the pin.
To change the property location on the map, either click-hold-and-drag the pin to a new location; or click the "Set Location" button, and then click on the map position where you wish to place the pin. You can then zoom in and drag the pin as need for fine adjustment to the location.
Any map location changes that you make in the CMA function will affect only the property locations displayed in the CMA report.
When you have finished making changes, click the Ok button at the top of the CMA- Map screen to return to the "CMA - Add/Revise Comparable" screen.
Photo Button
Click the Photo button to browse to a folder that contains the desired image file. To add or replace the photo for the comparable property, select and open the desired image file. It will open in the "CMA - Photo" image editor. For instructions on how to edit the size and orientation of the photo area that will be captured, see "Edit Image screen" in Navigator's "Add or Edit a Listing or Rental" tutorial. After completing any desired changes, click the Save button to add the photo to the current comparable property. Since CMA's can display only one photo per property, adding a new photo will replace any existing photo.
Clicking Save or Cancel on the "CMA - Photo" screen will return the view to the "CMA - Add/Revise Comparable" screen.
Click the Ok button on the "CMA - Add/Revise Comparable" screen will return the view to the "CMA - Add/Modify Comparable Properties" screen.
Warning: None of your changes to the comparable properties for the current CMA will be retained until you click Save at the top of the "CMA - Add/Modify Comparable Properties" screen.
This concludes the Edit Comparable Properties in CMA tutorial for editing CMA Reports in CTI Navigator II.
▲ Return to Table of Contents ▲
[Edit_CMA_Comparables.aspx<>rev. 07.03.2017]