- Choose Gmail
- Enter your Username in the empty box beside @googlemail
- Click the "Grant Access" button
The Desktop version of CTI Navigator sends email out through whatever email program and email account is set in Windows (or in the Desktop mode of Windows 8) as the default for email service. You can click here to select the appropriate instructions to setup your preferred Email Program as the default email handler in your Windows (or scroll down to the Index of Topics below).
Both browser based versions of CTI Navigator send email out through CTI's national email provider by default (no setup is necessary and it doesn't matter whether your device is running a Windows or Apple computer operating system). CTI Navigator Web Silverlight also can be set to send out email through your personal Gmail account instead of through CTI's email provider. Your Gmail account can be set to send mail (such as MLS reports) as if From a non-Gmail address. Click here for instructions on using Gmail in CTI Navigator Web Silverlight. Note that MLS reports emailed from CTI Navigator Mobile on your Smartphone, tablet or Phablet are sent through the same email provider as set in the browser based version of CTI Navigator.
Contact your Internet Service Provider (ISP) or your email account provider for instructions to setup access to their email service in email "client" programs that run inside a computer (not just on the Internet). Email client programs include Windows Live Mail (for Windows 7, 8 and 10), Windows Mail (for Windows Vista), Office Outlook (purchase for Windows or Mac), Mozilla Thunderbird (for all versions of Windows), Opera Mail, or Outlook Express (for XP). Some dedicated email providers also can be setup to send and receive email through Office Outlook or Outlook Express. However, "Webmail" programs that are strictly Internet based (such as MSN Hotmail or the free version of Yahoo! Mail) use HTTP servers that do not share data objects (such as HTML links or file attachments) inside Windows, and therefore cannot be used to directly email MLS reports out of Windows. Windows Mail in Vista does not support HTTP email. The "Mail" app in Windows 8 and Windows 10 does not support MAPI, so it does not interface with Desktop apps such as CTI Navigator Desktop. (See note under Yahoo! Mail Plus for a free proxy service that might be used to access a free Yahoo! Mail account in Windows.)
Microsoft offers two options for free (advertisement supported) e-mail through their "Windows Live" suite of services. The options are for Windows based "Windows Live Mail" (which is no longer downloadable but existing installs still run), or for web-based "Windows Live Hotmail". Microsoft also offers a paid "MSN Premium" account that allows you to send and receive email through Outlook Express or Office Outlook XP (2002) and later.
Yahoo.com offers a paid "Ad Free Mail" POP3 service that allows you to send and receive email directly through Windows Live Mail or Outlook Express (see "Yahoo! Ad Free Mail" in related articles below). Google's free Gmail (See "Gmail Help" in related articles) can be configured in popular email clients such as Windows Live Mail, Thunderbird, Opera Mail, Office Outlook, or Outlook Express to send and receive Gmail email through Windows (see related article, "Gmail POP Troubleshooter"). AOL uses IMAP servers to interface with email in Windows.
There are several third party "MAPI-to-Webmail" utility programs (such as Affixa, MAPI4Webmail, and TVHGoogleMapi) that can redirect Mapi code for Windows email to supported webmail services such as Gmail. While not email programs themselves, these utilities can act as a MAPI interface between Windows email and Webmail. See how to install Affixa below.
Click here for a description of the special email issues with Windows 10, 8, 7 and RT.
You need to know the following information to setup email service in a third party email client program (such as Windows Live Mail, Office Outlook, Mozilla Thunderbird , or Opera Mail) or device::
This email server setup information is normally available from whoever provides you with your email address (your email host or your Internet Service Provider). If you are already familiar with the process of setting up email client programs, see the "Summary Table of Server Settings for Common Email Service Providers" at the end of this web page for quick reference to the settings for commonly used email providers. Otherwise, select your email client or service in the following index for appropriate setup information.
In the topic list below, click on the email service or program that you are using to go directly to appropriate setup instructions (or contact your email provider for setup instructions):
Other information on using email with CTI Navigator:
▲ Back to the Top of this webpage ▲
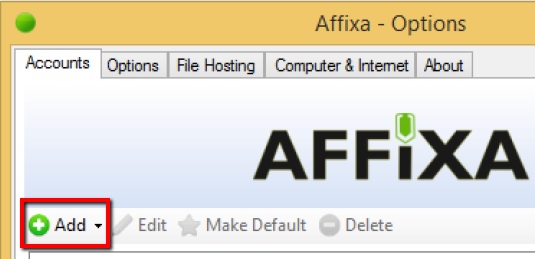
CTI Navigator Desktop email uses Windows Mapi code. Affixa is a Mapi handler utility program that can redirect Mapi code for Windows desktop email to supported Internet webmail services. The free-for-personal-use "Desktop" version of Affixa can redirect Windows Mapi email code to Gmail for a single mail account. The subscription based "Enterprise" version of Affixa (which costs less than $5 per year for one user) can redirect Windows Mapi email code for multiple mail accounts to Gmail, Google Apps, Office 365, Outlook Web App (OWA), and Zimbra for enterprise systems.
To set Affixa to send Navigator Desktop Email to your Internet Gmail account by default in Windows:

Email reports from CTI Navigator Desktop will be automatically transferred as attached links to the Drafts folder (not the Compose screen) in your Gmail account when Affixa is set as the Default Email handler in Windows (as described above). Affixa can be set to open the draft message automatically in Internet Explorer; or in Firefox or Chrome by installing the "Gmail Draft Display" add-on in Firefox or "Gmail Draft Display" extension in Chrome.
Unless some other email application (such Office Outlook, Mozilla Thunderbird, or Windows Live Mail) is installed, Outlook Express is the default mail handler in Windows XP and earlier, and Windows Mail is the default mail handler in Windows Vista. (Windows 7 does not include a default email handler.) To setup these parts of Windows to send and receive your email through the account you have with an email provider (such as Alltel, AOL, AT&T/BellSouth, Comcast, Embarq, Gmail, RoadRunner, Verizon, or Windstream):
To leave email on a mail server (so the same messages downloaded into Outlook Express or Windows Mail can also be read on the Internet or on another computer):
To not download email from a mail server into Outlook Express or Windows Mail on a computer (but still allow Windows to send mail out though Outlook Express or Windows Mail):
Outlook Express cannot be installed in any version of Windows later than XP. For more information on using Windows Mail, see the related article, "Using Windows Vista and Windows 7 ." For Microsoft's Windows Vista instructions, see the related articles below, "Setting Up Windows Mail Account from Start to Finish" and "Using Windows Mail in Vista".
Note: If User Account Control (UAC) is enabled in Vista, Windows Mail (or Office Outlook if installed) typically must be closed before MLS reports can be transferred from CTI Navigator into Windows Mail (or Office Outlook) using Microsoft's email coding. Otherwise, Vista's UAC may treat the email transfer as a separate login attempt and block it. To fix a "Login Failed...clsSendMail_Send" error message, close Windows Mail (or Office Outlook) and use the Windows Task Manager to end the WinMail.exe process (or Outlook.exe process) if it is still running (described in the instructions for Vista in the related article, "CLS Send or Mapi error in Email").
▲ Back to the Index of Topics or ▲ Back to the Top of this webpage ▲
Microsoft provides detailed instructions online for how to add or remove an e-mail account in Outlook (see "Outlook 2016, 2016 Email Setup" in the related articles at the end of this webpage). Following is a summary of the basic information to setup email in Microsoft Outlook 2010 and later.
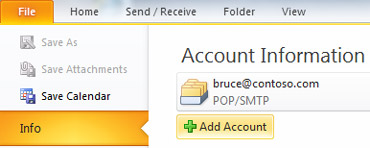
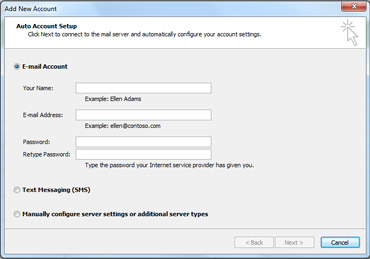
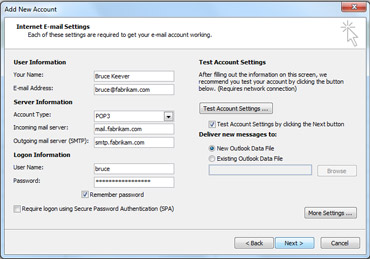
Outlook Collaboration Fix: Unlike previous versions of Office Outlook, Microsoft does not provide collaboration code (CDO) to allow Outlook 2010, 2013, or 2016 to accept e-mail messages created by Windows programs (like CTI Navigator) that are not part of the Microsoft Office suite. Therefore CTI has created special programming to allow CTI Navigator to transfer MLS reports through Windows into the default (32-bit) version of Outlook 2010, 2013 or 2016 (and also work with Microsoft's CDO code when activated in Outlook 2007 and 2003). For 64-bit versions of Outlook see 64-bit Outlook Note below. These files from CTI will only affect e-mail originating from CTI Navigator. After these special files have been installed on a computer where Outlook is the default mail handler, e-mail reports from CTI Navigator will send out through Outlook whether or not it was already open.
To install this special programming so that MLS reports or MLS contacts can be e-mailed through (32-bit) Outlook, first close both CTI Navigator and Office Outlook. Then download and unzip the CDO Fix file (below) appropriate for your version of Windows (CDO_Fix.exe for 32-bit Windows or CDOx86Fix.exe for 64-bit Windows). Do not change the "unzip to folder" from "C:\" unless you installed CTI Navigator in a non-standard location.
Windows Version Note: To determine whether your Windows is 32-bit or 64-bit, go to Start > Control Panel > System > then in the System section under the "System Type", look for either 32-bit or 64-bit Operating System. The 32-bit version of Outlook is the default installation in both 32-bit and 64-bit Windows. (To determine the version of Outlook, see the Outlook Version note below.)
Outlook 2013 and 2016 System Requirement. Office 2013 and later can be installed only on Windows 7 SP1 and later (8, 8.1 and 10). Installation in Windows Vista or XP is not supported.
Windows 10, 8, 7 or Vista with User Account Control ON (the default setting)
Windows 10, 8, 7 or Vista with User Account Control OFF
If User Account Control is OFF in Windows Vista and later, you can install CTI's CDO Fix files either as described above, or using fewer steps as described for Windows XP below.
Windows XP
64-bit Outlook Note: The default installation for Office is 32-bit. Unless you require Excel spreadsheets that are larger than 2 gigabytes, Microsoft recommends that the 32-bit version of Office (rather than the 64-bit version) be installed on both 32-bit and 64-bit Windows (see "Microsoft 64 bit editions of Office compared to 32-bit" in the related articles below). The 32-bit version of Office provides the same functionality as the 64-bit version and allows for better compatibility with Windows controls, add-ins, and third-party applications. To email MLS reports through a 64-bit version of Office Outlook 2010 (which is not widely used), install Microsoft's "Outlook Hotmail Connector 64-bit" instead of CTI's special codes. The free "Outlook Hotmail Connector 64-bit" connects e-mail and contacts from Windows Live Hotmail (which accepts text links from CTI Navigator) into 64-bit Outlook. Click here to download Microsoft Outlook 2010 Hotmail Connector 64-bit. Then use your free Windows Live Hotmail account in your 64-bit Outlook 2010.
▲ Back to the Index of Topics or ▲ Back to the Top of this webpage ▲
Outlook Version Note: To determine if Office Outlook is installed as 32-bit or 64-bit:
- In Outlook 2013 or 2016, click on File, "Office Account", then "About Outlook" and look for either 32-bit or 64-bit at the end of the version number.
- In Outlook 2010 or 2007, click on File, select Help or About, and look for (64-bit) at the end of the version number.
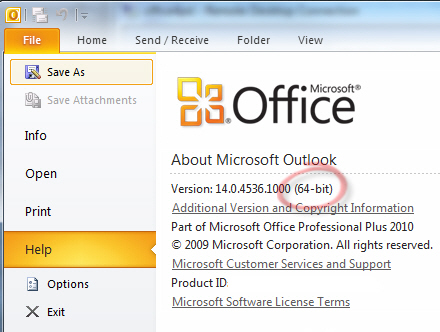
To setup email in Office Outlook 2007:
Download and install either CTI's CDO Fix files that work just for email from CTI Navigator (see Outlook Collaboration Note above; or install Microsoft's Collaboration Data Objects (CDO) for Office 2007 to collaborate with any Windows based, email program not part of Microsoft Office (see "Download Collaboration Data Objects for Office Outlook 2007" in the related articles below).
For Microsoft's detailed instructions, see Configure E-mail Accounts in Office Outlook 2007, 2003 & 2002 in the related articles below.
UAC Note: When using Microsoft's Collaboration Data Objects (CDO) in a version of Windows with User Account Control enabled, Office Outlook 2007 needs to be closed before MLS reports can be successfully transferred from CTI Navigator into Outlook.
▲ Back to the Index of Topics or ▲ Back to the Top of this webpage ▲
Default Email Program Notes:
▲ Back to the Index of Topics or ▲ Back to the Top of this webpage ▲
You can use the free "Opera Mail" with AOL, Gmail, Yahoo, MobileMe or any service that supports IMAP or POP protocols. Opera mail can be installed by itself, or built into the Opera browser for Windows or for Mac. Click here to go to Opera's online tutorial to setup Opera Mail Desktop.
Microsoft offers several options for free (advertisement supported) e-mail through their "Windows Live" suite of services. The options are for Windows based "Windows Live Mail"; or for web-based "Windows Live Hotmail" or "Outlook.com". (See note 1 in this section regarding using old grandfathered Hotmail accounts.) Although it is not often used, you also can install a free Microsoft Outlook Connector add-in (see Outlook Hotmail Connector below) to access and manage your Windows Live Hotmail or Microsoft Office Live Mail accounts in Microsoft Office Outlook 2010, 2007 and 2003.
End -of-Support: On January 10, 2017 Microsoft will
discontinue downloading or supporting Windows Live Mail (WLM).
Already installed email applications will continue to
work (except not for Microsoft accounts @Outlook.com, Hotmail.com, Live.com
or msn.com). Microsoft account users may want to switch from WLM to free
Thunderbird or Opera, or use a paid email program that
supports the standard Windows "mapi" messaging protocol. Note that the Mail
app in Windows 10 does not support mapi, so it will not support email
from Navigator Desktop. Also note that there is an increased security
risk associated with use of unsupported products past their end of support
date.
Install.
To install Windows Live Mail in your computer: go to
http://windows.microsoft.com/en-US/windows-live/essentials-other-programs > click
the Download Now button > select Mail > Run (or Save then Run) the
WLsetup-web.exe
file > follow Microsoft's installation prompts.
Add Account. To add your personal e-mail
account in Windows Live Mail: in the
top ribbon, select File > Options >
@ Email Account > Add >
enter your existing e-mail account information. Windows Live Mail will
automatically enter the server
settings for AOL, Gmail, Hotmail, LiveMail or YahooPlus accounts (unless you check "Manually configure server settings for
e-mail account"). Be sure to check "Remember this Password"
and "Make this my default email account" as
appropriate.
Warning: Sometimes this automatic setup fails to enter the correct outgoing SMTP server address and settings. (If needed, see Email Provider Server Settings Summary for common service provider setup information or contact your e-mail provider for details.) In this case, you can receive but will not be able to send messages from Windows Live Mail until the outgoing SMTP server address (and authentication required by your e-mail service provider, if any,) is corrected.Edit Account. To Add, View or Edit Account Properties, or Remove an email account in Windows Live Mail, click on File (or the Menu icon) in the top left of the screen, select Options,
 (click on image to enlarge), then select Email accounts...
Note: To access Accounts from a Tools menu in some versions of Windows Live, click the
Menus icon (next to the
Help icon) near the top right of the main screen (or press Alt+M keys), and select "Show menu bar" in the drop-down list .
Set Safety. To enter CTI's email domain (ctimls.com) as a Safe Sender which is allowed to email HTML messages (such as HTML formatted MLS Reports):
 (click on image to enlarge) > beneath "Download Images", check "Show
images and external content from email addresses in my Safe Senders list"
> click the OK button.
(click on image to enlarge) > beneath "Download Images", check "Show
images and external content from email addresses in my Safe Senders list"
> click the OK button.If desired, you also can install other optional components of the Windows "Live
Essentials" services (such
as Movie Maker, Photo Gallery, OneDrive, Family
Safety, Writer) from the
http://windows.microsoft.com/en-US/windows-live/essentials-other-programs
website.
These are not needed to use CTI Navigator.
To setup a Windows Live Hotmail account in Windows Live Mail: Open Windows Live Mail in your computer > Click "Add an e-mail account" button in the left pane (if it does not open automatically) > Enter your full Hotmail email address > Enter your Hotmail Password (by default "Remember password is checked) > Enter a Display Name (which does not have to be the same as your Hotmail user name) > click Next > Windows Live Mail should confirm that the setup succeeded.
To setup a Windows Live Hotmail account in Outlook Express: follow Microsoft's instructions at http://windows.microsoft.com/en-US/hotmail/help-center . The key configuration information is summarized at http://windows.microsoft.com/en-US/hotmail/send-receive-email-from-mail-client, or in the Summary of Common Email Provider Server Settings table near the end of this webpage.
Warning: According to Microsoft*, "Free Windows Live Hotmail accounts become inactive if you don't sign in for more than 270 days or within the first 10 days after signing up for an account. After an account becomes inactive, all messages, folders, and contacts are deleted. Incoming messages will be sent back to the sender as undeliverable. Your account name is still reserved. However, if the account stays inactive for an additional 90 days, the account name may be permanently deleted. If you don't use your Windows Live ID for 365 days, your Windows Live ID may be permanently deleted." To ensure that a Hotmail account remains open regardless of activity you must purchase a Windows Live "Hotmail Plus" subscription. [* http://windowslivehelp.com/solutions/settings/archive/2009/03/13/how-to-close-your-hotmail-account.aspx]
Note 1: Effective September 1, 2009, old Hotmail accounts that Microsoft previously "grandfathered" access in Windows (Outlook Express or Office Outlook) must be switched from Hotmail's HTTP servers to Microsoft's "Live.com" servers, or converted to Windows Live Mail. See the article "Hotmail Pop3 in Outlook Express" in related articles below. For a connector to Office Outlook, see the "Outlook Hotmail Connector" section below.
or ▲ Back to the Top of this webpage ▲Outlook Hotmail Connector
Outlook Hotmail Connector allows you to view and manage your Windows Live Hotmail e-mail, calendar, and contacts from within Office Outlook. Using Hotmail Connector with Outlook 2010 should allow you to send text link formatted email reports from CTI Navigator through a Hotmail account in Outlook.
To use Windows Live Hotmail in Microsoft Outlook 2010, 2007 or 2003 download the appropriate version of Microsoft's Outlook Hotmail Connector and then follow Microsoft's instructions (see "How to Use Windows Live Hotmail account in Outlook 2010" in the related articles at the bottom of this webpage).
- For 32-bit version of Office 2010, 2007 or 2003, click here (or select "Microsoft Outlook 2010, 2007 and 2003 32-bit Hotmail Connector" in the related articles below)
- For 64-bit version of Office 2010 only, click here (or select "Microsoft Outlook 2010 64-bit Hotmail Connector" in the related articles below)
To migrate Outlook Hotmail Connector features and settings to Outlook 2013 or 2016, click here (or select "Manually migrate Outlook Hotmail Connector features and settings to Outlook 2013 or 2016" in the related articles below).
Thunderbird by the Mozilla organization is a powerful and very popular Open Source (freeware), cross platform (Windows, Mac OS X, and Linux) email application alternative to Microsoft's paid Office Outlook program, and free Windows Live Mail, Windows Mail (only in Vista) and Outlook Express (only in XP). Thunderbird can be downloaded and installed in all current versions of Windows to handle your email (see "Download Thunderbird" in the related articles at the end of this webpage).
To setup Thunderbird to handle email in Windows, see Mozilla's "Automatic Account Configuration", "Thunderbird Help and Tutorials" or "Thunderbird Messaging Knowledgebase" in the related articles at the end of this webpage. The basic setup steps are summarized below.
Starting with version 3.0, Thunderbird can automatically configure email accounts that use major email providers as follows.
 (click on image to enlarge)
  (click on image to enlarge)
  (click on image to enlarge)
 (click on image to enlarge)
 ▲ Back to the Index of Topics or ▲ Back to the Top of this webpage ▲
To setup email in older versions of Thunderbird:
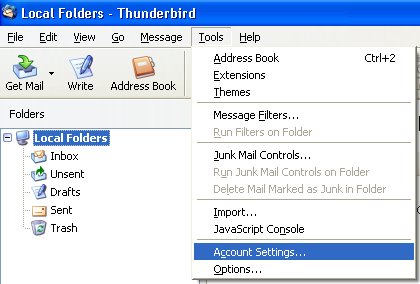
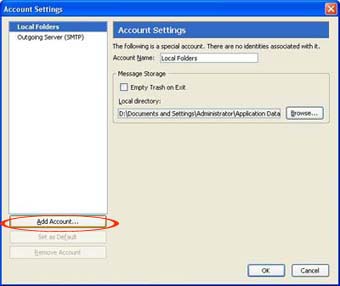
 (click on image to enlarge)
Warning: Do NOT save the password unless you are certain that it works in Thunderbird and is typed correctly. It is difficult to change a password once it has been saved.
To set an account to be the default for processing messages created by other programs (such as CTI Navigator) and transferred into Thunderbird by Windows, select Tools > Account Settings > highlight Your Account > click on Account Actions (at the bottom of the left pane) > click "Set as Default" (which will gray out once selected) > click OK.
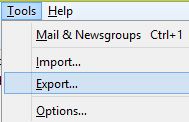

Note: For more options in importing or exporting contacts in Thunderbird, consider an add-on such as "ImportExportTools."
For additional help on Thunderbird, see "Thunderbird Help and Tutorials", "Thunderbird Messaging Knowledgebase", or "Fix CLS Send, No Valid ID, or Mapi error in Email" (also listed in Related articles and Internet Links at the end of this webpage).
▲ Back to the Index of Topics or ▲ Back to the Top of this webpage ▲
AOL allows Windows to connect to AOL's e-mail servers through Outlook Express, Office Outlook, Windows Mail, Windows Live Mail, Opera Mail, or Eudora using IMAP technology (instead of POP3). Instructions for creating and configuring AOL email in Windows email programs should be available at one of AOL's on-line support sites (see "AOL Help" in related Internet Links at the end of this webpage).
The key system entries for setting up to use an AOL account in Windows email programs are:
Mail Server is IMAP (not POP3 or HTTP)
Incoming mail server is imap.aol.com
Outgoing mail server is smtp.aol.com
Servers tab > Outgoing Mail Server > "My mail server requires Authentication" must be checked
Advanced tab > Server Port Numbers:
Outgoing mail (SMTP) port number is 587 (not 25)
Incoming mail (IMAP) port number is 143 (not 110)
(This is beside Outgoing Mail Server under the Servers tab of the E-mail Account property.)
▲ Back to the Index of Topics or ▲ Back to the Top of this webpage ▲
According to Yahoo, the ability to access Yahoo! Mail to send and receive email through a POP email client (such as Outlook, Outlook Express, Windows Mail, Window Live Mail, or Thunderbird) is only available to customers of the premium (subscription based) Yahoo! Mail Plus service. (See note below for a converter to access free Yahoo! Mail in Windows.)
To enable POP (the Internet standard "Post Office Protocol") for your Yahoo! Mail Plus account:
The key system entries for setting up to use a Yahoo! Mail Plus (or Ymail.com) account in a Windows email program are:
Mail Server is POP3
Incoming server is pop.mail.yahoo.com
Incoming Port is 995
"This server requires a secure connection (SSL)" must be checked
Log on using "Clear text authentication" should be selected if available in the email client.
Outgoing server is smtp.mail.yahoo.com
Outgoing Port is 465
"This server requires a secure connection (SSL)" must be checked
"My mail server requires Authentication" must be checked
Account Name/Login Name is your email address without the "@yahoo.com" or "@ymail.com"
Email Address is your full Yahoo! Mail address with @yahoo.com or @ymail.com.
For details, see "Yahoo! Mail Plus" in the related articles and Internet Links at the end of this webpage.
Note: Access to a free Yahoo! Mail account may be available through the free open source YPOPs application gateway (see the appropriate YPOPs link in the related articles and Internet Links below). The YPOPs service works as a proxy server to convert messages into the POP3 format used by Windows mail clients such as Outlook Express, Office Outlook, Mozilla Thunderbird and IncrediMail. Once installed in Windows, YPOPs can be set to access your Yahoo! Mail account through your Windows mail client.
▲ Back to the Index of Topics or ▲ Back to the Top of this webpage ▲
Google supports both POP and IMAP to access your gmail messages from other email programs, including Windows email programs. POP is simpler, and faster. However, according to Google IMAP offers the following advantages:
"Unlike POP, IMAP offers two-way communication between your web Gmail and your email client(s). This means when you log into Gmail using a web browser, actions you perform on email clients and mobile devices (ex: putting mail in a 'work' folder) will instantly and automatically appear in Gmail (ex: it will already have a 'work' label on that email the next time you sign in).IMAP also provides a better method to access your mail from multiple devices. If you check your email at work, on your mobile phone, and again at home, IMAP ensures that new mail is accessible from any device at any given time.
Finally, IMAP offers a more stable experience overall. Whereas POP is prone to losing messages or downloading the same messages multiple times, IMAP avoids this through two-way syncing capabilities between your mail clients and your web Gmail.
If you're trying to decide between using POP and using IMAP [with Gmail], we recommend IMAP." (Quoted from Google's "Getting Started with IMAP for Gmail" in the related articles and Internet Links at the end of this webpage.)
One downside to IMAP is that it often takes longer to synchronize because it downloads messages into more folders than POP3.
Note: You do not need to enable POP3 or IMAP to send email out of CTI Navigator Web.
▲ Back to the Index of Topics or ▲ Back to the Top of this webpage ▲
To enable other email programs to use Internet Message Access Protocol (IMAP) to access your Gmail account:
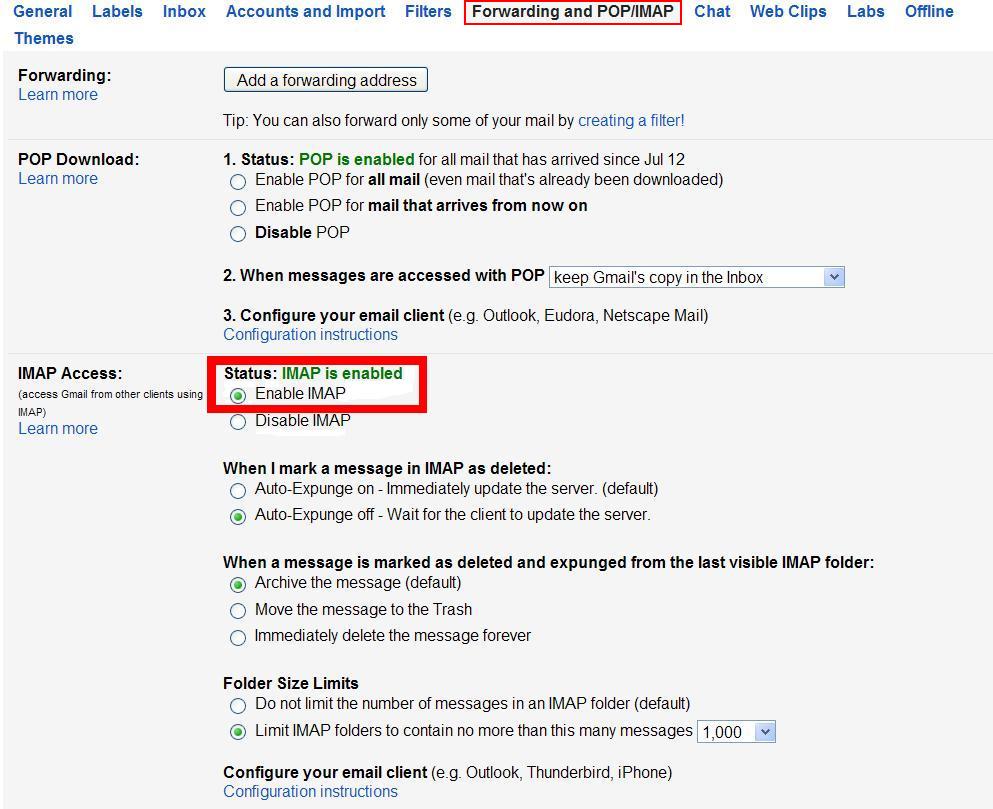 .
.
After enabling IMAP access in your Gmail account (as described above), you can use the following to setup your Gmail account in other email programs (such has Windows Live Mail, Windows Mail, Outlook Express, Office Outlook, or Thunderbird):
Mail Server is IMAP
Incoming mail server is imap.gmail.com
Outgoing mail server is smtp.gmail.com
Servers tab > Outgoing Mail Server > "My mail server requires Authentication" must be checked
Advanced tab > Server Port Numbers:
Outgoing mail (SMTP) port number is 587 (not 25)
"This server requires a secure connection (SSL)" must be checked
Incoming mail (IMAP) port number is 993 (not 110 or 995)
"This server requires a secure connection (SSL)" must be checked.
▲ Back to the Index of Topics or ▲ Back to the Top of this webpage ▲
To enable other email programs to use Post Office Protocol ( POP) to access your Gmail account:
After enabling POP download in your Gmail account (as described above), you can use the following to setup your Gmail account in other email programs (such has Windows Live Mail, Windows Mail, Outlook Express, Office Outlook, or Thunderbird):
Mail Server is POP3
Incoming mail server is pop.gmail.com
Outgoing mail server is smtp.gmail.com
Servers tab > Outgoing Mail Server > "My mail server requires Authentication" must be checked
Advanced tab > Server Port Numbers:
Outgoing mail (SMTP) port number is 465 (not 25)
"This server requires a secure connection (SSL)" must be checked
Incoming mail (POP3) port number is 995 (not 110)
"This server requires a secure connection (SSL)" must be checked.
For details and troubleshooting help see "Gmail Help" or "Gmail Troubleshooter" in the related articles and Internet Links at the end of this webpage).
▲ Back to the Index of Topics or ▲ Back to the Top of this webpage ▲
Email reports and messages that you send from CTI Navigator Web are sent out through CTI's national email provider by default. However, you can set CTI Navigator Web Silverlight to send out your messages though your own Gmail account instead of through CTI's account. Gmail also lets you set your personal account to send messages with another of your email addresses listed as the sender instead of your Gmail address (see "alternate email address" below).
Note that your CTI Navigator Web and Navigator Mobile account share the same data and settings. Consequently, MLS reports emailed from CTI Navigator Mobile on your smartphone or tablet will be sent through the same email provider you have set as the default in CTI Navigator Web.
To set your Gmail account to automatically send messages as if from a different (alternate) email address and so replies will return directly to this alternate address:
Note: This sending "on behalf of" another email address is not the same as forwarding email.
You also can synchronize your "Clients" Contacts (see below) in CTI Navigator Web Silverlight with Contacts in your Gmail. To synchronize Client contacts, click the "Synchronize Now" button after verifying that CTI Navigator Web Silverlight can access your Gmail (described above).
Note: Currently, the client database in new Navigator Web II (HTML5) cannot synchronize email addresses from Gmail.
Client synchronization has the following features:
Note that only contacts assigned to your Gmail Contacts Group labeled "Clients" will automatically sync with CTI Navigator Web Silverlight. To transfer Gmail contacts not assigned to a "Clients" group, export the selected contacts in "Outlook CSV format" and then import that CSV file into CTI Navigator Web Silverlight. To see Google's instructions for Exporting Gmail Contacts to a CSV file, click here. To see a tutorial video on Importing email contacts and Using Email in CTI Navigator Web Silverlight, click here.
It is not necessary to download contact information for MLS members, offices or affiliates. This information is provided in the Address Book of CTI Navigator Web. To see a tutorial video on using the Address Book in CTI Navigator Web Silverlight, click here.
▲ Back to the Index of Topics or ▲ Back to the Top of this webpage ▲
Unlike all other versions of Windows, Windows 7 does not include any built-in email program (such as Windows Mail or Outlook Express). Windows 7 can use access webmail services like Gmail, Hotmail/Outlook.com and Yahoo through an Internet browser, and its browser can support emailing from CTI Navigator Web. However, a Windows email program must be installed to handle Windows messaging code, such as created by CTI Navigator Desktop for emailing MLS reports. To email from within Windows 7, Microsoft recommends downloading Microsoft's free Windows Live Mail (or purchasing and installing Microsoft Office Outlook). Free third-party desktop email programs such as Thunderbird or Opera Mail also can be downloaded to email from within Windows 7 and later (or any version of Windows except RT).
Microsoft's Mail app included in Windows 8 and 10 can send and receive email itself, but does not support Windows mail code created by Desktop apps. To be able to email from a desktop app (such as CTI Navigator Desktop) in Windows 8 or 10, first install and configure a desktop email app such as Windows Live Mail, Mozilla Thunderbird, Office Outlook, Opera Mail, or Affixa Desktop for Gmail. Then set this desktop email app as the default mail program in Windows. It is not necessary to install a desktop email app in Windows 8 or 10 if you use CTI Navigator Web (or CTI Navigator Mobile) instead of CTI Navigator Desktop to email MLS information.
Windows RT does not allow desktop email apps to be installed, cannot send mail from File Explorer, does not include Outlook in its special edition of Office 2013, and does not allow plug-ins (such as Silverlight) to be installed in its Internet browser. Consequently, only CTI Navigator Web II or Mobile can be used in Windows RT (not Navigator Web Silverlight or Desktop). Any web enabled device (including Windows RT, Apple iOS, or Android) can send email from CTI Navigator Web II or Mobile. This is because Navigator Web II and Mobile send email through CTI's email service rather than through your device's operating system or browser plug-in.
▲ Back to the Index of Topics or ▲ Back to the Top of this webpage ▲
How to email MLS reports is described in detail under Help in CTI Navigator Desktop's menu. Select Navigator Help > Using Cti Navigator > Communications > E-mail (see the related article, "Using Help in CTI Navigator").
Note that email reports normally should be sent from a Search Results table (not
from the Report Preview screen) in CTI Navigator. Emailing from a table
of results provides more options, is much more efficient, and does not
require your message recipient to have PDF Reader software. To preview reports before emailing, your can use
the Report Display icon (![]() )
on the table. This Report Display is dynamic and will change to show the
selected report for each listing when you click on it in the table.
)
on the table. This Report Display is dynamic and will change to show the
selected report for each listing when you click on it in the table.
Emailing from a Report Preview screen creates a PDF file. This pdf file can be attached to any e-mail message, including web-based e-mail. To be read, a pdf file must be opened by a PDF Reader on the recipient's computer. (Adobe's free PDF reader can be downloaded by selecting "Adobe free PDF Reader" in the related articles below.) Beware that the pdf file can become quite large and extremely slow to transmit when more than one or two listings are included in the same file. As opposed to a pdf file, report links are very small and efficient to send by email.
Note 1: CTI Navigator Desktop uses Microsoft's SimpleMAPI codes to transfer MLS reports internally to the default email program in your Windows. You then address your message and send it to the recipient(s) using the Windows default email program. For this transfer between CTI Navigator and your Windows email program to succeed, only one email program can be set as the default for email. If you have multiple email programs installed in Windows and encounter a MAPI error sending MLS reports, follow the instructions in the related article, "Fix CLS Send or MAPI error." If your device is using Windows 8, see "Windows 8 Mail."
Note 2: The "User Account Control" (UAC) feature in Windows 7, 8, and Windows Vista may require you to close your default email program before you open CTI Navigator Desktop and attempt to sent email. This is a security measure to prevent potentially malicious programs from accessing your email without your knowledge.
Note 3: To set CTI Navigator Web Silverlight to send MLS Report through your personal Gmail account, see "Gmail in CTI Navigator Web" above.
▲ Back to the Top of this webpage ▲
The Roster function in CTI Navigator Desktop can be used to email messages to selected fellow MLS members (see Help > Navigator Help > Using CTI Navigator > Roster > Office, Agents, Affiliates Tabs).
Email can be sent to the entire MLS membership from CTI Navigator Desktop. However, most MLS boards discourage or do not permit unapproved mass mailings to the entire membership because such unsolicited email is considered SPAM. Many MLS members do not want their email address in the MLS used for any type of mass mailings. Typically only the MLS office is authorized to send membership-wide email messages. Please check directly with your local MLS association for their policy regarding mass mailings from individuals to all MLS members. See how to comply with federal regulations for commercial email at CAN-SPAM Act Compliance Guide (by the FTC).
If permitted by your MLS policy, the Roster function in CTI Navigator Desktop can also be used to send email messages to all MLS members with an email address in the MLS roster. To email to all agents, go to Roster > Agent/Office info > select the Agents tab > click the All button beside Office > click the All button at the bottom beside Selected Items > click the email icon.
WARNING. Unsolicited mass mailings to individual email addresses also are generally classified as SPAM by email providers. Sending mass emails risks getting your email address "black listed" as a Spammer. If agents' or providers' anti-spam measures designate your email address as a Spammer or source of "Junk Mail", you then would not be able to email anything - including listing and/or contract specific email - directly to those agents who use junk mail filters or anti-spam measures. Even if not blocked, mass mailings tend to clog up recipient's mail boxes, potentially causing them to miss client/prospect messages because their mailbox is full or clogged up with unsolicited messages.
The Agent/Office Roster and Client Contacts are included in the Address Book of CTI Navigator Web. All entries in the Address Book are searchable by partial name or email address. To see a tutorial on using the Address Book in CTI Navigator Web II (HTMLS5), click here. To see a tutorial on using the Address Book in CTI Navigator Web Silverlight, click here.
▲ Back to the Index of Topics or ▲ Back to the Top of this webpage ▲
Provider |
SERVERS |
Secure Connection SSL |
Advanced Port# |
|||||
|
Type |
INcoming |
OUTgoing |
Auth* |
Logon* |
OUT |
IN |
||
|
Alltel.net (obsolete - use Windstream) |
|
|
|
|
|
|
||
IMAP |
Imap.AOL.com |
Smtp.AOL.com |
þ |
same |
|
587 |
143 |
|
|
AT&T/BellSouth.net |
Pop3 |
inbound.att.net |
outbound.att.net |
þ |
same |
Out & In þ Require SSL |
465 |
995 |
| Century Link | Pop3 | pop.centurylink.net | smtp.centurylink.net |
þ |
same | Require SSL |
587 |
995 |
|
Comcast.net |
Pop3 |
Mail.Comcast.net |
Smtp.Comcast.net |
þ |
same |
Require SSL |
587 |
995 |
|
Comcast.net |
IMAP |
imap.Comcast.net |
Smtp.Comcast.net |
þ |
same |
Require SSL |
587 or 465 |
993 |
|
Dnet.net |
Pop3 |
Email.dnet.net |
Smtp.dnet.net |
|
|
Always connect using Dnet |
||
|
Earthlink.net |
Pop3 |
Pop.Earthlink.net |
SMTPauth.Earthlink.net |
þ |
Email address |
|
587 |
110 |
|
Embarq.com |
Pop3 |
Pop.EmbarqMail.com |
Smtp.embarqmail.com |
þ |
Email address |
Replaced Sprint Earthlink 2007 |
|
|
| GoDaddy.com | Pop3 | pop.secureserver.net | smtpout.secureserver.net |
þ |
same |
[w/o optional SSL encryption] |
25 |
110 |
| GoDaddy.com (encrypted) | Pop3 | pop.secureserver.net | smtpout.secureserver.net |
þ |
same |
Out & In þ Require SSL |
465 |
995 |
|
Google Gmail.com¹ |
Pop3 |
Pop.gmail.com |
Smtp.gmail.com |
þ |
same |
Out & In þ Require SSL |
465 |
995 |
| Google Gmail.com¹ | IMAP | Imap.gmail.com | Smtp.gmail.com |
þ |
same |
Out & In þ Require SSL |
587 |
993 |
|
Hotmail.com(obsolete) |
HTTP |
http://services.msn.com/svcs/hotmail/httpmail.asp (see Hotmail "Live" for grandfathered accounts in OE) |
||||||
| Hotmail "Live" - Grandfathered accounts | Pop3 | Pop3.Live.com | Smtp.Live.com |
þ |
same |
Require SSL |
587 or 25 |
995 |
|
MSN.com (obsolete) |
Pop3 |
Pop3.email.MSN.com |
Smtp.email.MSN.com |
þ |
same |
þ SPA |
|
|
|
Netscape.net |
Pop3 |
Pop3.isp.Netscape.net |
Smtp.isp.Netscape.net |
þ |
same |
|
587 |
110 |
|
Netzero.net² |
Pop3 |
Pop.netzero.com |
AuthSmtp.netzero.com |
þ |
Email address |
|
Not ü leave copy on server |
|
| Outlook.com | Pop3 | Pop3.Live.com | Smtp.Live.com |
þ |
same |
Require SSL/TLS |
587 |
995 |
| Outlook.com 4 | IMAP | imap-mail.outlook.com | Smtp-mail.outlook.com |
þ |
same |
Require SSL/TLS |
587 or 25 |
993 |
|
PlantationCable.net |
Pop3 |
Pop.gmail.com |
Smtp.gmail.com |
þ |
same |
Out & In þ Require SSL |
465 |
995 |
|
RoadRunner(cfl) |
Pop3 |
Pop-server.cfl.rr.com |
Smtp-server.cfl.rr.com |
|
|
|
|
|
|
TDStelecom.net³ |
Pop3 |
mail.tds.net |
mail.tds.net |
þ |
same |
Out & In þ Require SSL |
587 |
995 |
|
TDStelecom.net³ |
IMAP |
mail.tds.net |
mail.tds.net |
þ |
same |
Out & In þ Require SSL |
587 |
993 |
|
Verizon.net |
Pop3 |
Incoming.Verizon.net |
Outgoing.Verizon.net |
þ |
same |
Require SSL |
465 |
995 |
|
Browser based – Text Links only – No offline access unless downloaded into WL Mail in Windows |
||||||||
|
Windows Live Mail processes mail through other Provider's Servers - Will no longer support Microsoft accounts (eg, Outlook.com, Hotmail, or Live Mail) after Jan.10, 2017. See note 4 below. |
||||||||
|
Windstream.net |
Pop3 |
Pop.windstream.net |
Smtp. windstream.net |
þ |
same |
Clear Text auth |
25 |
110 |
|
Pop3 |
Plus.Pop.mail.Yahoo.com |
Plus.Smtp.mail.Yahoo.com |
þ |
same |
Require SSL |
465 |
995 |
|
|
Pop3 |
Plus.Pop.mail.Yahoo.com |
Plus.Smtp.mail.Yahoo.com |
þ |
same |
587 |
110 or 995 |
||
| YMail.com |
Pop3 |
Pop.mail.yahoo.com |
Smtp.mail.yahoo.com |
þ |
same |
Require SSL |
465 |
995 |
| YPOPSemail.com | Pop3 | 127.0.0.1 | 127.0.0.1 |
þ |
same |
Server Times out = Long (5 minutes) |
25 |
110 |
|
INcoming |
OUTgoing |
OUT |
IN |
|||||
*Auth= "My Outgoing Mail Server Requires authentication". Do not check "Log on using Secure Password Authentication".
*Logon= Outgoing Mail Server Settings. Same= "Logon using same settings as Incoming server". Email Address= Logon Using full Email Account Name and Password. Do not check "Log on using Secure Password Authentication".
¹ Gmail account must be set inside Gmail on the Internet to either "Enable POP..." or to "Enable IMAP" as appropriate. ²a To use Yahoo!Mail Plus, setup account in Outlook Express (or WinMail) and set Windows default email to Outlook Express /Windows Mail (Not to Yahoo!Mail). Email sent directly to Free Yahoo!Mail (without going through Outlook Express/Windows Mail) cannot process links (w/o YPOPS proxy). Only paid, not free, accounts can interface successfully through Outlook Express./Windows Mail/Windows Live Mail. ²b Yahoo recommends enabling SSL for both POP and SMTP. If you choose not to use SSL for Yahoo!MailPlus in Windows and your ISP blocks port 25, change the Outgoing server (SMTP) from port 25 to 587. ³ TDS used Gmail servers prior to 2015, but e-mail accounts were username@tds.net. 4 To access Outlook.com accounts in Windows Live Mail after January 10,2017, you must manually configure the server settings for IMAP Web-based free Windows Live Hotmail and subscription-based Yahoo!Mail Plus can process Text links only (no HTML links) on the Internet. However, if installed before Jan 10, 2017 free Windows Live Mail can run in Windows 7/Vista/XP to handle all email formats.
▲ Back to the Index of Topics or ▲ Back to the Top of this webpage ▲
Related articles and Internet links:
▲ Back to the Index of Topics or ▲ Back to the Top of this webpage ▲
To return to CTI's menu of Help & Tutorials, click here or use the back arrow at the top of your Internet browser.
rev.10.03.2017