Document Manager is a tool to attach listing documents such as Plat drawings, Disclosure statements, and Covenants and Restrictions to listings. These attached documents are stored on the MLS Internet server (not on your local computer) for viewing over the Internet by other agents. All documents are stored in PDF format (Portable Document File). The PDF format allows linked documents to be displayed on a wide variety of computers using a free reader from Adobe.
To view documents associated with a listing, highlight the listing in a Search Results table and click the Web Links button at the top of the table (not Web-Links in the CTI Navigator menu). Click on the appropriate link to display the associated document(s) in your Internet browser. Of course your computer must be connected to the Internet to display linked document(s).
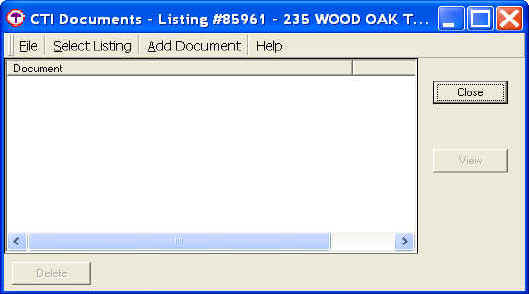
Open Document Manager under the Tools menu. (Only MLS members authorized by their broker to add or revise listings will have the Document Manager tool.) On the Select Listing screen, enter (or Browse to) an existing listing number to which a document is to be attached and click the OK button. This brings up the Document Manager screen (see below).

Any documents already linked to this listing will display in the Document Manager screen. Highlight a document description and click the View button to display the full document. Click the Delete button to remove the highlighted document (or its Internet link) from the MLS server.
To add a document to the selected listing, click Add Document either under File or on the top menu. To add a document to a different listing, click Select Listing and enter (or Browse to) the appropriate listing.
Under Add Document, you can:
Click the Close button to exit the Document Manager and save the listed documents or links.
To open the Create PDF tool in CTI Navigator, click Tools, Document Manager, Add Document, Create a Document from Scanned Images. Use create PDF to build a new PDF document from image files and link this PDF document to a listing. Images may have filename extensions such as .jpg, .bmp, .tif, .png, or .fax. They can come from various sources such as directly from a scanner (using a Twain interface), from files created by a scanner and saved to disk, or from fax software (although fax images tend to be relatively low quality).

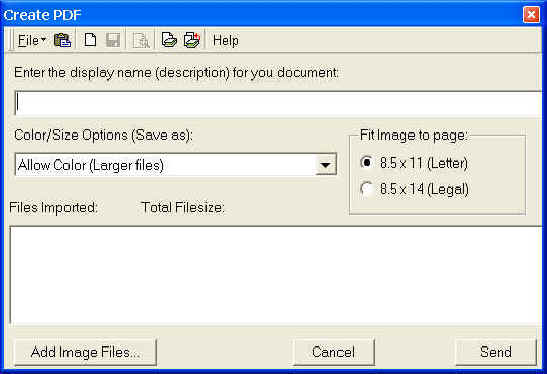
To add an image file for conversion into PDF format, enter a display name for the document in the appropriate box, select the Color/Size Option (color, grayscale or B&W), and verify the Fit Image to Page size (letter or legal). If the image file already exists, click the Add Image Files... button. To scan a document to create an image file, click File, Twain and select the appropriate scanning option (Acquire Single or Acquire Multiple). If the image is on the Windows clipboard, select File, Paste at the top menu of the Create PDF screen. The steps to add, scan or paste images into the Create PDF tool are described below.
To add an existing image file, click the Add Image Files... button. On the Import Image screen, change the Look In path to the location of the existing image file. Select the image file name, and check Enable Preview to verify that the correct image (or page) has been selected. Click OK. The path to the imported image will display in the Files Imported box.
To add another image to the image(s) already imported, click the Add Image Files button and select the next image. Check Enable Preview to verify that the correct image (or page) has been selected. Warning: Be careful to add the images in the same order in which they should be displayed. Images cannot be rearranged within the same PDF document once imported. If the images are in the wrong order, you must Cancel the Create PDF session and start over.
To scan an image into a document, a scanner must be installed and working correctly on the computer. To scan a single image, select File, Twain, Acquire Single Image (or select the Acquire Single Image icon at the top menu of the Document Manager). Follow the screen prompts provided by your scanner's software.
Note 2. If the Twain interface does not work properly with your scanner, scan and save your document into an image file (such as .tif). Then use the Add Image Files button as described above.
To scan several images into one document, select File, Twain, Acquire Multiple Images (or select the same icon at the top menu of the Document Manager). For scanners that support it, the Acquire Multiple Images twain interface leaves the scanned image file open until all images have been scanned and the composite file (containing multiple images) is manually closed. To scan multiple images, follow the screen prompts provided by your scanner's software.
If you scanner does not support the Acquire Multiple Images interface, repeat the Acquire Single Image process for each image. Each time a document is scanned, the image file name should appear in the Files Imported box. Warning: Be careful to add the images in the same order in which they should be displayed (e.g. add page 1 first, then add page 2, etc). Images cannot be rearranged within the composite PDF document once imported. If the images are imported in the wrong order, you must Cancel the Create PDF session and start over.
If your computer's Twain interface (Acquire Single or Acquire Multiple) does not work properly with your scanner, see note 2 above.
Images in the Windows Clipboard can be pasted directly into the Document Manager. First, copy an image (such as a photo or map image) onto the Windows Clipboard (use Edit, Copy or use Ctrl/C ) while viewing the image in another program (such as in Microsoft Paint or in Paint Shop Pro). Minimize or close that program, and open or maximize the Create PDF tool in CTI Navigator.
Then use File, Paste (or use the Paste icon at the top menu) in the Create PDF screen to paste the image from the Windows clipboard into the Create PDF tool. Note that some image resolution (or sharpness) may be lost when images are transferred through the Windows Clipboard.
The path to the imported, scanned or pasted image(s) will display in the Files Imported box. Note the Total File size displayed at the top of the File Imported box. This is the size of the resulting PDF document from all imported Images. Large documents can be time consuming to download and view. The maximum file size that can be associated with a listing is one megabyte (1 MB). If the file size is too large, click the Cancel button and re-import using a different Color/Size (grayscale or B&W) Option, or scanning resolution (as appropriate). If there still is more than 1 MB of information, then it must be separated into more than one PDF document (such as part 1 and part 2).
It is highly recommended that you Preview documents before sending them to the MLS server. To Preview a new PDF file, select File, Preview (or select the Preview icon at the top) in the Create PDF menu. After all images (such as multiple pages) that belong to a single document have been imported into the Create PDF screen, click the Send button. This will send the image(s) to the MLS server as a single PDF file attached to the selected listing.
Definitions and Descriptions
Display Name: Enter descriptive text (such as "Disclosure Statement") to display as the link for this document.
Color/Size Options:
Allow Color - Select if you need color in your image, e.g., a plat with the property highlighted in yellow. The resulting file size will be larger than Black & White images.
Grayscale - Select if your image does not need color but has varying tones that should be retained (using varying shades of gray to represent various colors). If the original is color, grayscale usually results in a better looking image than the Black & White setting. Grayscale file size is usually smaller than color but not always.
Black & White - Select for text documents and B&W drawings. The resulting image is very high contrast like a Fax. The resulting file size may be significantly smaller than Color or Grayscale.
Fit Image to page: The imported images will be resized to fit on the selected page size with a half-inch margin.
Files Imported: Lists the images that have been imported into the current document.
Total File size:
This is the size of the resulting PDF document from all imported
Images. Large documents can be time consuming to download and view. The maximum
file size is one (1) megabyte (MB).
Add Image Files...: Allows you to add image files from disk. You may add multiple files
into a single document (such as add the image file for each of multiple
pages of the same document).
Cancel:
Exit and discard the current document.
Send:
Click when finished to send the current document to the MLS server. It
is highly recommended that you Preview your document BEFORE clicking Send.
Toolbar Items
Paste: Adds an image that has been copied into the Windows clipboard.
New: Discards the current document and begins a new document.
Save: Saves the current PDF document to disk.
Preview: Allows you to view the current PDF document. It is highly recommended that you preview your document to check that is correct BEFORE sending it to the server.
Acquire Single: Imports a single image (file) from Twain devices such as a scanner.
Acquire Multiple: The Twain command to "Acquire Multiple" should progressively import multiple images into a single file, but does not work for some devices. In this case, to include multiple images (such as multiple pages) in a single document, first scan or save each image into its own file. Select "Create a Document from Scanned Images" under Add Document. Then use the Add Image Files button to progressively add each image (such as each successive page) before clicking Send.
To return to CTI's menu of tutorials, click here or use the back arrow at the top of your Internet browser.
{rev.061506}