This tutorial describes how to create, view and print Inventory Reports for your listings in CTI Navigator Web II.
Click on any topic below to go directly to the information on that topic in this tutorial.
Touchscreen Note. Where instructions are to select or click, touchscreen device users would press or tap as appropriate for your device.
A summary by Status of
your Personal Listings,
your Office’s listings, and for the entire MLS is
automatically displayed
on the Home Page in CTI Navigator Web II.
You can click on the right-pointing triangle icon
![]() beside
any inventory item to see its subcategory. Click on a category name (with at
least one listing) to see a summary table of all the listings in that category.
beside
any inventory item to see its subcategory. Click on a category name (with at
least one listing) to see a summary table of all the listings in that category.
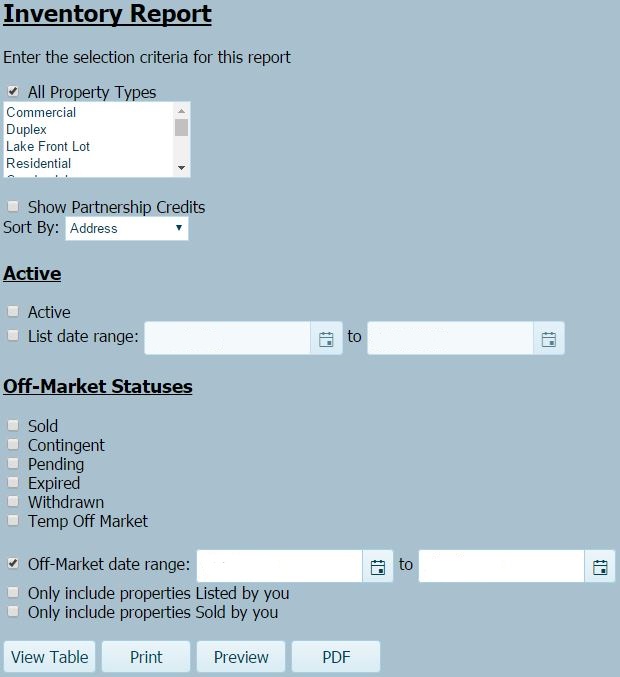
To produce a standardized, printable Inventory Report for your listings, click on "Reports" in Navigator's main menu-bar and select Inventory Report. This will display a screen similar to the following where you can specify the selection criteria for your report.
 |
 |
▲ Return to Table of Contents ▲
The default setting is checked for "ALL Property Types". To
limit the inventory report to only one property type,
scroll down the list of property types and
click on the desired type (such as Residential). To include several property types, hold down the Control in
Windows, the Command![]() key on a Mac, or use the equivalent gesture on a touchscreen, and click on the
desired items in the menu of property types.
key on a Mac, or use the equivalent gesture on a touchscreen, and click on the
desired items in the menu of property types.
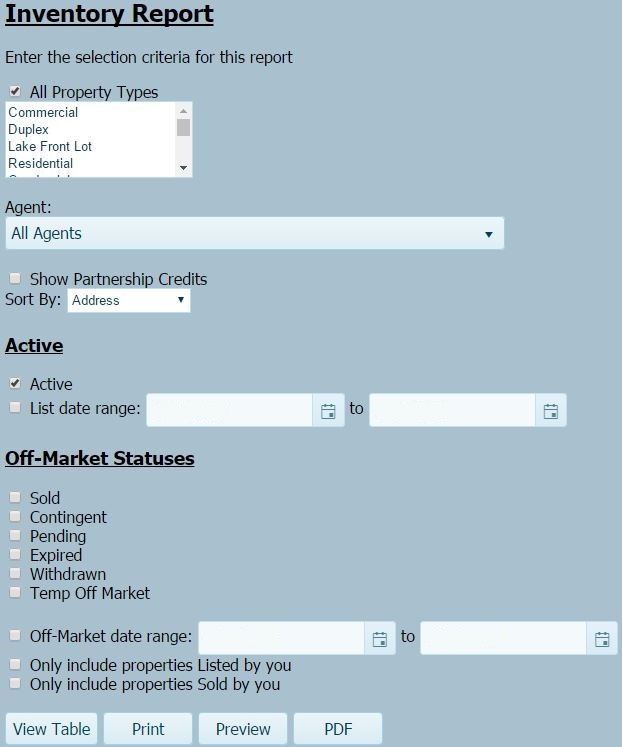
The Agent and Broker Inventory Report use the same criteria and report format. By default, the Inventory Report will include only properties for the agent identity currently signed into CTI Navigator. If you do not have management access, you will not see an option to change the Agents or Offices to be included in your Inventory Report.
If you are authorized for management level access for your office, then you will see an "Agent" selection menu below the Property Types section (see "Broker Inventory Report screen" image above). You can run an Inventory Report for your entire office by selecting "All Agents" in the list (which is selected by default); or you can limit the report to only properties for a specific agent in the office by clicking in the Agents box and selecting their name in the list of your office agents.
-Agent.jpg)
If you belong to a multi-branch company and you are authorized for management level access, then you will see an "Office" and an "Agent" selection menu below the Property Types section (see image above). You can run the report for your entire company (all listings at all your company offices on a single report), or limit the report to only properties for a specific branch office, or you can limit the report to only properties for a specific agent in the company.
Check "Show Partnership Credits" to include columns for the Credit percent and credit dollar split between partners for each agent (as applicable) on your Inventory Report. Listings with no credit split display 100% and full $ price.
By default Inventory Reports are sorted by Address within each status category. To change the sorting criterion, click the down arrow beside "Sort By" and select the desired criterion (such as by Owners Name, MLS Number, Price, List Office Code, List Agent Code, Sale Office Code, Sales Agent Code, or Close Date).
▲ Return to Table of Contents ▲
By default, "Active" is checked so your report will include all your currently active listings, regardless of list date. To restrict the active listings on the report to those listed during a specific time period, also check "List date range" and enter a beginning and ending date. To restrict Off-Market properties that were listed during a specific time period, un-check Active, check "List date range," and enter a beginning and ending date.
Check the appropriate box(es) to include any non-active (off-market) statuses such as Sold or Expired. You may specify a date range for when the included non-active properties went off-market by selecting the appropriate time periods in the two boxes beside "Off-Market date range." If you do not enter a date range, the report will include all matching properties regardless of when they went off-market.
For the two "Only include..." boxes, check the appropriate box to limit the report based on who listed or who sold the included properties. For example, checking both boxes will limit the report to only properties that were both listed and sold by you (or your office). Selecting both delimiters excludes properties you sold that were not listed by you or your office; and it excludes your listings that were sold by agents outside your office. Due to possible agent relocation and office consolidations throughout the year, reports for a specific agent in the office will be based on the list and sale agent fields for each property, regardless of the list or sale office.
After entering and selecting all criteria, click on the View Table, Print, Preview, or PDF button as desired. The Print, Preview and PDF buttons display a standardized Inventory Report format.
Your selection criteria will display at the top of the first page of an Inventory Report. Listings that match your selection criteria will display in the Status categories you selected. Each category will include a sub-total for its number of listings, total dollar volume, and average price. The Inventory Report format is standardized and cannot be modified. (Use "View Table" to create and print a customized report layout.)
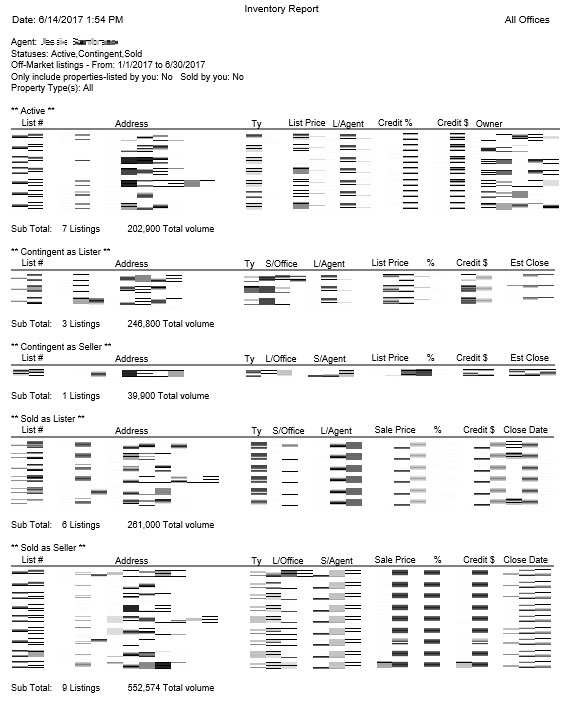 Click on this image to view an example Inventory Report.
Note: Selection criteria will revert to their default settings once the Inventory Report function is closed.
▲ Return to Table of Contents ▲
Click the "View Table" button to open a one line summary Table (not a report format) that displays each listing that matches your inventory selection criteria. You can sort, print, email or export the listings on this table.
Click the Print button to display your Inventory Report in a tab in your browser and automatically open the print dialog box for your device.
Click the Preview button to display your Inventory Report in a tab in your browser. If desired, you can use your browser's controls to manipulate the report (such as print, save, or share).
Click the PDF button to display your Inventory Report in a tab in your browser using its PDF Viewer (such as Adobe Acrobat Reader). If desired, you can use your PDF Viewer to print, save or email your report.
Adobe Email
Note. Click on the Adobe icon in Adobe's floating toolbar (usually
at the bottom of the page)
![]() or simultaneously press the Control+H keys on your device's keyboard to
open Adobe Acrobat Reader's full toolbar
or simultaneously press the Control+H keys on your device's keyboard to
open Adobe Acrobat Reader's full toolbar
![]() if it is not already visible when viewing your report. Click on the envelope
icon in the full toolbar to email your report (either as a link or as an
attachment).
if it is not already visible when viewing your report. Click on the envelope
icon in the full toolbar to email your report (either as a link or as an
attachment).
▲ Return to Table of Contents ▲
To return to the Index of Tutorials for CTI Navigator Web II, click here.
InventoryReport.aspx|<>|rev.10.10.2017