Overview
Document Manager is a tool in CTI Navigator Desktop to attach listing documents such as Plat drawings, Disclosure statements, Association Fee statements, and/or Covenants and Restrictions to listings and store these documents on the MLS Internet server (not on your local computer). These attached documents are then available for viewing over the Internet by other agents, or emailing to clients. All documents are stored in PDF format (Portable Document File). PDF files can be read on any computer with a PDF reader (such as the free Adobe Reader in related articles below). This allows linked documents to be displayed on a wide variety computers.
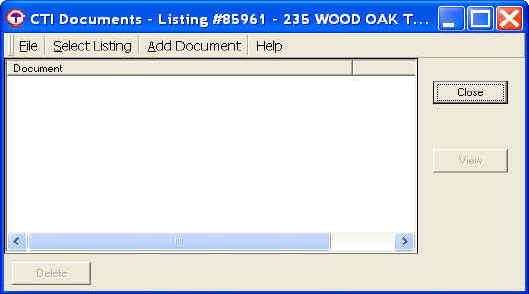
Open Document Manager under the Tools menu in CTI Navigator Desktop. (Only users authorized by their broker to add or revise listings or photos will have the Document Manager tool.) On the Select Listing screen, enter (or Browse to) an existing listing number to which a document is to be attached and click the OK button. This brings up the Document Manager screen (see below).

Any documents already linked to this listing will display in the Document Manager screen. Highlight a document description and click the View button to display the full document. Click the Delete button to remove the highlighted document (or its Internet link) from the MLS server.
To add a document to the selected listing, click Add Document either under File or on the top menu. To add a document to a different listing, click Select Listing and enter (or Browse to) the appropriate listing.
Back to the top of this page ▲
Under Add Document, you can:
Note: Use Add/Modify Listings (not Document Manager) to link an un-branded Virtual Tour to a listing so that it can be included in MLS reports emailed to the public (see the related article below, "Enter Virtual Tour Link").
Click the Close button to exit the Document Manager and save the listed documents or links.
Back to the top of this page ▲
To view documents associated with (linked to) a listing, highlight the listing in a Search Results table and either click the round, blue "Info" button at the top of the table, or the pale gray Documents icon at the top or in the right-column of the table. Then click on the document Name to view it in your Internet browser. To display pdf documents linked to a listing, your computer must have a PDF reader installed (such as the free Adobe Reader listed in related articles below) and must be connected to the Internet (because listing documents reside on the MLS server, not on your computer).
To email listing documents, use the "Send" email function in your Internet browser, or the email function in your PDF Reader, while viewing the document.
(If you are using an older version of Adobe Reader that does not display an email/envelope icon in its toolbar, you can add it by right-clicking on a blank spot on the Adobe top menu > select "More Tools" > and under "File Tools" check Email.)
Back to the top of this page ▲
You can enter the URL address (as described above) for a document that has already been attached to another listing in the MLS. To determine the URL address for an existing document, open the link to the document in your Internet browser. You can copy this link to the Windows Clipboard, and then paste this link into the Document Manager (or into the Add/Edit Internet Links in Add/Modify Listings) for another listing to which the same document applies. (To copy a URL, highlight the full http://... path in the address box, then either right-click and select Copy with your mouse, or on the keyboard press Ctrl-C.)
Warning: all such copied and shared links will become invalid (and no longer work) once the original listing on which their reference code was created is purged from the MLS (i.e., after the original listing has expired, sold or been withdrawn, and the date passes the retention period for off-market listings set by the MLS).
Note: If you copy the URL for an existing document into the Internet Links in Add/Modify Listings (rather than into the Document Manager Internet URL) of another listing, the Description for the Internet Link will appear under the Web Link column, not under the Docs column, in a data table; and on the Info screen it will appear under the Links heading rather than under the Documents heading.
Back to the top of this page ▲
Select Listing - Select the listing to upload documents for.
Add Document - Attach an existing PDF document. This allows you to select a previously
created PDF document to upload.
Create a document from scanned images - This opens the
Create PDF tool (See
Create PDF in the related articles
below) that allows you to create a PDF document from scanned
images. Example: Scan the pages for a disclosure statement. Then use the Create PDF tool to import the scanned
pages and upload the document attached to the selected listing.
Enter an Internet URL - Creates an Internet link to a document/web page that already exists on the Internet. This can also be used to add web links (such as your web page) to a listing.
Document window - Displays information about existing documents that have been uploaded for a listing.
Delete - Deletes from the system the currently selected document in the document window.
View - Displays the currently selected document in the document window.
Display Name - When adding a document, you will be required to enter a display name. Enter brief descriptive text (such as Disclosure) that will display as the link in the Web Links window for this document.
Back to the top of this page ▲
Related articles and Internet links:
To return to CTI's menu of Help & Tutorials, click here or use the back arrow at the top of your Internet browser.
{rev.04.07.2015}