Windows 7 is built on the foundation code of Windows Vista. Many of the functions and user screens are exactly the same or extremely similar in Vista and Windows 7. CTI Navigator installs and runs essentially the same in Windows 7 as in Vista (in both 32-bit and 64-bit). Therefore, information specifically on using Vista and Windows 7 has been combined here for the convenience of CTI Navigator users. Instructions that are different in Windows 7 from those in Vista are noted by fushia color. Where Vista or Windows 7 are not specified, the instructions or descriptions apply to both versions of Windows. For information on using Windows 8, 8.1 and RT, click "Using Windows 8".
[Note: you can use the Windows Find command - hold down the Ctrl key and press the letter "F" key - to successively find every place where Windows 7 or any other term is mentioned in this webpage.]
Click on the topic of interest (listed alphabetically) below to go directly to that section:
See Related Articles at the end of this webpage for links to additional information, such as
Windows Vista and Windows 7 have a "User Account Control" (UAC) protection feature that requires a user to "Allow" programs to run with Administrative privileges. Consequently, when installing or running CTI Navigator in Windows Vista or Windows 7, you should select "Allow" on any User Account Control screen. When downloading MLS data or taxes from the Internet into Windows Vista or Windows 7, right-click on the downloaded file and select "Run as Administrator" (for details see Set Program to Run with Administrative Privileges below).
▲ Back to the top of this page
Due to extra security in Windows 7 and Vista, programs that need access to Windows system files must be specifically given "administrative privileges". To temporarily assign administrative privileges during the current Windows session, right-click on the program icon on the Windows desktop (or on the executable program file in Windows Explorer which is the target of the icon, or on the program in the "All Programs" list) > left-click on "Run as Administrator" > click Allow. Use this procedure to run installation files that have been saved from the Internet into Windows 7/Vista or to specify that a program (such as CTI Navigator, NotePad, WordPad, or Office Outlook) open with administrative rights.
Administrative privileges also can be permanently assigned to a program. To manually set a program to always run as an administrator in Windows 7 or Vista: open Windows Explorer > browse to the program folder > right-click on the program executable (.exe) file > select Properties > click the Compatibility tab > under Privilege Level, check "Run this program as an Administrator" > click Apply > click "Show/Check Settings for All Users" button (if this button is displayed) and in Privilege Level under the Compatibility for All Users tab, check "Run this program as an Administrator" > click OK.
If CTI Navigator was installed prior to April 19, 2012, it must have administrative privileges in order to save user information, keep itself up-to-date, and function properly. Therefore, you should verify that Windows did assign administrative privileges to CTI Navigator. To do so, open Windows Explorer > browse to C:\Program Files\CTI Navigator\ (or, in a 64-bit version of Windows, to C:\Program Files (x86)\CTI Navigator\) > right-click on CTI Navigator.exe > select Properties > click the Compatibility tab > under Privilege Level, check "Run this program as an Administrator" > click Apply > click "Show/Change Settings for All Users" button (if this button is displayed) and in Privilege Level under the Compatibility for All Users tab, check "Run this program as an Administrator" > click OK. Use the same steps to also verify or manually set administrative privileges for the CTIUpdateManager.exe file in the CTI Navigator folder (right-click on CTIUpdateManager.exe > select Properties > click the Compatibility tab > under Privilege Level, check "Run this program as an Administrator" > click Apply or OK).
If CTI Navigator was installed prior to April 19, 2012 and it does not have administrative privileges in Windows 7 or Vista, this can lead to a wide variety of errors such as 429 - "ActiveX component can't create object", error 380 - "Invalid Property Value", "Permission Denied", "Path or File Access" error (75), or a Windows component error such as "Component vslight.ocx or one of its dependencies not correctly registered - a file is missing or invalid" (see appropriate Related Articles at the end of this article). It can even cause problems with printing or emailing. Not having administrative privileges also can result in CTI Navigator updates being trapped in the Windows Virtual Store (where they are inaccessible after Windows restarts) rather than being saved in the appropriate place in CTI Navigator.
To help address such issues, installation of CTI Navigator was changed on April 19, 2012 to use a new Windows service that is separate from the program files. Therefore, installations of CTI Navigator after April 19, 2012 do not require Administrative privileges.
Note 1: If User Account Control is enabled, files cannot be edited in the Program Files or Program Files (x86) folder unless the editing program (such as WordPad or Notepad) is set to "Run as Administrator" and the file is opened by browsing from within the editing program.
Note 2: If the User Account Control function is turned off or Set to "Never Notify" (see UAC for Vista and UAC for Windows 7 below), all programs are allowed administrative privileges. Also, Windows Administrators can set UAC policy to allow elevated privileges without prompting for their account only. Either approach stops the sometimes annoying UAC prompts to provide "permission to continue", but is potentially unsafe (see note 1 in the "Manage User Account Control" section below).
▲ Back to the top of this page
The User Account Control (UAC) in Windows Vista and Windows 7 is designed to prevent accidental or unauthorized system access or changes (such as by spyware or malware). UAC is much less obtrusive in Windows 7 than in Vista. However, sometimes it may be necessary to temporarily disable UAC (such as to allow a trusted helper like CTI to remotely troubleshoot security issues and/or make changes to your computer's settings).
To confirm whether UAC is on or off in Windows Vista, click Start > Control Panel > Security Center > click the down arrow beside "Other Security Settings".
To Disable or Enable User Account Control (UAC) in Windows Vista (or Windows 7):
For Microsoft's explanation of Vista's User Account Control feature, see "What is user account control?" in the related articles and Internet links at the bottom of this web page.
Note 1- UAC Policy: After desired assistance and changes have been completed, Microsoft strongly recommends re-enabling UAC. Leaving UAC disabled lowers your system security level and essentially causes Windows Vista or Windows 7 to revert to the user security mode of Windows XP. However, if you are using a Windows Administrator account and don't want to be bothered by User Account Control prompts, but you would still like to retain some measure of Vista/7's extra security (in your browser and for other users), it is possible to set Vista/7 to automatically elevate the privilege level without prompting just for your account. While not recommended, this procedure is described in the article "Disable UAC for Administrative (Owner) Account" in related articles and Internet links at the bottom of this web page.
Note 2: Two alternative ways to open System Configuration (step 1) to disable or enable UAC in Windows Vista are:
- Click Start > All Programs > Accessories > Run > type msconfig in the Open text box > click OK; or
- Click Start > Control Panel > System & Maintenance (if View is set to "Control Panel Home") > Administrative Tools > double-click on System Configuration.
Note 3: Disabling UAC will also disable Vista and Windows 7 special "Protected Mode" in Internet Explorer 7 or 8 (see IE Protected Mode in related articles and Internet links at the bottom of this web page).
To check the status of or change the User Account Control settings in Windows 7:
▲ Back to the top of this page
An updated version of Outlook Express called “Windows Mail” is included in Windows Vista. To send MLS reports out through Windows Mail in Vista, Windows Mail must be setup with your e-mail account and e-mail provider information (see related article, "Email - How to Setup and Use Email in Windows to Send MLS Reports"), and Windows Mail must be set as the default mail program for Windows (see note 3 below for web-based e-mail such as Hotmail and MSN). To set WinMail as the default e-mail program: open Windows Control Panel > select Internet Options > select Programs tab > in "Internet Programs" section, click Set Programs button > select “Set your default programs” > select Windows Mail in the list of Programs (on left) > select “Set this program as default” > click the OK button (bottom right).
If you have User Account Control (UAC) enabled in Vista, Windows Mail must be closed before MLS reports can be transferred from CTI Navigator into Windows Mail. Otherwise, the UAC in Vista treats the transfer as a separate login attempt and blocks it. If you get a "Login Failed...clsSendMail_Send" error message, you must either:
If you continue to encounter e-mail errors after manually ending WinMail.exe process (described above), you may need to disable the User Account Control and re-start Vista (see note 2 below).
Note 1: Instructions to open the Windows Task Manager are under Program Controls below.
Note 2: If you want to leave your e-mail program (Windows Mail or Office Outlook) always open, see Managing Vista's User Account Control and the UAC Policy note above).
Note 3: According to Microsoft, "Windows Mail no longer supports the HTTP servers that are used by Hotmail, MSN and other Web-based e-mail providers such as AOL mail, Google mail, and Yahoo! mail." To access web-based e-mail in Vista or Windows 7, Microsoft recommends using Windows Live Mail (see related article, Windows Live Mail...) which is described on CTI's support web page,"Email - How to Setup and Use Email in Windows to Send MLS Reports".
Unlike all other versions of Windows, Windows 7 does not include any built-in e-mail program (such as Windows Mail in Vista, or Outlook Express in XP). This means that to email MLS reports from Navigator Desktop through Windows 7 (or Windows 8) you need to install a program in Windows to handle e-mail. (For Windows 8, see "Emailing MLS information in Windows 8".) Microsoft recommends downloading Microsoft's free Windows Live Mail, or purchasing and installing Microsoft Office Outlook, to e-mail from within Windows 7 or 8. To open and use Windows Live Mail, you must have a free Windows Outlook.com, Hotmail or Live ID. Free third-party desktop e-mail programs such as Mozilla's Thunderbird also can be downloaded and installed for handling e-mail in Windows 7 or 8. For more information on setting up email, see "Email - How to Setup and Use Email in Windows" in the related articles section at the end of this webpage.
If you have Microsoft Outlook installed (as part of the Microsoft Office package) but want to use a different e-mail program (such as Windows Live Mail) to send MLS Reports, you may need to specify the default e-mail program in your Windows 7. For instructions to do this, see the "Change default e-mail program from Office Outlook" section on this webpage.
▲ Back to the top of this page
To send MLS reports out through Microsoft "Office Outlook", Office Outlook must be setup with your e-mail account and e-mail provider information (see related article, "Email Service Setup in Windows"), and Office Outlook must be set as the default mail program for Windows. When Microsoft Office is installed or updated, Outlook automatically sets itself as the default mail program for Windows.
In addition, Microsoft's Office Outlook program is set to process only e-mail created by one of the programs (such as Word or Excel) in Microsoft's Office suite. To be able to send e-mail through Microsoft Outlook from programs (such as CTI Navigator) that are not part of Microsoft Office, you need to either install and/or activate Outlook's Collaboration Data Objects (CDO) feature from Microsoft or, for Outlook 2010 (which lacks a CDO feature), install special files from CTI.
Outlook 2010. To install CTI's special programming so that MLS reports or MLS contacts can be e-mailed through Outlook, first close both CTI Navigator and Office Outlook. Then download and unzip the CDO Fix file appropriate for your version of Windows (CDO_Fix.exe for 32-bit Windows and CDOx86Fix.exe for 64-bit Windows). Do not change the "unzip to folder" from "C:\" unless you installed CTI Navigator in a non-standard location.
Note: If you are unsure whether your Windows is 32-bit or 64-bit, see the section below to "Determine the Edition and System Type of Windows".
Windows Vista or Windows 7 with User Account Control ON (the default setting)
To e-mail MLS reports through a 64-bit version of Office Outlook 2010 (which is not widely used), install Microsoft's "Outlook Hotmail Connector 64-bit" instead of CTI's special codes. The free "Outlook Hotmail Connector 64-bit" connects e-mail and contacts from Windows Live Hotmail (which accepts text links from CTI Navigator) into 64-bit Outlook. See the related article link at the end of this webpage, "Microsoft Outlook 2010 Hotmail Connector 64-bit", to download this Hotmail Connector. Then use your free Windows Live Hotmail account in your 64-bit Outlook 2010.
Outlook 2007. For Outlook 2007 and Exchange 2007, first close Outlook and then download the package of missing Collaboration Data Objects from Microsoft at http://go.microsoft.com/fwlink/?LinkID=73608. To install the CDOs: Save the ExchangeCdo.exe file from this website to your Desktop > right-click on and Run this file "as Administrator" to extract to your Desktop > Open the ExchangeCdo folder that is created when you run the "ExchangeCdo.exe" file > then right-click on and Run the ExchangeCdo.MSI installer as Administrator. (Both the ExchangeCdo file and folder can be deleted off the desktop once you have confirmed that the CDO feature works to allow e-mail files to transfer into Outlook.) If your e-mail provider is using Exchange 2007 Server, you may also need to download and install the MAPI Client code for Microsoft Exchange Server at http://www.microsoft.com/downloads/details.aspx?familyid=E17E7F31-079A-43A9-BFF2-0A110307611E&displaylang=en. After installing the CDO and/or MAPI client code into Office Outlook, you may need to re-start Windows .
Outlook 2003. For typical installations of Office Outlook 2003, the CDO feature just needs to be activated. To activate CDO in Outlook 2003: close Outlook > open Windows Control Panel > click "Programs and Features" > highlight the appropriate Microsoft Office > click the Change button (at the top of the list) > select "Add or Remove Features" > click the plus (+) beside Microsoft Office Outlook > click the down arrow beside the red "X" in front of "Collaboration Data Objects" > select "Run from my computer" > click the Update button (if prompted, insert the Microsoft Office CD in your CD drive) > click OK.
Note 1: For details and screen images on fixing a CDO error in Office Outlook, see the related article below, "Fix Office Outlook Collaborative Data Object (CDO), Active X or Unspecified Email error".
Note 2: If you have User Account Control (UAC) enabled in Windows Vista or Windows 7 and have installed Microsoft's CDOs, Office Outlook needs to be closed before MLS reports can be transferred from CTI Navigator into Office Outlook. To fix an e-mail error (after CDO's have already been installed in Office Outlook) such as "clsMailOutlook", "[Collaboration Data Objects-]", "Function:clsSendMail_Send" or similar error message:
If you want to leave Office Outlook open continuously and also be able to send MLS reports, you can either disable Windows Vista/7 UAC (not recommended except temporarily); set Windows policy to automatically elevate privilege for administrators only; or give Outlook administrative privileges during the current Windows session by setting it to "Run as Administrator" (see Set Program to Run with Administrative Privileges below). You can locate Outlook's program file (Outlook.exe) either by using the Windows Search function, or by opening Windows Explorer and browsing to C:\Program Files\Microsoft Office\Office12.
Otherwise, if you continue to encounter e-mail errors after manually ending the e-mail process (as described above), or if you prefer to leave your Office Outlook open, you may disable User Account Control (see Managing Vista's User Account Control above) and re-start Windows.
As an alternative to using Office Outlook for all e-mail, you can set the Windows Mail included in Vista as its default mail handler (see "change default e-mail program" in the Program Controls section below). In Windows 7 (or Vista) you can download and install the free "Windows Live Mail" from Microsoft to use as the default mail handler (for details and other options see the related article below, "Email - How to Setup and Use Email in Windows to send MLS Reports".) Even when another program is the default mail handler for Windows, Microsoft
Office components can still send e-mail out through Outlook. Only Outlook needs CDO's to collaborate with other programs.Note 3: If Office Outlook has been set as the default mail program in Windows but you do not intend to use Office Outlook at all for e-mail, it can be removed without removing the other Office components (such as Word or Excel).
To temporarily remove Office Outlook as an active component of Microsoft Office in Windows Vista/7:
For Microsoft's instructions to remove (or install) the Outlook component in Office 2007, see the related article below, "Remove Individual Office Components".
For Microsoft's instructions to uninstall the entire Office 2007 suite of programs, see the related article below, "Uninstall Office 2007".
▲ Back to the top of this page
To determine if Internet Explorer is the default web browser in Windows Vista, 7, 8.1, or 10: click Start (right-click in Windows 8.1 or 10) > Control Panel > double-click on Internet Options > select Programs tab > Default Web Browser ("Opening Internet Explorer" in Windows 10). To set Internet Explorer as the default web browser (if it is not already), click the "Make default" button ("Make IE the default browser" in Windows 10) and check "Tell me if Internet Explorer is not the default web browser."
To set or change a default program (such as for e-mail or web browser) in Windows: [if changing e-mail from Office Outlook, also see change default e-mail program below]
To confirm a change in the default web browser in Windows 7, click Start, type any Internet address starting with "www" in the box at the bottom, and then press the Enter key on your keyboard. That web page will open in Windows' default browser.
To confirm a change in the default
web browser in Windows Vista:
click Start, select Run {if Run is not available, hold down the Windows
logo key ![]() and press "R"} > type any Internet address starting with
"http://'' {you may click on any item in a list of visited sites if it
displays} > click OK or press the Enter key. That web page will open in
Windows' default browser.
and press "R"} > type any Internet address starting with
"http://'' {you may click on any item in a list of visited sites if it
displays} > click OK or press the Enter key. That web page will open in
Windows' default browser.
To Verify or Change which E-mail program is set as the default for sending e-mail through Windows Vista, 7, 8.1, or 10:
Change Default E-mail Program: Normally you can use "Set your default programs" as described above to change your default e-mail program in Vista or, once an e-mail program has been installed, in Windows 7, 8 and 10. However, if Office Outlook gets set as the default (see "Override Outlook" note below) - which can happen automatically when the Office suite updates on your computer- , to change the default e-mail program from Office Outlook to another e-mail program (such as "Windows Live Mail", "Windows Mail", or Thunderbird), it may be necessary to either "Verify or Change the default association for sending" as described above, and/or customize program access (to block Outlook from interfering with your preferred default email program) as follows:
Override Outllook Default note: Windows Updates that include updates to Microsoft Office may set the Outlook component of Office as your default email handler for all email in Windows - even though you may be using a different default email program. If you do not use Outlook, you may want to uninstall this component of Microsoft Office. Otherwise, follow the steps above to set your Program Access and computer defaults to your preferred email handler. For more information on setting up email, see "Email - How to Setup and Use Email in Windows" in the related articles section at the end of this webpage.
▲ Back to the top of this page
To close a program that is not responding, without closing Windows:
To stop a process from running, without closing Windows:
To open the Windows Task Manger with your mouse, right-click on the Windows task bar (at the bottom of the screen) and select Task Manager ("Start Task Manager" in Windows 7). To open Windows Task Manager from your keyboard, either (a) press the Delete key while holding down both the Ctrl and Alt key; or (b) press the Esc key while holding down both the Ctrl and Shift key.
To add, remove or repair a program in Windows Vista and later:
▲ Back to the top of this page
To activate the Windows Run Command in Vista or Windows 7:
To add a shortcut for a program to the Windows Desktop:
Copy Shortcut Note: Alternatively, you can copy a shortcut for a program by selecting Start > Programs > right-click on the desired program > select Copy > right-click on the Windows Desktop > select Paste.
There are three ways to change the size of icons in Windows Vista or Windows 7. Note that the selected size will apply to all icons as indicated.
To choose large, medium or small (classic) icon size on the Windows desktop:
- Right-click on the desktop
- Click View
- Select the desired size.
To dynamically vary icon size (change by degrees) on the Windows desktop:
- Hold down the control (Ctrl) key on your keyboard
- With the keyboard's Ctrl key depressed, also depress and hold down the right mouse button
- While both Ctrl key and right mouse button are depressed, scroll the mouse wheel up for larger size icons, or scroll the mouse wheel down for smaller size icons.
To change the size of all text and icons (both on Windows desktop and in programs), change resolution setting for your monitor as follows:
- Right-click on an unused space of your Windows Desktop
- Select Personalize
- Select Display Settings
- Under Resolution,
- To increase display sizes, click and move the slider to the left (which will lower the resolution)
- To decrease display sizes, click and move the slider to the right (which will raise the resolution)
Resolution Note: the resolution setting of your monitor determines the size of text and icons inside all programs (such as CTI Navigator). In general, higher resolution displays are sharper (less blurry) but smaller. Normally, LCD monitors should be set to their "native resolution" (i.e., factory default setting). Typical resolution settings for CRT monitors are
- 1024 x 768 for 15 inch monitors
- 1280 x 1024 for 17 to 19 inch monitors
- 1600 x 1200 for 20+ inch monitors.
▲ Back to the top of this page
To display the Menu Bar in Windows Explorer of Vista or Windows 7:
To keep the Menu Bar visible every time you open Windows Explorer:
Click the down arrow beside Organize on the toolbar
Open the Layout submenu
Check Menu Bar.
To view hidden files, folders and file extensions in Windows Explorer:
Note: Folder Options to view hidden files or folders can also be set in Window's Control Panel:
▲ Back to the top of this page
To display the VirtualStore Folder in Vista or Windows 7:
Note: CTI Navigator cannot access necessary Windows system files from Windows' Virtual Store location. Also, if User Account Control redirects the MLS data and/or data updates into its Virtual Store, the CTI Navigator program cannot access this data. (Updates will run but there will be no new data in CTI Navigator; or print jobs may not get from CTI Navigator to your printer.) Therefore, if you find a CTI Navigator folder in the Virtual Store, it should be deleted along with all its contents. Both the program and MLS data need to reside in the actual (not virtual) Windows Program Files folder (or "Program Files (x86)" folder in a 64-bit Windows).
To delete CTI Navigator from the Windows VirtualStore:
To display the Menu Bar (File/Edit/View/Favorites/Tools/Help) in Internet Explorer 7, 8 or 9:
To keep the Menu Bar visible whenever you open Internet Explorer:
Open the View Menu (simultaneously press Alt+V if the Menu Bar is not already visible)
Open the Toolbars submenu
Check Menu Bar.
To copy the Path of a file or folder into Windows' clipboard:
Hold down the shift key
Right-click on the file or folder
Select "Copy as Path".
▲ Back to the top of this page
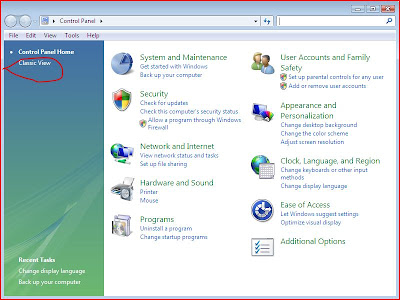
To configure appropriate security for CTI Navigator in Windows Vista or Windows 7, first open the Windows Control Panel. If the Control Panel View is set to Categories, it will be easier to find these security controls by selecting "Classic View" in Vista; or in Windows 7 click "View By" and select "Large Icons" or select "Small Icons".
 or
or 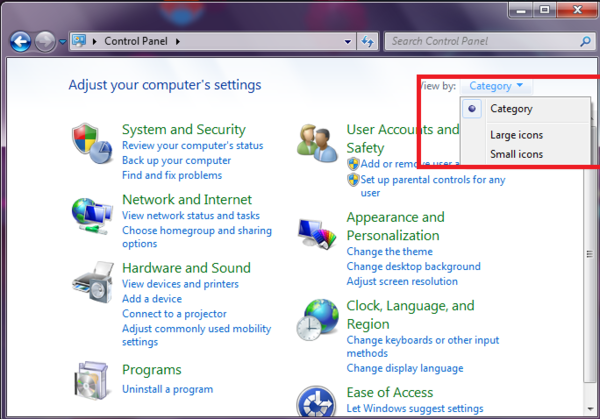
To avoid security conflicts, only one firewall should be active at a time (i.e., run only the Windows firewall or a third-party firewall, but not both simultaneously).
▲ Back to the top of this page
For details see How to configure and use Automatic Updates in Windows (Microsoft's instructions) in the related articles below.
Microsoft has extended the restricted privilege security model of Windows Vista to Internet Explorer (version 7 and later) in Vista and in Windows 7 and 8. This can provide extra protection against malicious code entering Windows through the browser. The new security level is called "Protected Mode." The Protected Mode of Internet Explorer (IE) utilizes the User Account Control (UAC) function to implement the principle of "least privilege" (and therefore is not supported in Windows XP or earlier). Sometimes this extra security can interfere with legitimate actions over the Internet.
The Protected Mode in Internet Explorer can be disabled for troubleshooting or performing specific actions in unprotected mode as follows:
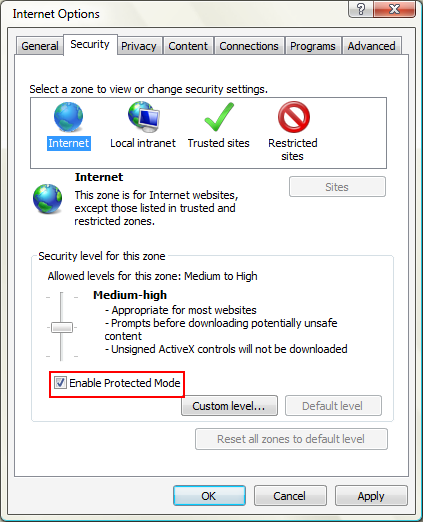
below the "Security level for this zone", and directly above the Custom level... and Default level buttons, un-check "Enable Protected Mode" > click OK button > if prompted with "Warning! The current security settings will put your computer at risk", click OK > close all IE screens, then re-open IE for the change to take effect.
▲ Back to the top of this page
The error message "Remote server does not exist or is unavailable" when logging into CTI Navigator over the Internet, sending new or retrieving existing listing information, photos, or CTI Matchmaker, indicates that: (1) one or more of the Internet components in your Windows is not properly activated, configured, installed or registered; or (2) something such as an Internet Firewall, Proxy Server, or ISP filter is interfering with secure remote computer connections over the Internet. See Configure Security above for instructions to configure security in Windows. For instructions to configure a third-party security program on your computer, see that vendor's help or the related article below appropriate for that program. For specific steps to fix this error, see the related article below, "Fix "Remote Server does not exist or is Unavailable" error (462)".
Also ensure that CTI Navigator is installed and running in Windows Vista or Windows 7 with administrative privileges. Right-click on the CTI Navigator icon on the Windows desktop > select Properties > click the Compatibility tab > check "Run this program as an Administrator" > click OK. You may also need to right-click on the CTI Navigator icon > click "Run as Administrator" > click Allow, the first time you open the program.
If you are still unable to log into CTI Navigator over the Internet or to send information (such as listings, photos, or Matchmakers) from your computer to the MLS server, run the following "SOAP" patch to ensure that Windows and CTI Navigator are using Microsoft's enhanced computer-to-server Internet connectivity codes:
Note: This "SOAP" patch may fail to install if the codes are already up-to-date on your computer. No other files are needed.
▲ Back to the top of this page
When setting up a network printer in Windows Vista or Windows 7, let Windows locate the printer on the network and add its IP address. If you browse to install a network a printer and manually enter its URL (alphabetic) address rather than its IP (numeric) address, MLS reports may not get routed correctly to the network printer (they may just disappear).
Sometimes application extension files (.DLL or .OCX) must be manually registered to properly support functions in a program such as CTI Navigator. A variety of Active X, Automation, or "Run-time" type errors can result when associated application extension files (also called ActiveX controls) are not registered in Windows for use by the program.
To register an individual ActiveX control (dll or ocx) file in Windows Vista or Windows 7 (see note 1 below for shortcut when registering multiple files):
Note 1: Registration Shortcut. You can add a file to the Windows Vista registry that will allow you to right-click on any DLL file and simply select Register or Unregister (without going through the detailed commands above). This is especially helpful when registering or un-registering multiple files. To add the Register and Unregister command to your right-click menu in Windows Explorer, go to www.ctimls.com/Downloads/Windows/Vista/VistaDll.reg > click Save > right-click on the saved file in your Vista > select Merge > accept the registry change notice. To also add a file to the Windows Vista registry that will allow you to right-click on any OCX file to register or unregister it, go to www.ctimls.com/Downloads/Windows/Vista/VistaOcx.reg > click Save > right-click on the saved file in your Vista > select Merge > accept the registry change notice. Warning: Before making any registry changes, Microsoft highly recommends that you make a backup of your registry (see related article below, "How to Back up and Restore the Registry in Windows XP and Vista").
For more details, see the related article below, "Register dll or ocx files".
Note 2: DLL Folders. In a 64-bit version of Windows, 32-bit versions of Windows system files and DLL libraries (used by CTI Navigator) are in the "Windows\SysWOW64" folder; and 64-bit versions of Windows system files and DLL libraries are in the "Windows\System32" folder. In a 32-bit version of Windows, the Windows system files and DLLs are in the "Windows\System32" folder (and there is no SysWOW64 folder).
▲ Back to the top of this page
If the CTI Navigator function currently incurring an error previously worked on this computer and all other approaches to fixing the error (see CTI's Menu of Error Fixes) have failed, you can use the Windows System Restore function to reset Windows back to when everything worked correctly.
To Restore System Files in Windows Vista or Windows 7:
Note 1: System Restore does not affect data files. However, any programs or program updates that were installed later than the Restore date will need to be re-installed. Automated updates to programs installed before the restore date should re-download any missing program updates.
Note 2: See related article below for Microsoft's instructions for "Re-installing Windows Vista".
▲ Back to the top of this page
If requested during normal business hours, CTI technicians can access your computer over the Internet to provide remote troubleshooting assistance for the CTI Navigator program. Normally this requires downloading a small remote support utility that can create an encrypted connection appropriate for your computer. For detailed instructions on remote assistance, click here.
Note 1: Vista and Windows 7. If the User Account Control is active in your Windows Vista or Windows 7, you may need to temporarily disable User Account Control (UAC). To disable UAC see the Manage User Account Control (UAC) section above.
Note 2: Disclaimer of Warranty. All services are provided under the terms and conditions of CTI's license agreement accompanying CTI Navigator. Assistance in any form is provided only as a convenience to licensed users of CTI products. Problems and solutions may depend on the nature of your system environment and other parameters that are unknown to CTI. By requesting assistance, user agrees that actions and solutions described, suggested or implemented by CTI staff are entirely at the user's own risk and are provided without warranties of any kind. Under no circumstances, including negligence, shall CTI or any of its employees be liable for any direct, indirect, incidental, special, punitive, consequential or other damages, loss, cost or liability whatsoever that result from or are related to use of technical support provided by CTI.
Note 3: Security. Our remote assistance programs use encrypted data for privacy during transmissions, and require you to initiate a connection. No one can connect to your computer using these programs without your permission and participation.
Note 4: Viruses. The only information transferred during remote assistance connections from CTI is the pixels for screen display, mouse operations, and keystrokes. Since no files are transferred, these connections are not vulnerable to spreading any known virus.
▲ Back to the top of this page
Starting July 29, 2015 Microsoft is offering a free upgrade from Windows 7 or 8 (but not Vista or XP) to Windows 10 for one year. For information, on using CTI Navigator in Windows 10 click here.
▲ Back to the top of this page
Related articles and Internet links:
▲ Back to the top of this page
To return to CTI's on-line menu of Help & Support for CTI Navigator, click here or use the back arrow at the top of your Internet browser.
To go directly to CTI's menu of Error Fixes, click here.
rev.07.29.2015