All current versions of Windows include a utility that can be used to request assistance from another Windows user over the Internet. While the particular steps and screens are a bit different in each version of Windows, the procedure is basically the same. Essentially, the person wanting assistance runs "Windows Remote Assistance" to create an encrypted invitation file and a secure password. The requester then emails this invitation to someone they trust (such as CTI technicians) to connect to and temporarily control their computer. The person requesting help must have Remote Assistance and Remote Desktop Connections enabled in their Windows.
Click on any topic below to go directly to that section:
1. Open the Windows Control Panel
a. In Windows 10 or 8.1, right-click
on the Windows logo Start Button
![]() in lower left of all screens, and select Control Panel.
in lower left of all screens, and select Control Panel.
b. In Windows 8:
on any screen, press the Windows logo key
+ the X key, and select Control Panel; or
In Tiles view, type “Control Panel” and click on Control Panel under Apps Results.
In Desktop view, open the Charms Bar, click on Settings, and select Control Panel
c. In Windows 7: click Start and select Control Panel
2. Open Troubleshooting:
a. In Icon View, select Troubleshooting.
b. In Category View, under “System & Security” click “Find and Fix Problems”. IF System and Security is already open, under “Action Center”, click on “Troubleshoot common computer problems”.
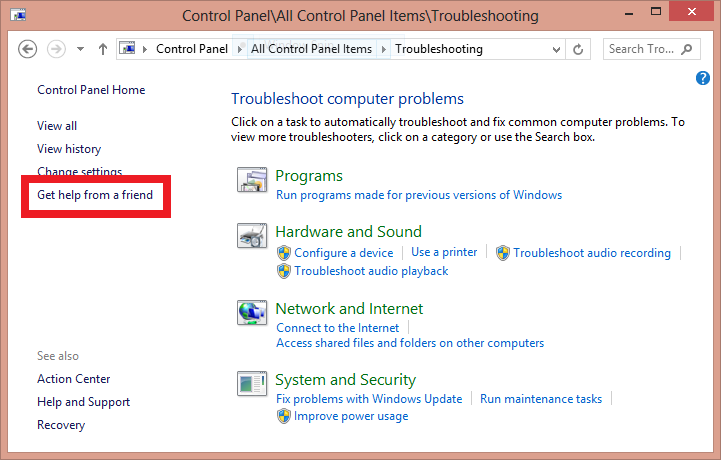
3. Click on “Get help from a friend” (on the left)
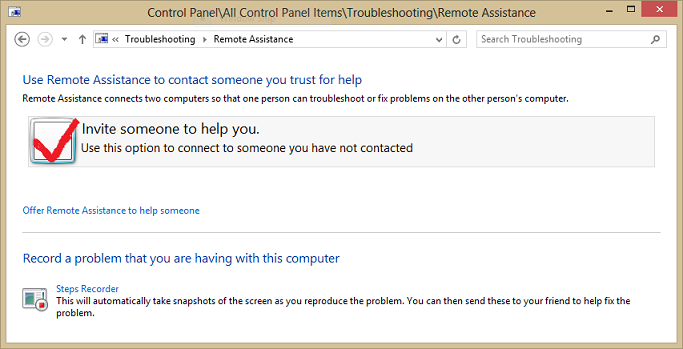
4. Click on “Invite someone to help you”
5. Select “Use e-mail to send an invitation” (or “Save this invitation as a file” if you want to manually attach the “Invitation.msrsincident” file to a personal web-based email message).
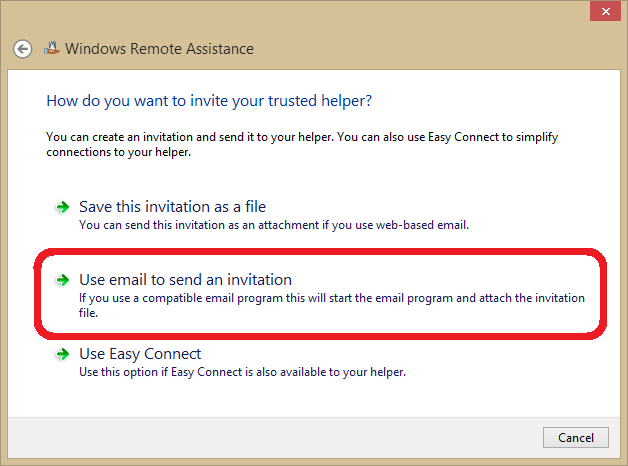
Windows will automatically create the invitation message, an encrypted "Invitation.msrsincident” file, and a 12 character password.
6. Address your email support request to CTI Support as directed (CtiMls99@hotmail.com; or CtiSupport@ctimls.com; or see email note) and send. Windows will automatically open a screen displaying the connection password.
7. Tell CTI Support which email address you sent your invitation to, and the 12 character password in your Windows Remote Assistance pop-up screen.
To allow a Remote Assistance connection, click here.
To suspend, change or end a Remote Assistance connection, click here.
▲ Back to the Top of this webpage ▲
1. Click Start
2. Select “Help and Support” [or type “Remote Assistance” in the Start Search box]
3. Select “Windows Remote Assistance” or “Use Windows Remote Assistance to get help…”
4. Select “Invite someone you trust to help you”
5. Select “Use e-mail to send an invitation” (or select “Save this invitation as a file” if you want or need to manually attach the invitation file in your web-based email).
6. Type and retype a secure password (with at least 6 characters, such as CTI*help).
· If you selected “Save this invitation as a file”, enter a path to the invitation file
7. Click Next [or Finish].
8. If you selected
· “Use e-mail to send an invitation”, Windows will automatically open the default Windows email program, create an invitation message, and attach an encrypted “RATicket.MsRcIncident”file.
· If you selected “Save this invitation as a file”, Windows will create and save an encrypted ”Invitation.MsRcIncident” file.
· Do not change the “.msrcincident” file extension.
· For optimum security, do not include your connection password in your invitation message (although you may send it in a separate email message if appropriate).
9. Address your email support request to CTI Support as directed (CtiMls99@hotmail.com; or CtiSupport@ctimls.com; or see email note) and Send.
10. Tell CTI Support which email address you sent your invitation to, and the connection password you created.
To allow a Remote Assistance connection, click here.
To suspend, change or end a remote assistance connection, click here.
▲ Back to the Top of this webpage ▲
1. Click Start and select “Help and Support”
2. Select “Remote Assistance” if displayed
3. Select “Invite a friend to connect to your computer with Remote Assistance” or select “Invite someone to help you” whichever is displayed
4. Select “Use e-mail to send an invitation” (or select “Save this invitation as a file” if you want or need to manually attach the invitation file in your web-based email). Windows will automatically open the default Windows email program, create an invitation message, and attach an encrypted “RcBuddy.MsRcIncident”file.
5. Address your email support request to CTI Support as directed (CtiMls99@hotmail.com; or CtiSupport@ctimls.com; or see email note) and click “Invite this person”
6. Enter Your name beside FROM, and type an invitation message in the Message box.
7. Click Continue
8. Select a duration the invitation will remain open (typically 1 day or 24 hours)
9. Check “Require the recipient to use a password”
10. Type and retype a secure password (with at least 6 characters, such as CTI*help).
11. Click “Send Invitation”
12. Tell CTI Support the password you created.
To allow a Remote Assistance connection, click here.
To suspend, change or end a remote assistance connection, click here.
▲ Back to the Top of this webpage ▲
When a CTI tech opens your invitation for assistance file, you will receive a prompt to allow the connection and a separate prompt to allow the tech to "share control" of your computer.
1. Click “Yes” to a permission prompt such as “Would you like to allow Support/HelperName to connect to your computer?” (or "Do you want {Support/HelperName} to view your screen and chat with you?") This allows CTI Support to passively see your desktop, but not to use any Windows functions on your computer. CTI will not be able to help you use your computer unless you also share control (see next step).
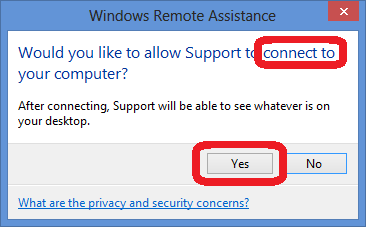
2. At a permission prompt such as “Would you like to allow Support/HelperName to share control of your computer?”
If your computer is running Windows Vista, 7 or 8, check beside “Allow {Support/HelperName} to respond to User Account Control prompts” and then
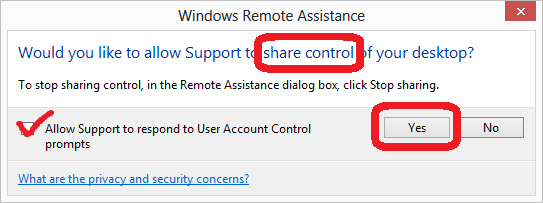
Click Yes .
Email Note: CTI's main Tech Support email addresses are CtiSupport@ctimls.com; and CtiSarasota@gmail.com.
Personalization Note. During a Remote Assistance connection any personalization settings (such as desktop background or custom cursor image) will be temporarily disabled. This is to optimize connection speed. Personalization settings should be automatically enabled once the Remote Assistance connection is closed, or Windows is restarted.
▲ Back to the Top of this webpage ▲
In the Windows Remote Assistance toolbar click
Pause to suspend sharing your computer screen. CTI will not be able to view your screen until you click Continue.
“Stop Sharing” or "Stop Control" to end sharing control of your computer screen but allow CTI's tech to continue to to view your screen.
Disconnect or Close (red X in top right corner) to completely terminate the support connection.
Remote Assistance is usually enabled by default in Windows. However, if you are not able to make a Remote Assistance Connection, you should verify that Remote Assistance is enabled on your computer as follows.
Open Windows Control Panel
In the Control Panel
in Classic or Icon view, click System, select Remote Settings Task (on left)
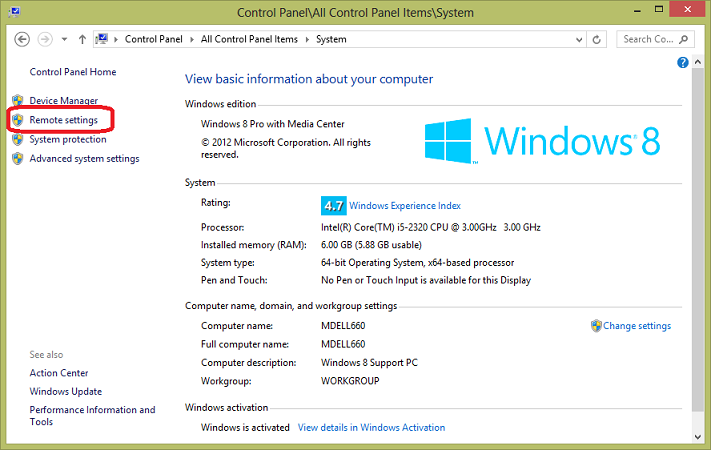
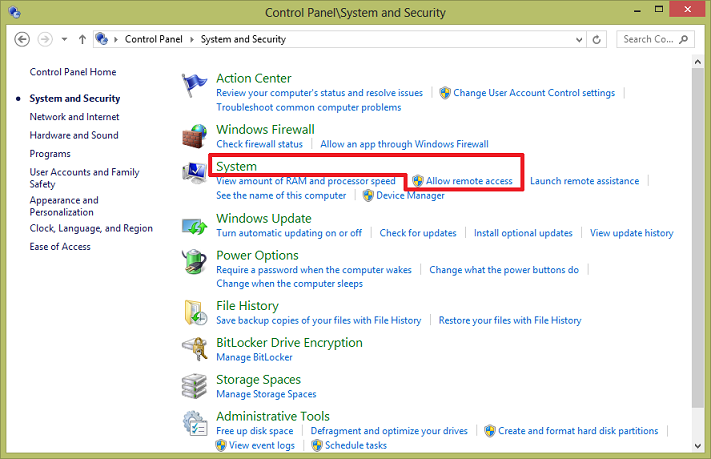
in Category view, click System and Security, select System, and click "Allow Remote Access"
Under the Remote tab on the System Properties screen,
in Windows Vista/7/8/10, check "Allow Remote Assistance connections to this computer"
in Windows XP: check "Allow Remote Assistance invitations to be sent from this computer"
if you are using a firewall other than the one provided in Windows, you may need to set it to open port 3389.
Click the Advanced button
On the Remote Assistance Settings screen
check "Allow this computer to be controlled remotely"; and
select the maximum amount of time (in Minutes, Hours or Days) invitation can remain open. The setting default is 6 hours.
click OK.
▲ Back to the Top of this webpage ▲
Related Articles and Internet Links
How to Remote Desktop Access Windows 10 Pro - video tutorial (6:02 minutes)
Windows 10 and 8.1 Remote Assistance Tutorial Video (4:26 min)
Connect to another computer using Remote Desktop Connection in Windows 7 (instructions by Microsoft)
How to Connect to Remote Assistance in Windows 7 from the book "Windows 7 Just the Steps For Dummies" .
Windows 7: Remote Assistance - video tutorial (6:21 min)
How to Connect to Remote Assistance in Windows Vista from the book "Windows Vista Just the steps for Dummies"
How to Setup and Use Remote Desktop in Vista - video tutorial (7:47 min)
Fix Firewall blocks Remote Assistance in Windows 7 or Vista (Microsoft)
Windows 8 Note: Other than using Start to open Windows Control Panel, Windows 7 information also applies to Windows 8 Desktop.
{rev. 05.01.2017}