You can click on a topic of interest in the list below to go directly to that topic:
When Remarks, Special Remarks, or Directions are incomplete (some information does not display or print), it usually is because too much text has been entered into that field in the listing record in Navigator to fit in the space reserved for it on MLS reports. The listing agent must correct this issue as described below.
CTI Navigator sets an approximate limit on what can be typed into the Remarks, Special Remarks, and Directions fields. However, because CTI Navigator allows proportional (variable) spaced fonts, it cannot be programmed in advance exactly how much space what is typed into the field will eventually fill the entire printable space. It is not just a function of number of characters. The total space is affected by factors such as the difference between letters (such as "i" versus "w") and between numbers (such as “1” and “8”), but also by the fact that capital or italicized letters occupy more space than lowercase or non-italicized versions of the same letter. It would degrade performance if the program had to continuously re-calculate space used/remaining with every keystroke as you type in the Remarks, Special Remarks, or Directions fields.
Pasting information into a field on the other hand is an all-or-none process. Therefore, Navigator will accept pasting blocks of text even though some of the text may exceed the available print area and not display on MLS reports.
As a general guideline, to ensure text can display in printed reports when using Arial 12 point font, listing agents should:
Depending on the actual characters, spacing and formatting used, it is possible to enter about 20 to 25% more than the above recommended maximum numbers. Note however, that viewing Add or Modify Listing on a larger monitor or maximizing the view will display more typing area, but does not actually increase what the system will display.
To help get more of the important information to display, listing agents can:
Field sizes have been optimized so that key information can be displayed in a variety of report formats. Any expansion in the size of one field would require offsetting reduction in the size of other field(s).
▲ Back to the Top of this web page ▲
Clear Temp Files. If printing from CTI Navigator Web worked properly recently, clear the temporary Internet files for the browser in which you are running Navigator (Internet Explorer, Firefox, Chrome, on Windows or Safari on Mac). Then close all open screens in that browser, and re-open the CTI Navigator website.
Page Setup Basics. CTI Navigator Web prints using your browser's printer and page setup settings. These setting should be for Letter size paper in Portrait orientation with no Header or Footer added by the browser. To view or change the current printer and/or printer settings for your browser, press the Ctrl+P keys on a Windows computer or Command+P on an Apple computer. Otherwise, in the browser menu for
Reduce Page Margins. If MLS reports have blank pages or do not fit on the print pages correctly, try adjusting the top and bottom margins (such as reducing size to 0.25 in Internet Explorer or Firefox) on the browser's Page Setup screen. Otherwise, print MLS reports using the browser's PDF viewer (described below) instead of using its general print controls.
Un-block Pop-ups. Also, to print from CTI Navigator Web, your Internet browser (or add-on toolbar) must allow the print screen to "pop-up" in a browser window. If you do not see a print screen, print options, or print preview when you click a Print button in CTI Navigator Web, configure or disable any pop-up blocker in your browser to allow ctimls.com. For instructions to disable the default Pop-up Blocker in your browser, click on the browser in the list below that you are using :
For additional instructions, select "Disable or Configure Common Pop-Up Blockers or Remove Add-on Toolbars" in the Related Articles at the end of this web page.
Trust Ctimls.com website. If your pop-up blocker is disabled or properly configured to allow "ctimls.com" but the print screen or print options fail, you may need to add "ctimls.com" to your browser's trusted sites and/or enable JavaScript/scripting in your browser. To add CTI's Internet server website (ctimls.com) to Internet Explorer's Trusted sites (which will also enable scripting specifically for the MLS website):
Select Tools > Internet Options > click the Security tab > select Trusted Sites > click Sites button > un-check "Require server verification (https:)... " > click in the "Add this website to the zone" box and type ctimls.com > click the Add button > click the close button.
Normally scripting is already enabled by default in all the major browser. For instructions on verifying or enabling scripting in the browser you are using, select "Enable JavaScript (scripting) in Internet Browsers" in the Related Articles at the end of this web page.
Print Using PDF Viewer. If your browser’s default print control is not inserting page breaks properly for MLS reports, even after disabling it from inserting its own Headers and Footers (as described under "browser page setup settings" below) and adjusting the page margins, print using the browser's PDF printer (click here to change the browser's default PDF printer if needed). To print using the browser's PDF print controls, on the CTI Navigator Print Report screen click the “View PDF” button (instead of the Print or the Preview button), and then select Print in the PDF viewer itself. You can see on-screen how the separate pages will print.
Note: The IE Tab browser extension must be installed and activated in Firefox to support printing MLS reports from Firefox's PDF Viewer in Windows. When the IE Tab extension is running in Firefox, a blue miniature Internet Explorer icon
is displayed on the website tab. Currently, the IE Tab extension for Firefox only runs in Windows (not in Mac OS X).
Chrome includes a built-in PDF viewer from Google. If this internal viewer does not print MLS reports in PDF View properly, you can disable it, download the free Adobe Reader, and set Chrome to use the Adobe Reader (as described under Chrome PDF Settings below).
Print Reports in Firefox:
To print MLS reports, follow the
instructions in "Print Using
PDF Viewer" above and then select the print icon
![]() on Firefox's PDF Viewer screen. If the print problem persists, click "Fix Printing Problems in
Firefox" for Mozilla's instructions on how to
troubleshoot printing problems in Firefox. If the problem is
printing multiple page reports, print from a different browser (see
"Print CMA from Firefox
through IE" below).
on Firefox's PDF Viewer screen. If the print problem persists, click "Fix Printing Problems in
Firefox" for Mozilla's instructions on how to
troubleshoot printing problems in Firefox. If the problem is
printing multiple page reports, print from a different browser (see
"Print CMA from Firefox
through IE" below).
Print CMA from Firefox through Internet Explorer: Due to a change in the way Firefox processes multiple page printing (which is now different from all other browsers), to print a CMA you may need to print your CMA in Firefox through the Internet Explorer (IE) browser. To print through IE:
To save your CMA report as a PDF file in IE, print to a PDF Converter. This is described in CTI's General Tech Tip, "Save File or Report as PDF".
Print problems for CTI Navigator Web can be caused by the browser's "Page Setup" settings.
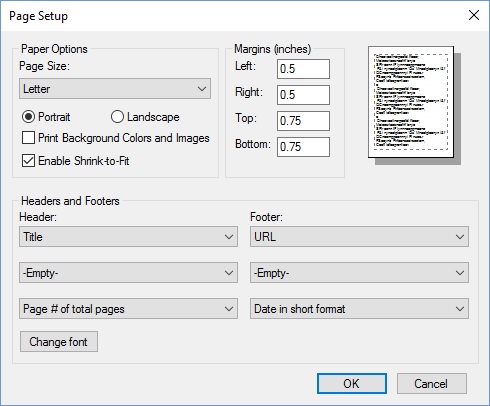
Internet Explorer. To see or change Internet Explorer's default Page Setup, go to the menu bar at the top of the browser, click File* (or the Print icon if displayed) and then click Page Setup. This will open a "Page Setup" screen similar to the following:
*IE Menu Bar Note. If the menu bar is not displayed, either press the Alt key on your keyboard to temporarily display it; or right-click on a blank spot at the top of the browser (or simultaneously press Alt+V > select Toolbars) and check "Menu Bar" to set it to stay visible.
What is in the top box under Header/Footer prints on the left side, what is in the middle box prints in the middle of the line, and what is in the bottom box prints on the right side of the Header/Footer line. For example, the settings above will create a Header with Title (if any) on the left, and "Page_ of _" on the right at the top of every page; and URL on the left, and Date on the right in a Footer at the bottom of every page. Any entry under Header will reserve the entire top line of every page for a header, even if there is no text to print there. The same is true for Footer (which reserves the bottom line of every page).
The Margin settings determine how close to the edge of the sheet the printer prints either its Heading/Footer, or if no Heading/Footer, how close to the paper edge the text prints. When the default page setup reserves space at the top and bottom of all pages for a browser Header and Footer, the space available to print reports (between the Header/Footer) is reduced. MLS Reports contain their own Header and Footer, and are not designed to also print (or reserve space for) a browser's Header and Footer. Checking "Enable Shrink-to-Fit" may cause the report to print between the Header/Footer at a reduced size. However, if the Top and Bottom Margins are too large (greater than 0.25 for most printers) and the browser is adding its own Header and Footer (as shown above), the MLS report may not print at all - even with "Enable Shrink-to-fit" checked. This is because the browser's Headers/Footers apply to every page, so no page will have room to print a complete MLS report page.
To change or delete any Header or Footer setting in the browser Page Setup, click the down button to the right of its setting box. Select "Empty" to not reserve space to print that Heading or Footer item. If any box has an entry other than empty, the entire Header/Footer line will be reserved and not available for printing report text or photos. To maximize the space available in which to print reports or other information, set all Header/Footer commands to "Empty" as shown below. If the browser adds its own Header and/or Footer, some report pages or photos may overflow onto subsequent pages, causing blank pages or incorrect page breaks.
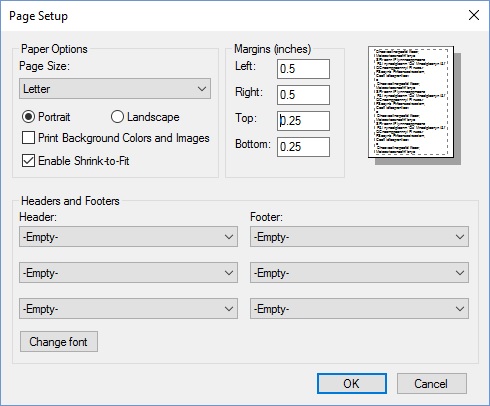
Depending on your printer, you may also need to adjust the margins (to between 0.5 and 0.25 for most printers) to print reports the way you prefer. All of these print controls and settings are in the browser (not in CTI Navigator Web). For Microsoft's information on printing from Internet Explorer, click Help in Internet Explorer's Menu bar > select Internet Explorer Help > type "Page Setup" under the Index or Search tab.
▲ Back to the Top of this web page ▲
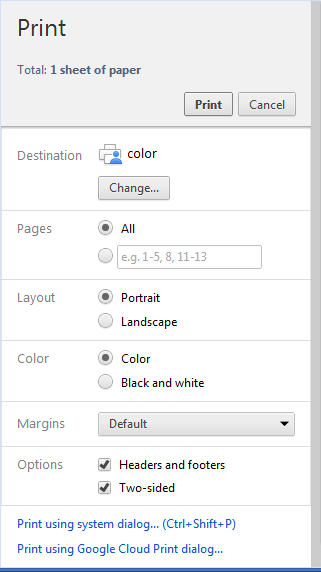
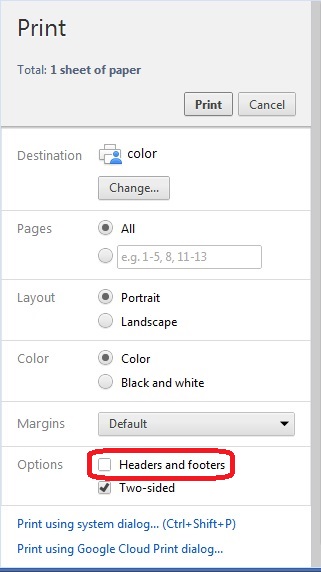
Chrome. To adjust basic printer and page
settings in Chrome, click the menu icon
![]() (or wrench icon
(or wrench icon ![]() )
and then select Print, (or in press Ctrl+P
Windows or Command+P in Mac) to display Chrome's Print
screen (see settings in image below).
)
and then select Print, (or in press Ctrl+P
Windows or Command+P in Mac) to display Chrome's Print
screen (see settings in image below).
|
DEFAULT |
ADJUSTED |
 |
 OR
OR
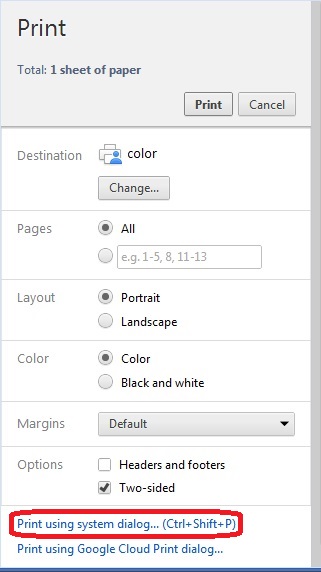 |
On this screen you can adjust:
Note that changes in Chrome's Print screen are only temporary during the current browser session. Once you close all the browser screens, Chrome returns to Google's default print settings (instead of retaining your custom settings).
▲ Back to the Top of this web page ▲
Firefox. In Mozilla Firefox select File* > "Page Setup" to open the screen where you can adjust print orientation, margins, and the page headers and footers:
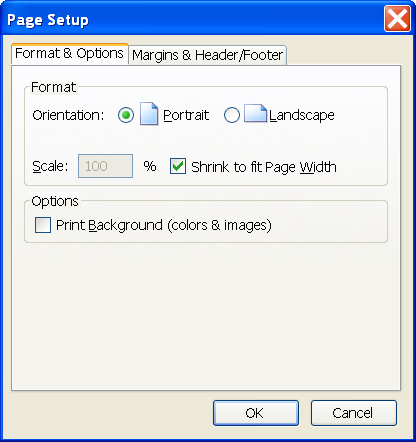
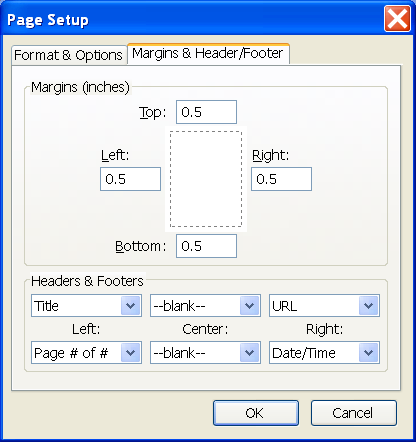
*FF Menu Bar Note. If the menu bar is not displayed at the top of your Firefox browser screen, either press the Alt key on your keyboard to temporarily display the menu so you can select File > Page Setup; or Click the Menu button
in the top toolbar > select Print > Page Setup.
If MLS reports do not print correctly in Firefox, try setting the
Top and Bottom Margins to 0.25 and
set all the
"Headers & Footers" boxes to "-blank-"
to maximize the printable area for the MLS report.
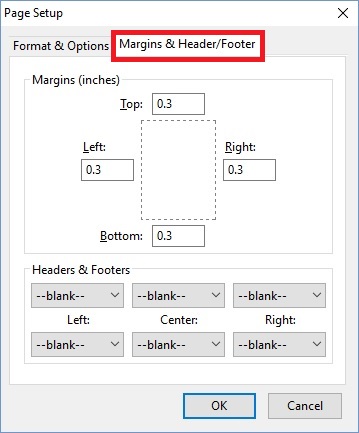
Otherwise, follow the instructions to "Print Using PDF Viewer" above.
▲ Back to the Top of this web page ▲
Safari. In Apple Safari (for versions prior to 3 on a Mac or current versions installed in Windows), select File > Page Setup. The default Page Setup screen displays all 1 inch margins as shown below:
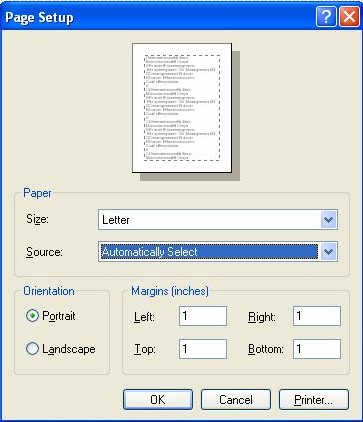
If your MLS reports (especially CMAs) do not print correctly in Safari, try setting the Top and Bottom margins to 1.2 inches (or zero, or whatever works for your printer). Set the margins on the File > Print Preview screen so you can use Safari's Up and Down Arrow icons in the top menu of the Print Preview screen to preview for page breaks.
Some printers may also have utility software for configuration. To check, select the Apple icon at the top left of the screen > select System Preferences > "Print & Fax" in the Hardware section.
Starting with version 3 (Leopard) and later of Safari installed on a Mac, the page setup has been integrated into the File > Print dialog screen. On the Print dialog screen you can select Page Size, set the Orientation and its Scale (+/- 100%), and you can check or uncheck to Print Headers and Footers. Ensure that Paper Size is set to "US Letter" (8.50 by 11.00 inches) and Orientation is set to Portrait. Un-check "Print Headers and Footers" to provide more printable area for MLS reports and to support normal page breaks.
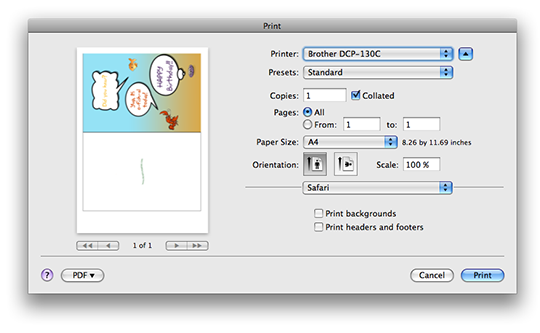
There is no setting option for margins on the print dialog screen. Print Margins are now a feature of the specific printer that is installed, and the margin settings can be shared across browsers in Apple's OS X System Preferences. Depending on your brand and model of printer, selecting Paper Size may provide a "borderless" option, or a "Manage Custom Sizes" option. The "Manage Custom Sizes" screen will usually provide margin settings that you modify and then save the setting with a Custom Name (such as "No Margins" if you set all margins to zero). For more information on managing or resolving printing issues, consult your printer manufacturer's website.
The following procedure for setting margins in Safari 4+ on a Mac was posted on the Macworld Community Form.
Note: You DO NOT need to select the Paper Size on the "Print" screen menu. Although "Paper Size" displays the default "Letter," it actually prints the margin sizes set for your Custom paper size.
If your printer does not provide an adjustable margin setting option, you can (install and) open Firefox, and then change the Page Setup margins in Firefox (see above). Those adjusted margins should also be reflected when printing from Safari on a Mac using OS X.
▲ Back to the Top of this web page ▲
To speed up graphic performance, Internet Explorer 9 and later direct the rendering of web pages, images and web mail from your computer's Central Processing Unit (CPU) to your video card's Graphics Processing Unit (GPU) by default. If your computer's video card or video driver do not support GPU hardware acceleration, you may not be able to Print or view the Print Preview of web pages or emails; printed colors may not match displayed colors; or printing may generate a script error (that may reference "URL: res://ieframe.dll/preview.js"). Script errors also can be caused by an outdated, incompatible or corrupt printer driver.
To resolve problems when trying to print from IE 9, 10 or 11, first update your printer driver to the latest version. If the print problem persists, set your IE 9, 10, or 11 browser to use Software rendering instead of GPU rendering. Then, if necessary, re-register the ieframe.dll file in Windows.
To update or repair your printer driver to the latest version, follow the steps below as needed:
For detailed instructions, select the article in the Related Articles at the end of this web page appropriate for your version of Windows. (Note that IE 9 or later cannot be installed in Windows XP or earlier.)
As a temporary workaround for script errors when printing from IE 9+:
To set your IE 9+ to use Software rendering instead of GPU (hardware) rendering:
To re-register the ieframe.dll file in Windows 7 or Vista:
To re-register the ieframe.dll file in Windows 8:
▲ Back to the Top of this web page ▲
If you are "unable to print or view the print preview of a webpage in Internet Explorer 7, 8, or 9", click here for Microsoft's repair instructions. This article describes the following resolution methods:
ICACLS "%userprofile%\AppData\Local\Temp\Low" /setintegritylevel (OI)(CI)low
When PDF documents do not print or do not print properly from the browser, change the browser's default PDF settings. Install Adobe Acrobat Reader DC onto you device before attempting to set your browser to use it.
Chrome. To set Chrome to use Adobe Reader in Windows to view and print PDF documents:
Firefox. To change the default PDF settings in Firefox (only if the current settings are not working properly):
Black & White or Color. To print in Black & White, check "Print in
grayscale (black and white)" on the Print dialog box for your printer (as
shown below)

To send color code for PDF documents to your color printer, un-check "Print in grayscale (black and white)" on the Print dialog box for your printer.
▲ Back to the Top of this web page ▲
Print problems in Windows are typically caused by either a missing, corrupted, out-of-date, or misconfigured printer driver (or LAN print server/spooler), or by non-standard printer default settings or fonts. Printer drivers can become corrupted by viruses, power surges or outages, and other computer problems. If you upgrade your version of Windows, the current printer driver may not be fully compatible with the new version of Windows.
The preview and print functions in CTI Navigator Desktop depend entirely on the default settings of the default printer in your Windows. Reports depend on your printer's default settings to be standard formats (letter size, portrait layout) and standard fonts (Windows standard Arial). A corrupted or out-of-date printer driver may fail to print MLS reports properly even though it prints correctly for other programs (that do not depend on the printer's default settings). In Windows XP, you must install a print driver before you can preview reports correctly (even if a printer is not attached to the computer).
You can check the Windows default printer and its settings in the Windows Control Panel by selecting Printers (or "Devices and Printers"). To verify that the printer driver is active, right-click on the default printer > select Properties > click Test Print Page (or print from another Windows application such as WordPad or Word). Click Printing Preferences to verify that the default printer is the correct name and that it is set to letter size paper, portrait orientation, main or default tray.
In CTI Navigator Desktopyou can see the Windows default printer settings by selecting the "Setup" button above the Preview button in the "Select Report" screen. If the default print driver is not correct or one of the printer's default settings is non-standard (such as legal, landscape, postcard, banner, etc), MLS reports (which are formatted for Portrait layout) cannot print correctly. If you do not want to change the default printer setting in Windows, you can use this Setup button on the Select Report screen in CTI Navigator to temporarily change the printer properties (such as from black and white to color, or vice versa) to print the selected report(s) during the current print session. Using the Setup button on Navigator's Select Report screen does not change the printer's default settings in Windows.
Note 1 - Administrative Settings in Vista/7: If you are printing from CTI Navigator Desktop that was installed prior to April 17, 2012 in Windows Vista/7, you may need to change the administrative settings in Windows for CTI Navigator. Open Windows Explorer (right-click on the Start icon) > browse to Program Files\CTI Navigator > right-click on CTI Navigator.exe > click on Properties > select the Compatibility tab > Under "Privilege Level" check "Run this as an administrator" (or uncheck i if this is already checked) > click the OK button. If you are using a 64-bit version of Windows Vista/7, it also is advisable to ensure that CTI Navigator is not in Window's "VirtualStore". To check and correct this, open Windows Explorer, browse to \Users\{YourUserName}\AppData\Local\VirtualStore\Program Files (x86), and delete any CTI Navigator folder and its contents if they appear in this "Virtual Store" location.
Note 2 - Network Printer in Vista: When setting up a network printer in Windows Vista, let Windows locate the printer on the network and add its IP address. If you browse to install a network a printer and manually enter its URL (alphabetic) address rather than its IP (numeric) address, MLS reports may not get routed correctly to the network printer (they may just disappear).
Note 3 - Spooling: When printing over a network and/or through a wireless router, you may need to set the printer driver to accumulate the entire print file (by spooling) before sending the document to the printer. Otherwise, the printer may fail to print or lock up when printing MLS documents. To set spooling, open Windows Control Panel > select Printers > right-click on the name of the default printer > select Properties > Advanced tab > under "Spool print documents so program finishes printing faster" select "Start printing after last page is spooled" > OK button.
▲ Back to the Top of this web page ▲
To download the latest driver for your model of printer, go to the printer manufacturer's website. Most manufacturer's have a site with their name (www.{brother, dell, epson, hp, kodak, lexmark, or xerox}.com - although Canon's is www.usa.canon.com). If you don't know your printer's model, some of the generic driver site's have programs to detect it (such as www.drivershq.com, www.driverzone.com). If you are printing over a local area network, have the network administrator ensure that the latest print drivers are installed for that specific model of printer and for the version of Windows running on your computer.
MLS Reports are formatted to use the Windows standard Arial TrueType fonts. (The CTI Navigator program depends on Windows to provide the standard Courier New TrueType fonts and the MS Sans Serif fonts.) All of these are standard fonts included in every installation of Windows, so these fonts are not installed (or replaced) by CTI Navigator. If customized or corrupted versions of these fonts have replaced the original from Microsoft, MLS reports cannot print correctly. See Microsoft's instructions on reinstalling the standard fonts included in Windows under Related Articles below. You will need your Microsoft Windows installation disk to restore the standard fonts using Windows Setup as described in this Microsoft article.
Sometimes other programs send special print commands and/or fonts to the printer that stay in memory (i.e., the printer does not return to its default settings). MLS reports may not print correctly if the printer is not using its default (standard) settings. Selecting Print from the MLS report Preview screen (rather than printing directly from the Search Results table) can help ensure that the default printer driver with its default settings are activated in Windows.
It also is possible that memory management settings or resource limitations in Windows or in the printer itself are causing printing problems. Try closing all programs except CTI Navigator, turn the printer off and back on (to flush its memory and re-set it to its default settings) and then print MLS reports without selecting Preview.
Instead of selecting Print and Print Preview, you can select Report
Display ![]() on a search results table. The Report Display function
is not as resource (memory) intensive as the
Print Preview function. Using Report Display allows you to interactively preview
reports for each listing in a search results table and select only those you
want to print (see description of the Report Display Icon in the Data
Table Overview section of CTI Navigator Help). Even when
your computer or printer may have resource limitations,
you still should be able to use Report Display to preview before
printing.
on a search results table. The Report Display function
is not as resource (memory) intensive as the
Print Preview function. Using Report Display allows you to interactively preview
reports for each listing in a search results table and select only those you
want to print (see description of the Report Display Icon in the Data
Table Overview section of CTI Navigator Help). Even when
your computer or printer may have resource limitations,
you still should be able to use Report Display to preview before
printing.
Scanners may reserve specific sections of memory exclusively for us by the scanner. If you have a scanner attached to your computer, try inactivating the scanner's memory management program before printing MLS reports.
If re-installing your printer driver does not fix the problem, you may need to adjust the margins for output to your printer. To change the printer margins, in CTI Navigator select File > Options > Printer Margin Offsets.
Printer margin adjustments are in pixels. There are approximately 1,440 pixels in one inch. Therefore a one-eighth inch adjustment would be 180 pixels, one-quarter inch would be 360 pixels. The value entered is added to the existing default margin. Entering a positive value makes the margin wider (i.e., printing starts further away from the edge of the paper). Entering a negative value reduces the width of the margin (i.e., text prints closer to the edge of the paper).
Printers differ in how close they can print to the edge of a sheet of paper. Reducing the width of the margin (by entering a negative offset value) assumes that your printer can actually print as close to the edge of the paper as you specify. You may need to experiment with several values to determine the pixel adjustment appropriate for your printer, or consult the printer's documentation from the manufacturer.
Example margin adjustments are:
Most printers work correctly with the default print settings and do not need printer margin offsets.
Click here to use
Microsoft's "Fix-it" utility
to automatically fix printing
issues in Windows such as printer does not
work, unable to install
printer, cannot connect to a
network printer, and other
printing errors.
What it fixes...
▲ Back to the Top of this web page ▲
Related articles and Internet links:
To return to CTI's Menu of Instructions to Fix Errors, click here or use the back arrow at the top of your Internet browser.
rev.11.16.2017