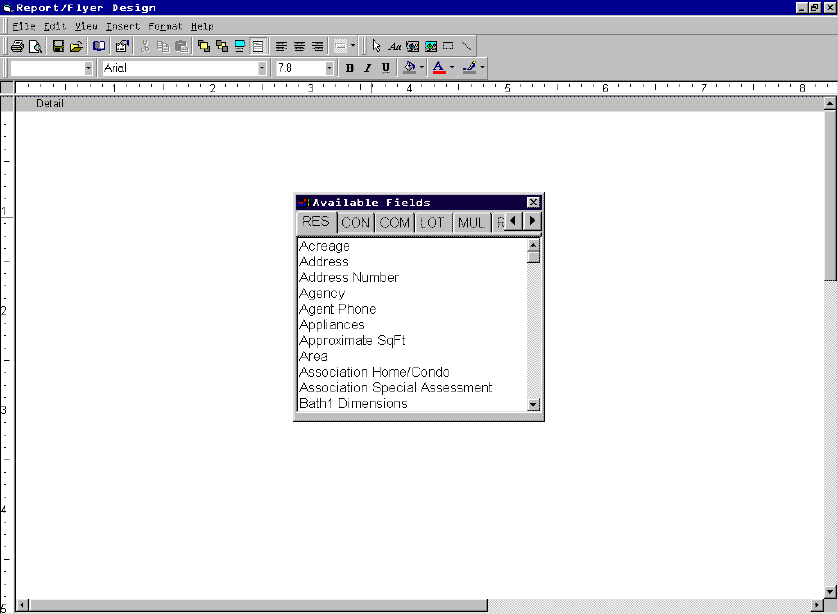
The design screens and design processes for designing flyers are virtually the same as for designing custom reports in CTI Navigator Desktop. Everything is positioned by free-hand on a design palette. While the design process is not complicated, using predesigned templates is much simpler and faster than creating custom designs.
To design a new custom report for listings, on the main screen of CTI Navigator Desktop select Tools > Report Designer > Listings. A blank screen will open and a list of fields that can be used to create the report will be displayed. To open an existing report or report template, on the Report/Flyer Design screen select File > select Open > change "Look in" to the location of the existing report or template > click Open. If you open a template, next click "Save AS" and change the name so that you do not overwrite the original template.
To design a new flyer, on the main screen of CTI Navigator Desktop select Listings, select Flyers, click "Create New Flyer" button, enter a Listing Number and click OK. This will open a blank "design" screen and a list of available fields that can be used in the flyer. To open an existing flyer or flyer template, on the Report/Flyer Design screen select File > select Open > change "Look in" to the location of the exiting flyer or flyer template > click Open. If you open a template, next click "Save AS" and change the name so that you do not overwrite the original template.
Easy step-by-step instructions to edit a flyer template in CTI Navigator Desktop are provided at Beginner's Guide to Flyers. However, new users should not attempt to edit or create a flyer until after reviewing the present article. (As you will see, many graphical design commands to edit text are NOT the same as for word processing.) Custom flyers will be saved in a Flyers folder that is separate from custom Reports (see Storage Location below).
Basically there are four types of items used to design a flyer or report: (1) Field, (2) Label, (3) Photo, or (4) Graphic. Fields are the standard items by Form Type for listings (such as address, list price, bedroom). Fields are place markers for where the designated listing information will appear on the report/flyer when the listing information is linked to the flyer or report. Field names are presented in lists appropriate for the listing Form Type (RES, COM, et cetera).
Labels are boxes in which you type text. This text is saved with the flyer/report and does not change with different listings. Text in the label box can be formatted.
Many descriptions on flyers are combinations of Label boxes (containing the descriptive text) that are followed by the Field that displays the value for the field. For example, a Label box containing the word "Bedrooms" followed by the Field for Bedrooms that displays the actual number of bedrooms for the selected listing. Field boxes can overlap label boxes.
Photo boxes are positioned and sized on the flyer/report where a photograph will display. A listing photo or non-listing graphic (such as a personal photo or company logo) can be placed directly in a photo box and saved with the flyer/report or a link to the graphic image can be placed in the photo box. Photographs that belong to a listing (i.e., are bound to a listing) can be placed in a Bound Photo box. Bound photos are saved with the flyer/report.
Graphics such as lines or rectangles can be placed on the flyer/report and saved with the flyer/report. Lines are useful for separating sections of information or for aligning other elements. Empty rectangles can be used to reserve space (using zero border setting), or to place a border around several design elements.
All design elements have property settings. Properties can be used to emphasize or customize the appearance of the element(s) on the flyer or report. Example properties are font, border size, background color. Note: You must press the Enter key after changing the value of any property in a property selection box to save the change.
▲ Back to the Top of this webpage ▲
Do not crowd image elements. Blank "white space" can help readability and should be used to clearly separate areas of information.
Limit the variety and size of fonts to about three or less. A large number of fonts is visually distracting and can impair readability. To improve readability, do not use all capital letters.
Use Insert > Section Break to ensure that all elements in a section appear together (i.e., are not split across pages).
Do not add too many elements on a page. Too many elements on a page can cause a blank page to display or print. See Section Break.
Unless you are emailing or printing your flyers in color, avoid using bright colors. Bright colors on screen often appear "faded" and difficult to read when printed in black and white.
▲ Back to the Top of this webpage ▲
The main screen for designing flyers in CTI Navigator Desktop is the same as for reports except that the "Available Fields" list will differ. For an overview of the design process, see the preceding Overview. For step-by-step instructions to create a custom flyer based on a template, see Beginner's Guide to Flyers (after completing the following screen descriptions).
All of the design functions can be accessed from drop down menus (File, Edit, View, Insert, Format, Help). The most frequently used functions are directly accessible from shortcut icons on the action bar below the menu. The position of elements on the flyer or report is indicated on the horizontal and vertical rulers on the main screen.

▲ Back to the Top of this webpage ▲
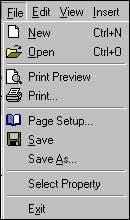 Use the File Menu to: start a New
design screen (and automatically close an open screen); Open
a previously saved design; Preview and/or
Print the currently open design; Setup
the page features (such as margins, columns, spacing, page number, etc.); Save
the design with the same file name as it was opened or Save
As with a new file name; Select
the property whose information will populate the report or flyer; or exit
the design function.
Tip: For a report to print more than one listing on the same page: create a report that covers only a portion of the page (half page to fit two listings, one-third page to fit three listings, etc.) > select File > Page Setup > un-check "Force a new page between records" > click OK. To print a multi-listing/custom report, close the Report Designer > perform a listings search > on a search results screen, select listings to display in the report > select Reports> change "Look in" to your name > un-check "Show selection criteria" and "Show page heading" > click Preview. Note: Although a flyer can display only one listing at a time, custom reports (that can display data for several listings as described above) can be designed to look like flyers.
▲ Back to the Top of this webpage ▲
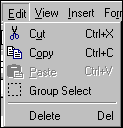 Use the Edit Menu to:
Cut, Copy, Paste or Delete selected items on the design
screen; or to Select a Group of items on the screen to which the same action
will be applied. For example, use the Group
Select function to frame several fields to be moved to a new location on
the screen while maintaining their position relative to each other.
After clicking on Group Select in the Edit Menu, click and hold your cursor while tracing a box frame around the items to be selected. If any part of an item is covered by the group frame, the entire item will be included in the group. Once multiple items have been framed and the cursor button released, each individual item in the group will be highlighted with sizing handles.
![]() Sizing handles are
small solid squares at the four corners of a selection box and at the midpoints
of the four sides of the selection box. Click, hold and drag a midpoint sizing
box to change the size in the selected direction (drag outward to increase and
inward to decrease). Sizing handles in three corners of the selection box can be
used to change size in either or both of two dimensions (length and width). The
handle marking the upper left corner of the selection box is colored solid
red to indicate it is a positioning
only handle. Click, hold and drag this
red handle to move the entire
selection box and its contents to another position.
Sizing handles are
small solid squares at the four corners of a selection box and at the midpoints
of the four sides of the selection box. Click, hold and drag a midpoint sizing
box to change the size in the selected direction (drag outward to increase and
inward to decrease). Sizing handles in three corners of the selection box can be
used to change size in either or both of two dimensions (length and width). The
handle marking the upper left corner of the selection box is colored solid
red to indicate it is a positioning
only handle. Click, hold and drag this
red handle to move the entire
selection box and its contents to another position.
Individual items in a selected group can be resized or repositioned by clicking on the appropriate handle. All group selected items can be moved together as a group by moving the cursor inside any one of the items until it becomes a repositioning (double arrow) crosshair. Click, hold and move the repositioning crosshair to move the group as a single unit.
▲ Back to the Top of this webpage ▲
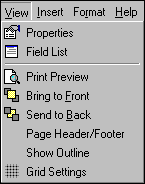 Use the View functions to control how elements are to be displayed. To view
the Properties
of an item, first select the item and then either click on View > Properties,
or click on the Properties shortcut icon in the action bar, or double click your
cursor on the item. Different types of items have different properties. Typical
Properties are item name, alignment, format, color, etc. Press the
ENTER key
after making a change to any property and BEFORE leaving the Properties screen.
Selecting Field List will display a list of the field names available. Fields for listings (and listing flyers) differ by form type and are different from fields for taxroll based reports (where available). The Field List itself can be resized by clicking, holding and dragging a perimeter line. It can moved by clicking and holding its title bar while moving the pointer.
To add a field to a report or flyer, click and hold your cursor on the field name in the list and drag the cursor to the approximate position on the flyer or report where the information is to be displayed. The insertion point is indicated by vertical bars on both the horizontal and vertical rulers on the screen margins. Note that the box for the field name usually needs to be resized so that the selected field information will fit properly. When linked to an actual listing, the field name in each box will be replaced by the designated listing information (which may be larger than the field name). Be careful to include enough space for lower case letters with "below the line" descenders ("tails" such as on g j p q and y). If the text for the listing information does not fit completely in the field box, the field may not be displayed properly, if at all.
Selecting Print Preview (under the View Menu or shortcut icon) displays the report or flyer as it will appear when printed. You can print directly from the Print Preview screen, or return to the design screen and print using File > Print (or the Print shortcut icon).
Use Bring to Front or Send to Back to control whether an item will display on top (in Front) of or behind (Back of) any other item with which it overlaps. To fully control what elements print on top or behind, also use the Transparent and Opaque settings under Properties (be sure to press Enter after setting a property).
Select Page Header/Footer to display header and footer sections in the design field. Items can then be added to these sections and they will be repeated on every page of the flyer or report.
By default, Show Outline is always on. This displays the outline of images (boxes) when in the design mode that may not show when the actual flyer or report is generated.
Select Grid Settings to change the number of Twips a selected item moves vertically (Height setting) and horizontally (Width setting) when the cursors moved. Normal settings are 60 and 60 (the default) or 1 and 1 (for smoother but more resource intensive graphical movement).
▲ Back to the Top of this webpage ▲
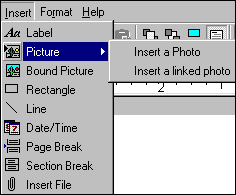 Use the Insert Menu to place items on the
flyer or report such as text box
labels, photographs, graphics, date field, page or section break marker, or a
report file.
Select Insert > Label (or the Aa shortcut icon) to insert a text box. Position the cursor where the upper left corner of the text box should be anchored, then click and hold the pointer. Drag the cursor to create the proper sized box. When you release the pointer, the cursor will appear as a vertical bar in the upper left corner inside the text box. This is the edit mode.
By default the Label border width will be set to zero so it will not show in the actual report/label. The box may be resized by clicking on one of its perimeter lines and using the sizing handles that appear. The box can be moved either by clicking and holding on the red positioning handle while moving the pointer, or by clicking inside the box and holding the repositioning crosshair while moving the box to its new position.
Select Insert > Picture to insert either a photograph or graphic image that will become part of the flyer or report, or to insert a link to a photograph (or graphic image) stored elsewhere. Non-listing graphics include personal photos or company logos. Large images should be reduced in size (to 55 KB or less) before adding them to a flyer (see related article, Reduce Image Size in Flyers). A link to an image takes substantially less storage space than the actual picture; and a linked graphic can be kept up-to-date from a central file.
Select Insert > Bound Picture to place a listing photograph on the flyer or report. The particular photo can be specified by selecting the Bound Picture box, opening its Properties, entering the appropriate "Photo Number" for the desired view, and pressing the Enter key on your keyboard.
Select Insert > Rectangle to insert an empty rectangle on the flyer or report. Rectangles can be sized to reserve space, or to frame elements on the report/flyer with a border.
Select Insert > Line to draw either a vertical or horizontal line on the flyer or report. Click, hold and drag the cursor to draw the line. To move a line, click and hold the cursor anywhere on the line and drag it to it new position. Set the width of the line using the Properties function (be sure to press Enter after setting a property). Diagonal lines are not currently supported.
Select Insert > Date/Time to insert a box with the date and time the flyer or report is displayed or printed. Set the format using the Properties function (be sure to press Enter after setting a property).
Select Insert > Page Break to force the flyer or report to advance to the next page after the page break marker. If the page break marker is drawn as a box, the incremental number of the page break will be displayed in the box. Otherwise, the marker will appear as a short horizontal line affixed to the left margin of the design screen.
Select Insert > Section Break to indicate the start of a new section. Section markers are used to keep all elements of a defined "section" displayed or printed together. If all elements of a section will not fit on the same page, the entire section will be displayed or printed on the next page (i.e., the elements will not be split across multiple pages). Note that too many items in a section can cause a blank page to display or print. In general, do not add elements below 9.5 on the vertical ruler unless you want them to appear on a second page.
Tip. One way to fit more information on a page is to reduce the top and bottom margins (under File > Page Setup).
Select Insert > File to place a report file (.rdt) on the report/flyer.
▲ Back to the Top of this webpage ▲
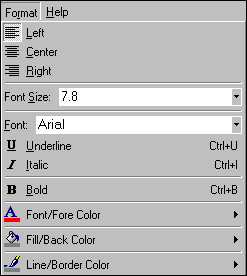 Use the Format Menu or format shortcut
icons to specify the format of text in a selection box. The box
itself (not its contents) must be selected for the format changes to apply.
Single click anywhere on a label or field name box to select the box. Sizing
handles appear when the box is selected. Select Format in the top menu (or right-click on the selection box) to
enter the edit mode. Text will display in the current format.
- The same formatting applies to ALL text in the same text box. To use different formats for different lines of text, use different text boxes. Text boxes can overlap, although you may need to use the View function to specify the contents of which box displays/prints on top of the other.
- There are no Clear or Undo buttons in formatting. To revert to a previous format, re-select the previous format setting (or Exit without saving changes).
- To end editing and save changes, click outside the text box on a different part of the screen (or click the Tab key on your keyboard).
▲ Back to the Top of this webpage ▲
Reports and flyers that you create are saved locally on your computer (not on the MLS server) in a special "Reports" directory in CTI Navigator Desktop. This Reports directory is created under your "Users" directory using your name exactly as recorded by your local MLS (which is the same name that your agent code automatically translates into when you login).
The path to your custom flyers would be "{see note 1}\CTI Navigator\{YourMLScode}\Users\{Your User Name}\Reports\Flyers\". The path to your custom listing reports would be "{see note 1}\CTI Navigator\{YourMLScode}\Users\{Your User Name}\Reports\Listings\".
Note 1. The full path to the "\CTI Navigator\{YourMLScode}\Users\" folder depends on when the CTI Navigator Desktop program was installed, and into which version of Windows it was installed. For details and examples of installation paths, see the Location section of "Copy & Location of Customized Items (such as CMAs, Flyers, Reports)" in the related articles at the end of this web page.
Custom flyers or custom reports saved under one user name are not directly accessible by other users or on computers other than the computer on which they are created. To access reports or flyers created under User Name 1, you must manually copy (or move) the Reports files from that User Name 1 to the Reports files for User Name 2 . Also, custom reports or flyers created on one computer (such as a laptop) will not be available on another computer (such as the same user's desktop computer) unless their files are manually copied and transferred to the other computer. For details and examples of transferring files, see the Transfer section of "Copy & Location of Customized Items (such as CMAs, Flyers, Reports)" in the related articles at the end of this web page.
Flyers and reports are stored in CTI Navigator Desktop using a proprietary format that provides internal links to MLS data. These files cannot be opened and modified in any other program.
▲ Back to the Top of this webpage ▲
Related articles and Internet Links:
To return to CTI's Menu of Help & Tutorials, click here or use the back arrow at the top of your Internet browser.
To go directly to CTI's Menu of Error Fixes, click here.
{rev. 05.24.2012}